File Explorer’s navigation pane is designed to show you the items and places that you visit the most so you can get to them easily. The navigation pane is always running down the left side of File Explorer’s window of every folder you visit.
This idea was enhanced with the Quick Access section of the navigation pane that is there to narrow down the list, yet again, to the things you probably want quick access to more than anything else.
From Quick Access, you can find direct access to items on the desktop, Downloads folder, Documents folder, and Pictures folder.
Beneath Quick Access is the OneDrive icon, which gives you direct access to the free (up to 15 GBs) online file storage service. OneDrive is password protected and online so that you can access it from any device. If you fill your OneDrive account with more than 15 GBs of allocated data, you’ll need to start paying for the service.
Beneath OneDrive is This PC, which offers more traditional access to your folders and drives from File Explorer. If you insert a disk or connect a device to the computer, it is here where you can find it; you can also get access to other items that were available from the Quick Access section as well. The full list of default folders and drives available from This PC includes the desktop, Documents, Downloads, Music, Pictures, Videos, Local Disk (C:), and Disk Drives.
You can add more folders to File Explorer’s navigation pane if you like, so it shows all folders there. This means you would no longer have to navigate through File Explorer to find the rest. The tradeoff, though, is that it adds clutter.
Examples of what File Explorer looks like with “Show all folders” on and off:
Method One: How to Turn On/Off “Show all folders” from Navigation Pane
1. Open File Explorer.
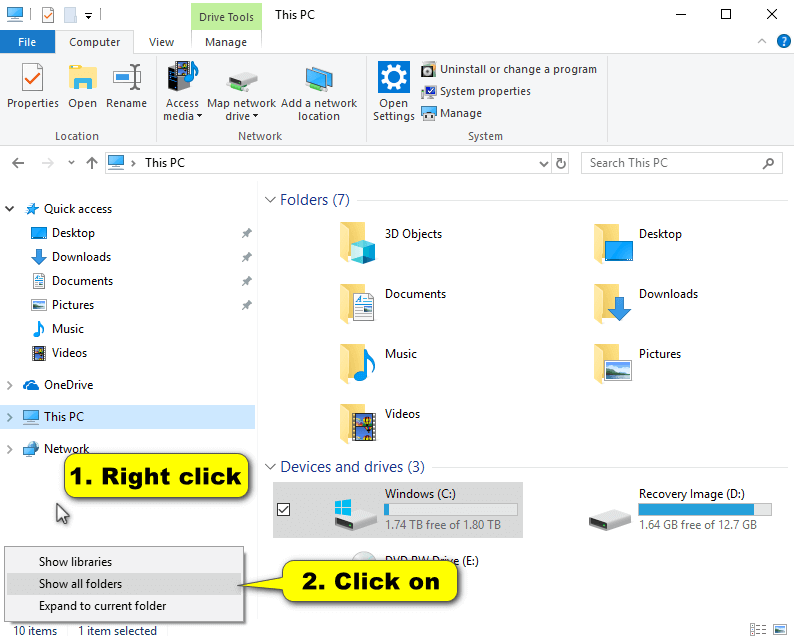
2. Expand the File Explorer window if you must, and then right-click on an empty space below the existing items in the navigation pane and then click on Show all folders from the menu. (click to enlarge screenshot below)
Method Two: How to Turn on/off “Show all folders” from File Explorer Ribbon
1. Open File Explorer.
2. Click on the View tab at the top of the File Explorer window and then click on the Navigation pane and the Show all folders option from the menu.

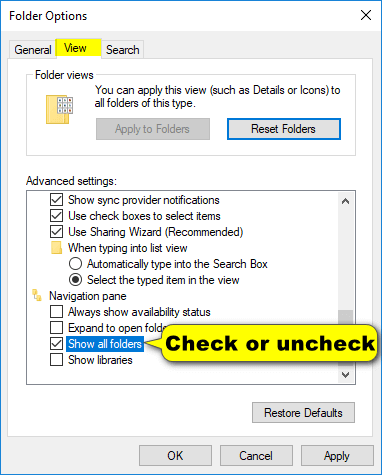
Method Three: How to Turn on/off “Show all folders” from File Explorer Options
1. Open the Folder Options dialog (aka File Explorer Options).
2. Select the View tab at the top of the dialog and then scroll down the Advanced settings until you get to the Navigation pane heading and then check or uncheck the option for Show all folders.
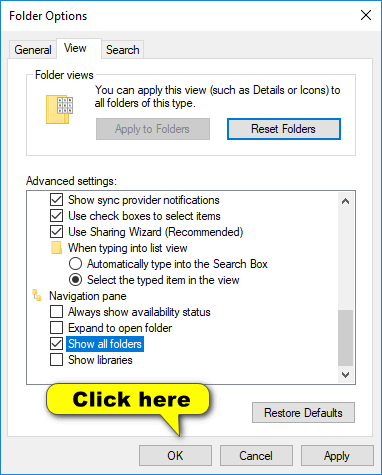
3. Click on the OK button to save your changes and close the Folder Options dialog.
That’s all.
Related Tutorials
- How to Create Bootable USB Flash Drive to Install Windows 10
- How to Move Location of Game DVR Captures Folder in Windows 10
- How to Create System Information File in Windows 10
- How to Exclude Folders from File History in Windows 10
- How to Turn Windows Features On/Off in Windows 10
- How to Open Control Panel in Windows 10
- How to Change Power Plan Settings in Windows 10
- How to Find Bluetooth Version in Windows