Few things associated with your devices are as essential as maintaining a working internet connection. A working internet connection empowers users to be able to browse the internet without any drawbacks, install Windows software updates, as well as install updates to applications and programs that may be installed on the operating system already. If you’ve ever run out of bandwidth because you went above the monthly data allowance from your Internet Service Provider, you’ll know all too well how untimely it can be when the World Wide Web slows to a mere bandwidth allocation that barely allows you to open a new tab and view a webpage once every few minutes.
Your bandwidth coming from your Internet Service Providers is going to be a metered one unless you and your ISP came to terms on an agreement to have unlimited bandwidth instead. If you go over that amount of bandwidth that you get with metered connections, which is another way of saying limited connections, you’ll either be paying high fees for more data, or you’ll be experiencing a very slow internet connection for the remainder of the time before the monthly bandwidth allocation resets.
There’s no way of controlling how much bandwidth (or data as it’s more commonly referred to) certain stuff that you have on a computer uses from within the accounts you have open with your ISPs. However, if it’s anything to do with the Windows 10 operating system that causes you to lose copious amounts of data for any particular reason, Windows does allow you to control that. The way you do it is by setting up a metered connection so that the Windows 10 OS restricts the amount of bandwidth it can use while doing things like installing new software updates. The data that it uses for doing so is coming directly from your ISPs. Setting up a metered connection in Windows 10 is now more critical than ever because the software is now chewing up more data than ever. Windows 10 is designed to be using up a substantial amount of your data, and it’ll even go out of its way to gobble up as much of your bandwidth as it desires without running over the proposal with you before it does so.
Most households in the US are now at least considering switching over to unlimited data plans with the rise of the use of smart TV apps for watching TV streaming channels such as Netflix and Hulu on smart TVs that also offer direct access to the internet from web browsers and sites like YouTube, and as a wider variety devices continue to become available that create new avenues for people to be online. The more people that are online, the more data that gets used and the cheaper these companies are prepared to offer it. But the move from Microsoft to use up as much bandwidth as Windows 10 does might have come a bit prematurely for the people who don’t have a lot of spare money and who don’t use up a lot of data because they aren’t yet subscribed to anything that comes close to an unlimited data plan. And that’s predominantly referring to people within the United States let alone everyone else. If you were to include other countries that have significantly slower internet speed and not as many people helping create revenue for an ISP, the Internet data could still be expensive in those areas, as well as not as appealing to spend so much time in front of it.
If you want to conserve as much of your valuable data as humanly possible on a network that uses Windows 10, then the most straightforward solution to the problem is set up a metered connection.
On the other hand, if you want Windows 10 to be able to do whatever it yearns for on your computer and use as much bandwidth as it thinks it needs to continue with every Windows software update or driver update imaginable for your Windows 10 experience to be at its best, then you should leave it set up as the unmetered connected instead. That way you’ll be staying up to date with Windows feature highlights that arrive with new software performance improvements, bug fixes, and security patches.
What Metered Connections Do in Windows 10
- Stops downloading many of the Windows Updates: Before your Windows 10 operating system can install an update, it downloads it first, using up your bandwidth in the process. These updates roll out more often than they otherwise would if it weren’t for using up a limited amount of data in mind, so no updates are ever really that big. Still, when it comes to using up bandwidth, few things will use up more of it from within Windows 10 than these updates, so this is a big one.
- Stops apps from downloading their updates: Like your Windows 10 software that makes up the new version of the operating system, the applications running on the OS needs to download the updates before they can be installed as well. Anything coming from the Windows Store will be blocked from getting updates, and that’s how Microsoft manages to handle that one. The apps themselves continue to be updated by the developers, but they won’t reach your machine until a later date when you turn off the metered connection.
- Stops peer-to-peer downloading of updates: When Windows 10 first came out, it used a peer-to-peer system similar to an app like BitTorrent where in order for you to be downloading, it required using uploading bandwidth from other computers somewhere around the world. That later changed, but Windows 10 still offers a place in the Settings app where you can choose to enable it if you want to allow others to use your upload. With the metered connection, that is no longer allows, and there is no peer-to-peer downloading taking place.
- Some apps may not work as normal: You might find some of the applications available from the Windows Store not do all the usual things you have come to expect of them. In particular. some of the features relating to downloading of content.
- Stops Tiles from getting updates: The tiles from your Start menu often have stuff showing on the outside that needs updating. For example, the weather tile gives you today’s weather. It can only do that if it uses some data to show it. Many other tiles go through a similar thing: your news tiles will give you snippets of today’s’ news and no longer yesterday’s and so forth. Many of those tiles may discontinue t show you the updated information on them, but it isn’t clear exactly which ones. You’d need to turn on the metered network and take a look if it affects any of the tiles that you need before making your choice—email being another popular one.
How to Set Wireless Network as Metered/Non-Metered Connection Using Settings App
You can establish the wireless network connection as a metered or non-metered one from the Settings app in WIndows 10. To do that, start by making sure that you are currently connected to one of the available WiFi networks. That’s easy to discover just by opening up a web browser app and attempting to use the internet. If it works, then you know that you are already connected to a WiFi network, provided that you aren’t connected to an ethernet connection instead. You’ll know if you are connected wirelessly or not by identifying any wires at the back of the computer. No wires attached to the back means it must be on WiFi.
There’s also a way you can find out of you are connected to a WiFi network without using any web browser applications. The quickest method is by logging in to your account that has the administrative permissions and then clicking on the WiFi icon available from the system tray in the taskbar. You should see it there to the left of the clock and looks a bit like our website logo. When you click on the icon, it opens up and shows you either the network you are currently connected to or the network available that you are not yet connected to. You’ll also see any other connections that might be nearby, such as your next door neighbors, or perhaps even a few houses down the road depending on how tight knit your community is. WIndows 10 is smart enough to put the network that is associated with your home at the top of the list, so you don’t need to guess which one it is.
Note that it is possible to connect to the other connections you neighbors have if they are not secured connections. They’ll either say “secured” or “not secured”—that’s why you need to use a password to sign in to your networks by default, but some people choose to take the passwords off, thus allowing other people to connect to their networks when in range.
Once you know that your WiFi connection is working and you’re online, click on the “WiFi” icon.
![]()
You’ll now see a window open up with the available connection and at the bottom of the window just above the WiFi and Airplane mode tiles is a “network settings” link that you need to click on now.

It now opens up to the area within the Settings application that is all to do with your WiFi. You could’ve gotten there by navigating to Start > Settings > Network and Internet instead, but this way was quicker.
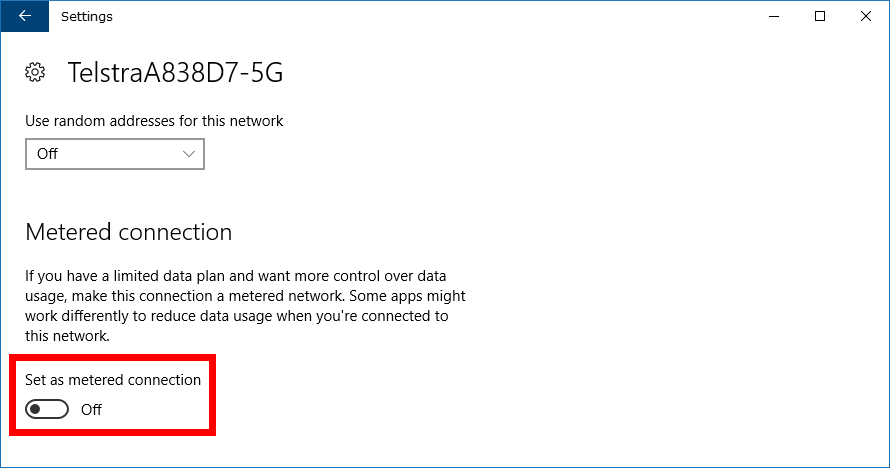
Once you get to this point within the Settings application, there are two ways for you to find the are that is to do with the metered and unmetered connection. It doesn’t matter what way you choose, both of them lead to the same place.
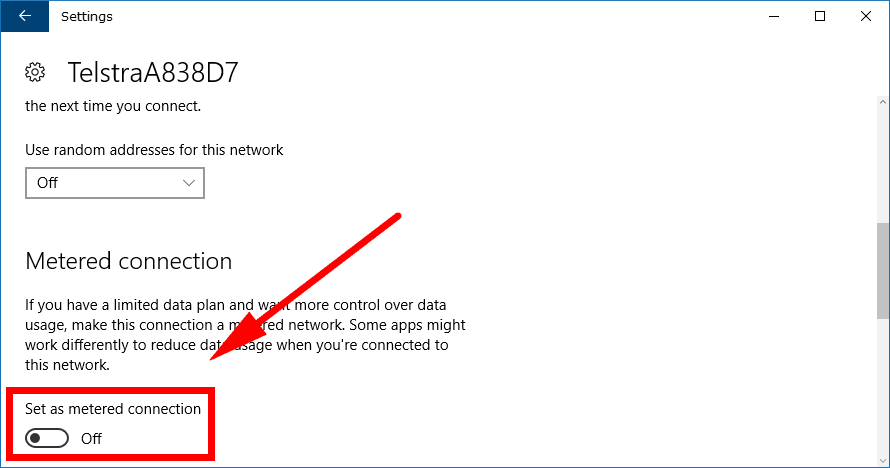
The first and most obvious way to get there is by clicking on the “WiFi” link in the left side pane and then click on the WiFi network name/logo that you can see at the top of the right side pane—that is, in fact, a clickable link even though it doesn’t give any reference that it would be anything more than a picture showing your network.

Without needing to scroll down the page at all, you’ll see a Metered connection heading with a few lines of text beneath it that fill you in on what exactly a metered connection is and why you might want it. Directly beneath that text is the toggle that you need to click on when you want to set it up as a meted connection if yours is currently set to the off position like ours in the picture below.
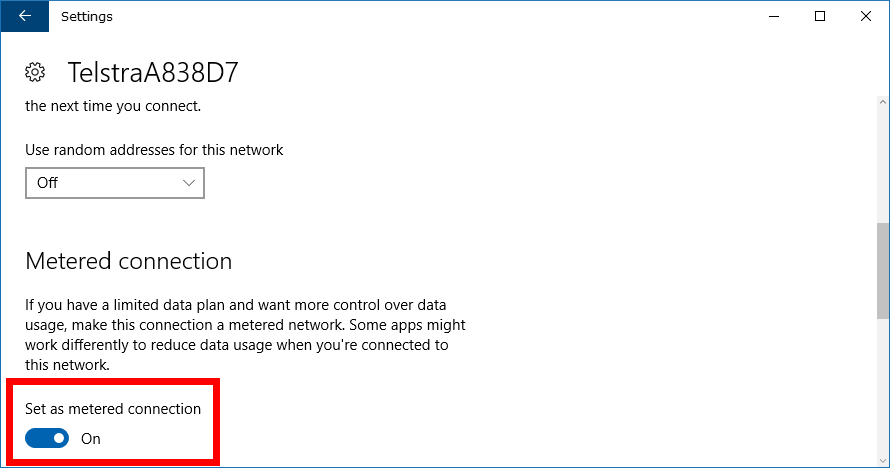
The metered connection is turned on when the toggle turns blue and shows the word “On” to the right of it. You can now close the Settings application and Windows 10 takes care of the rest without you having to do anything else. Just remember that toggle as the same toggle you need to find should you ever want to turn off the metered network connection again some times in the future.
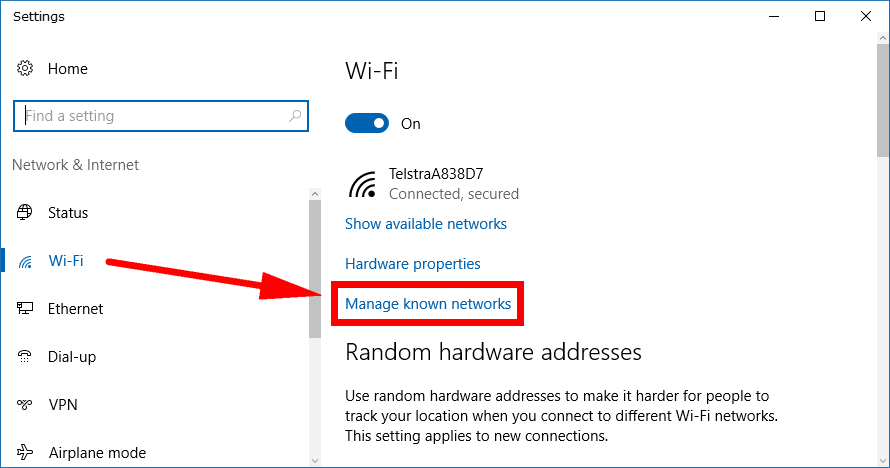
Those of you wanting to give the secondary method a try, can navigate back to the same WiFi area within the Settings application and then click on the “Manage known networks” from the right side pane.
You’ll then be directed to another page that shows all of the WIFi networks that your computer and Windows 10 that runs on that computer has known since you started using it. That includes any older WiFi connections that might be associated with mobile hotpots you might have used in the past, even if those phones that initiated the connections are no longer with you.
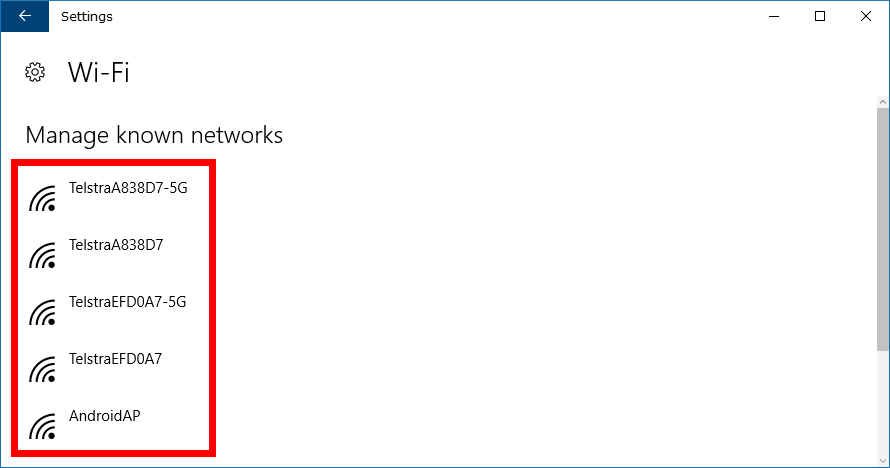
Click on the WiFi icon that represents the WiFi that you are connected to at the moment and then click on the “Proprieties” button that becomes available after you did the initial click.

You then get a Metered connection heading with the same text and toggle beneath it that you can turn on or off when you want to use/not use your metered connection. Change it to the “On” position by clicking on the toggle when you want to set up the connection as a metered one to limit the amount of bandwidth used.
How to Set Wireless Network as Metered/Non-Metered Connection Using Command Prompt
Microsoft also allows users the opportunity to set a metered or unmetered connection from the Command Prompt that has the administrative permissions assigned to it in Windows 10. To get started doing it this way, open the elevated variety Command Prompt window by heading to the search box located on the left side of the taskbar at the bottom of your screen and typing “Command Prompt” or “CMD.” You’ll then have to right-click on the Command Prompt desktop app and select the “Run as administrator” from the menu.
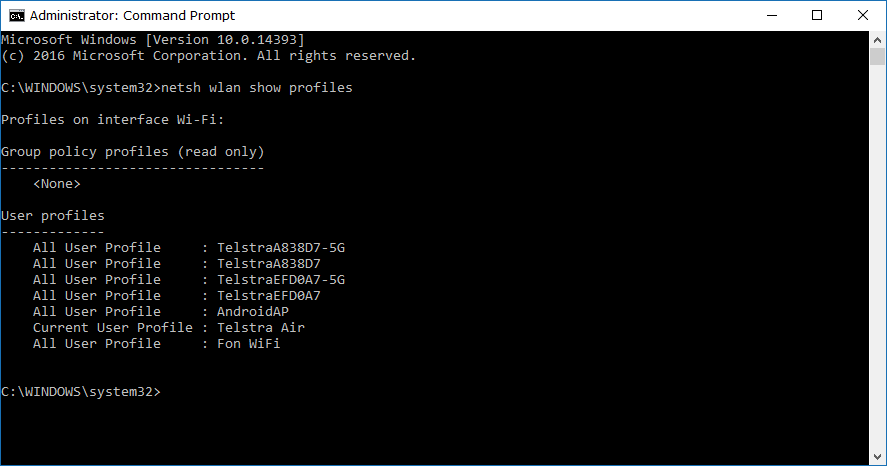
Once you have the Command Prompt with administrative permissions window open, type the netsh wlan show profiles command and tap the Enter key on your keyboard to execute the command.
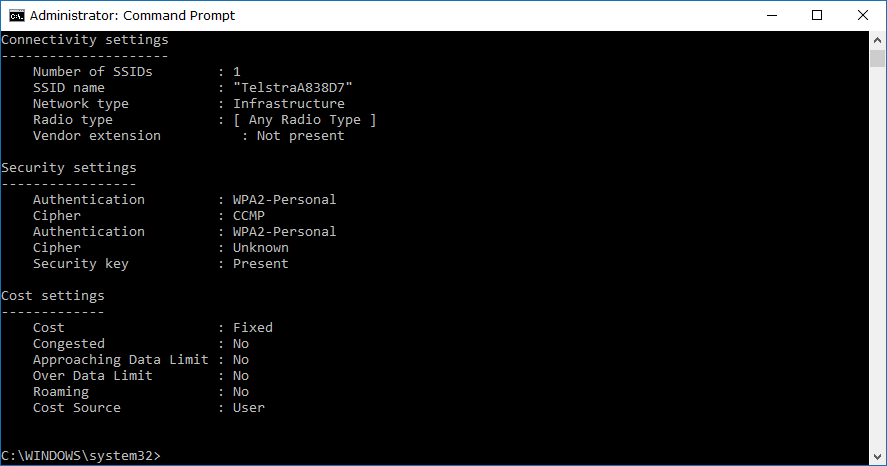
Next, find out if the WiFi connection that you have at the moment is a metered or unmetered one for your network from the “Cost Settings” in the Command Prompt by typing the netsh wlan show profile name="network name" command, making sure to change the “network name” part with the actual name of your network. You can find that netwrok name by scrolling up in the same Command Prompt window because it was first revealed when you did the step above.
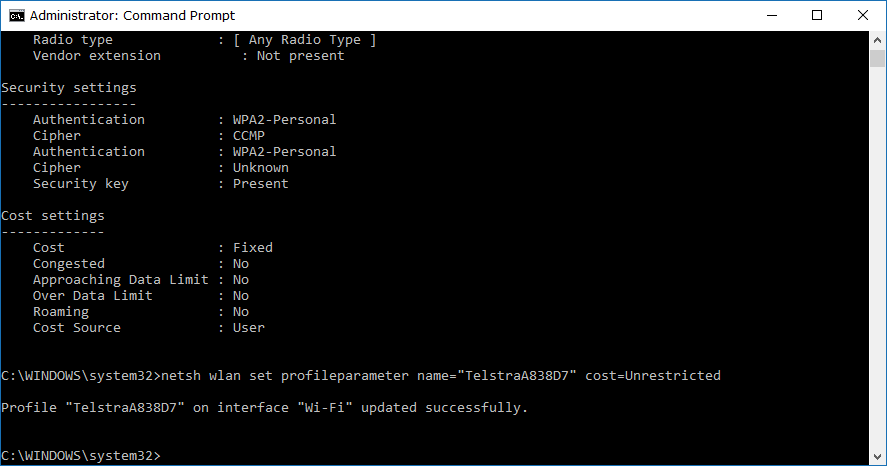
Should you ever wish to make the WiFi network an unmetered connection, type the netsh wlan set profileparameter name="network name" cost=Unrestricted command. For everyone else, you’ll need to enter the netsh wlan set profileparameter name="network name" cost=Fixed command if you want it to be metered.
Setting up the WiFi network in your home or office to be metered (limited) is going to benefit you if you have a limited amount of data and you are likely heading down the path of running out of data before your next month’s data allowance kick in and refreshes your bandwidth availability. Microsoft doesn’t say much about what their definition of “metered” actually means apart from it disabling the automatic downloading of updates, disabling automatic downloading of app updates, disabling peer-to-peer uploading, disabling the updating of tiles from the Start menu, and other applications will perhaps missing out on some updates. The developers at One Microsoft Way in Redmond, Washington also don’t open up the possibility for people like you or me to choose more well-defined settings correlating to it like they probably should. For now, though, it’s the safest option you have for trying to make sure you don’t end up having to use the internet with slowed speed because you’ve gone over your monthly data limit, and that internet connection of yours allows you to continue to use websites and the operating system, in general, without any hiccups.
Related Tutorials