Anyone who knows a lot about Android has likely already learned all about what having root access on it means. Root access is basically the Linux word for being the person who is in control of the account that has the full administrative permissions. The concept of having such an account available from an operating system is nothing new. All of the leading operating systems have a similar thing available, including Windows.
When you get root access to the Android operating system, you do it so you can run all of the apps. There are apps out there from the Google Play Store that will not run without root access—you can install them, but they won’t be able to operate after you try to open them from your app drawer. The reason being that without root access the apps aren’t able to get access to the deeper parts of the system that they need to work. Those specific parts of the operating system are what need rooting rights a.k.a full admin rights to enter.
With Windows, it’s a similar thing. The only difference is that you don’t run Windows apps as the administrators; it’s only the desktop apps that you can “Run as administrator.” The other thing, of course, is that you don’t call it root access with Windows. The word root in Linux is a term that is technically sound because of what happens to the UNIX-based system. The process is different in Windows, and therefore you don’t use the same term. But the act of becoming the person who is in control of the account that has the full admin rights is still a thing. What’s more, it’s not something that you get automatically.
The Windows Store (now renamed as the Microsoft Store) doesn’t compare very well to the Google Play Store if you want to assess the number of great applications that can be installed, but there are applications out there available from the Windows Store that cannot run unless they have full admin permissions. You know when a Windows application needs full admin rights before it can run because it gives you a “No Permission” or “Access Denied” message on the computer’s display.
When you have an application running as administrator, it then has full unrestricted elevated rights in Windows 10.
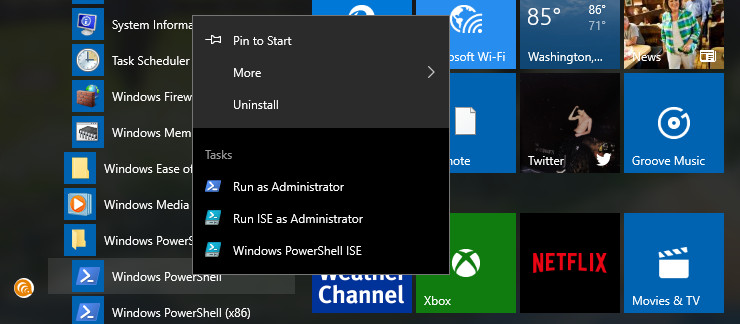
How to Run as Administrator in Start Menu
You have a bunch of applications available from the Start menu in Windows 10 if you scroll down the All Apps section. Many of those applications are desktop apps that can run with administrative permissions. To do that, just find the app that you want to run as admin and then right-click on it and click on the “Run as Administrator” option from the menu. You’ll now be running that application with the elevated admin account.
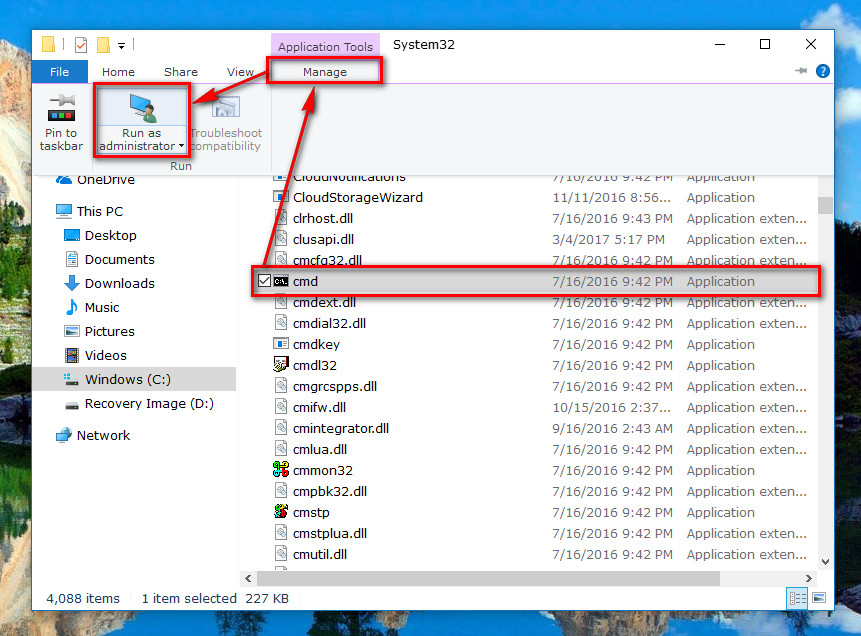
How to Run as Administrator in File Explorer
The File Explorer in Windows 10 offers ways to do things, so you don’t have to close the File Explorer to get the task done. Being able to run an application as an administrator is one of them. To do it, just locate the application that you want to run with the admin permissions and then when you highlight is another option called “Manage” becomes available in the top menu of the window. If you click on the “Manage” option, you’ll then get the chance to “Run as administrator” from the menu next to it.
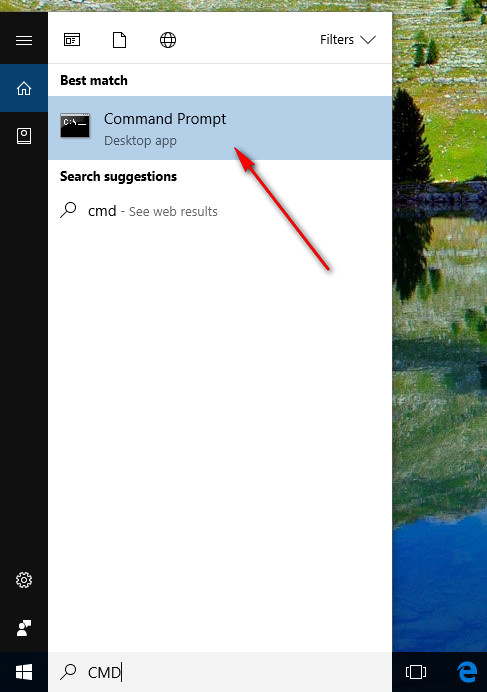
How to Always Run as Administrator from Search box
The taskbar—the black bar at the bottom of your desktop—has a search box in it that you can use anytime you want to find something on the operating system quickly and without having to navigate your way to it. Just about everything that you’ll want to navigate to in everyday life (out of work) can be located on the search box, and that’ll likely stay that way in future versions of Windows as well. One of the things you can do using the search box is find applications. Type the name of the application that you want to run as an administrator and then right-click on it when you see it under the Best match section. It gives you the option from the menu to run it as an admin after you have right-clicked on the entry.
How to Run as Administrator on Taskbar
The taskbar is home to the search box, some of your applications, and the system tray that shows your icons such as WiFi, sound, and Action Center. It’s also where you’ll find the clock on the far right side. Any applications that you open in Windows 10 show up as an icon in the taskbar. You can click that icon in the taskbar to open and close the apps (if you don’t want to use the white line on the far right side of the taskbar that always goes to the desktop in a hurry.) If you open the application you want to run as an administrator and then right-click on it, you’ll then get a menu. Right-click on the name of the app again and you’ll get a secondary menu that allows you to “Run as administrator” from it.

How to Run as Administrator in Task Manager
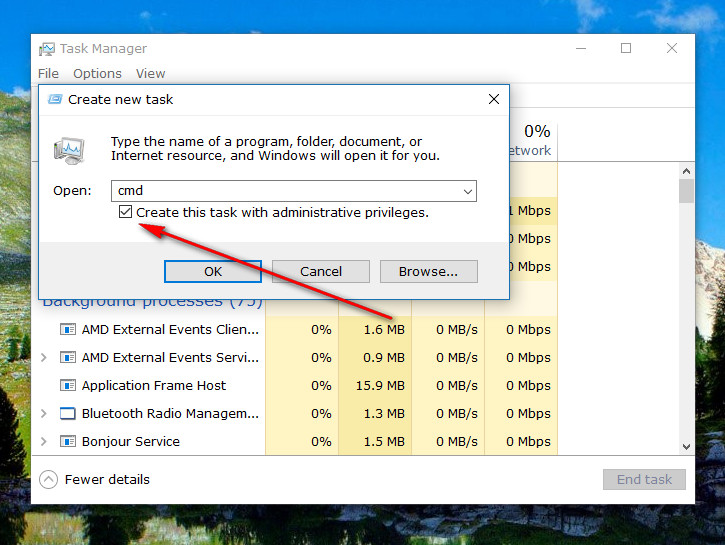
The Task Manager in Windows 10 has seen a complete overhaul, and now it’s more useful than ever. One of the options you have from the Task Manager is to run a desktop application as an administrator. To get started on it, open the Task Manager and navigate to File > Run new task.
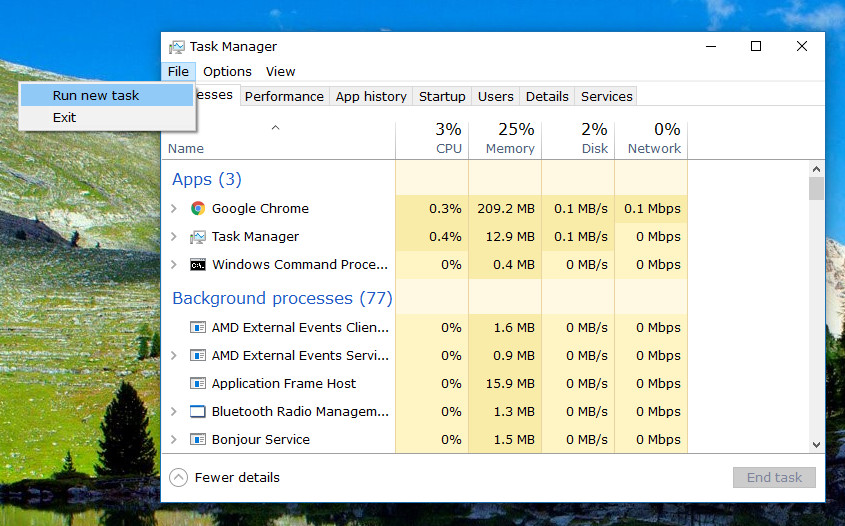
Next, type the name of the application that you need to run with the administrative permissions. After you have entered the name, check the box directly beneath it that says “Create this task with administrative privileges” next to it.
How to Always Run as Administrator in Registry Editor
It’s also possible to enter the Registry Editor and change the level of permissions to an individual application to always run as admin. What’s more, you can also choose to apply that to the application when it is running from the current user account you are logged in to or all user accounts that are on the computer. Open the Run dialog box by pressing the Windows logo + R keys on the keyboard and then type “Regedit” and hit the “OK” button at the bottom of the box.

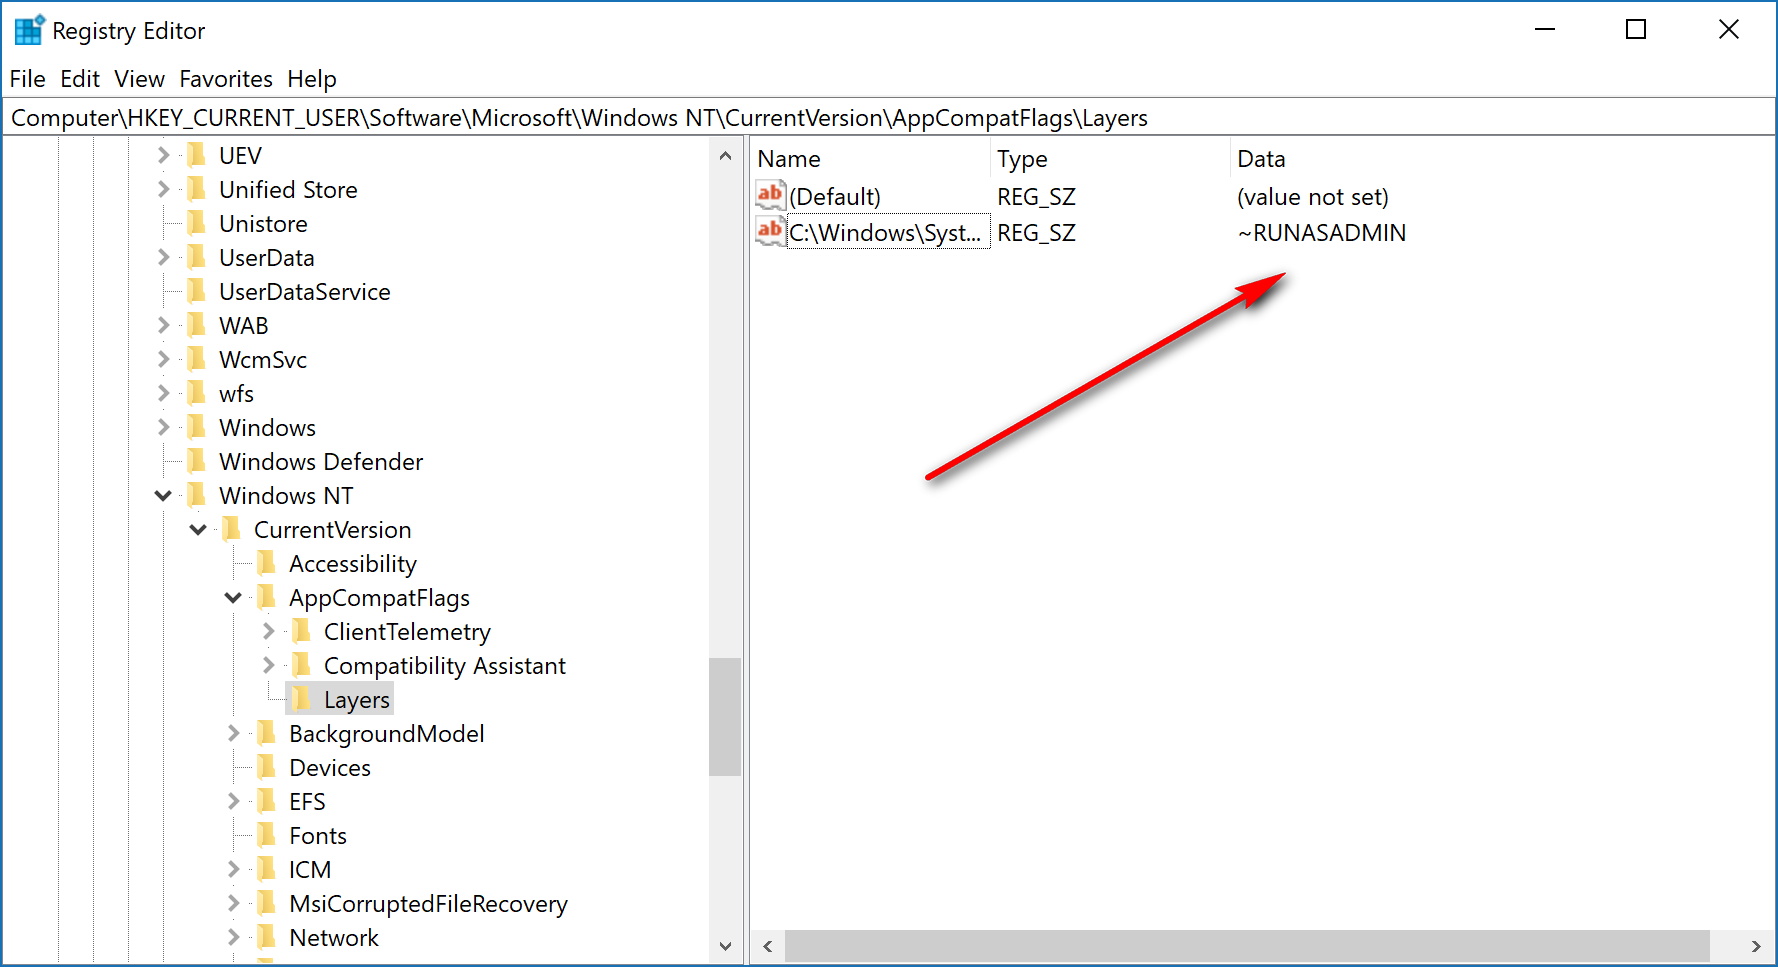
Navigate to the HKEY_CURRENT_USER\Software\Microsoft\Windows NT\CurrentVersion\AppCompatFlags\Layers key and then right-click on the “AppCompatFlasg” entry and hover over “New” and click on “Key” to create a new key in the menu.
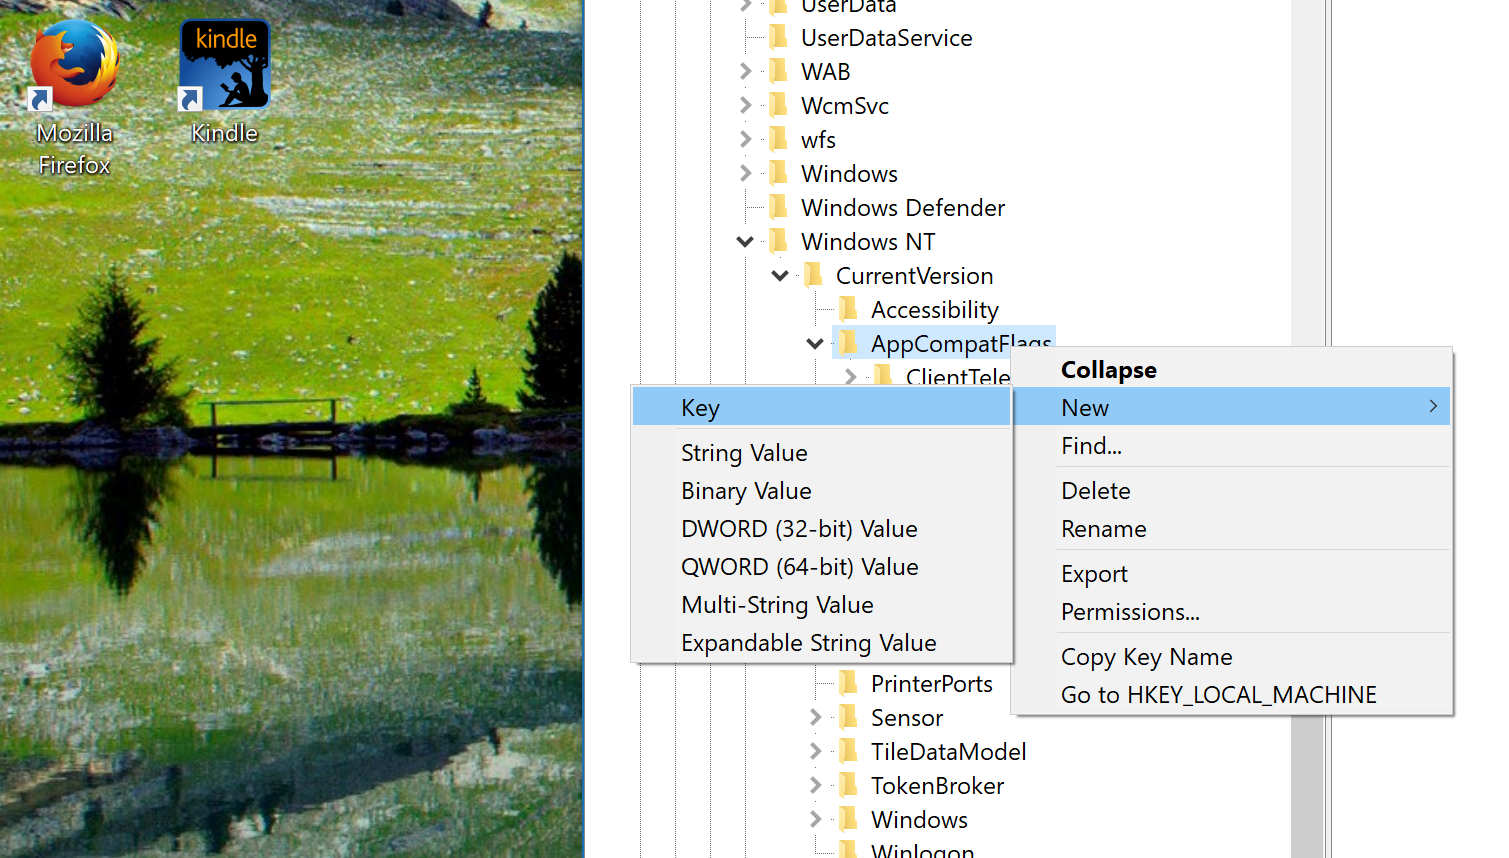
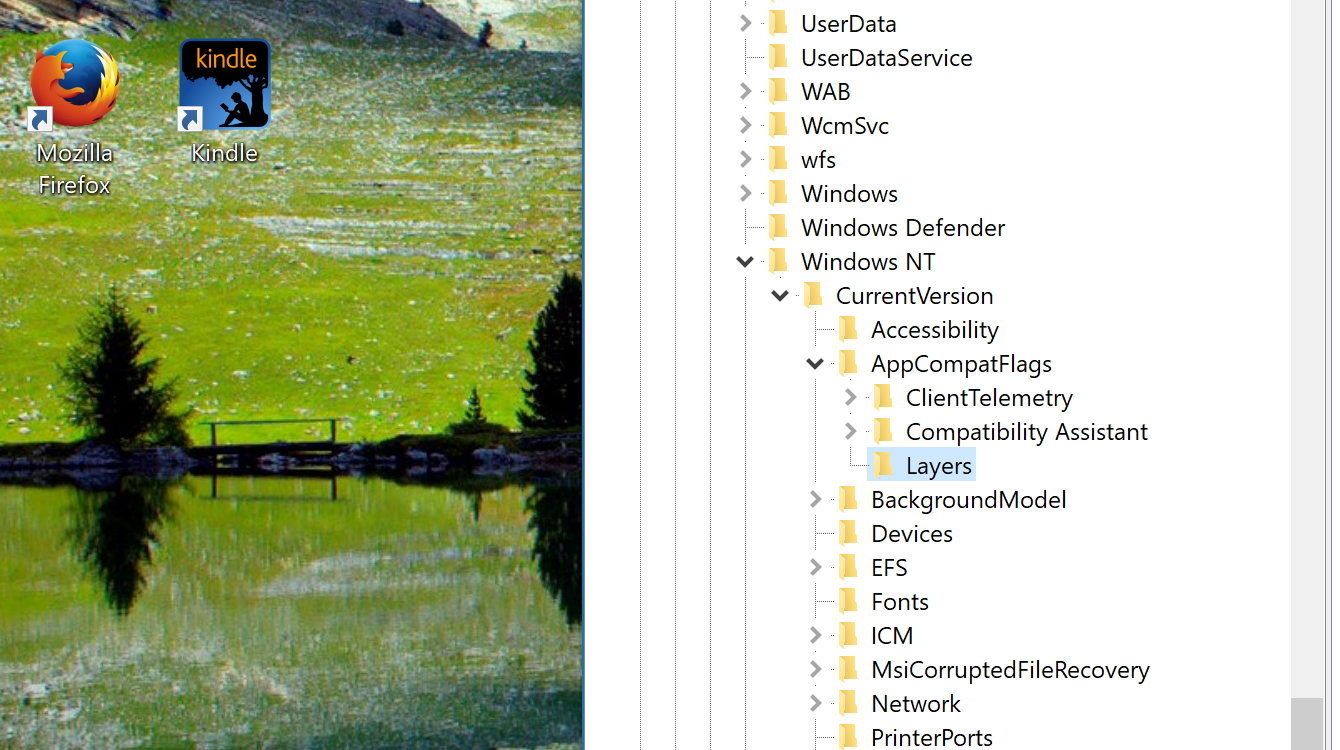
You’ve done it correctly when you can see the new “Layers” entry sitting at the bottom of the “AppCompatFlags” key.
With the Layers entry highlighted, right-click in the right side pane where there is nothing but the white background and then hover over the “New” and click on “String Value.”
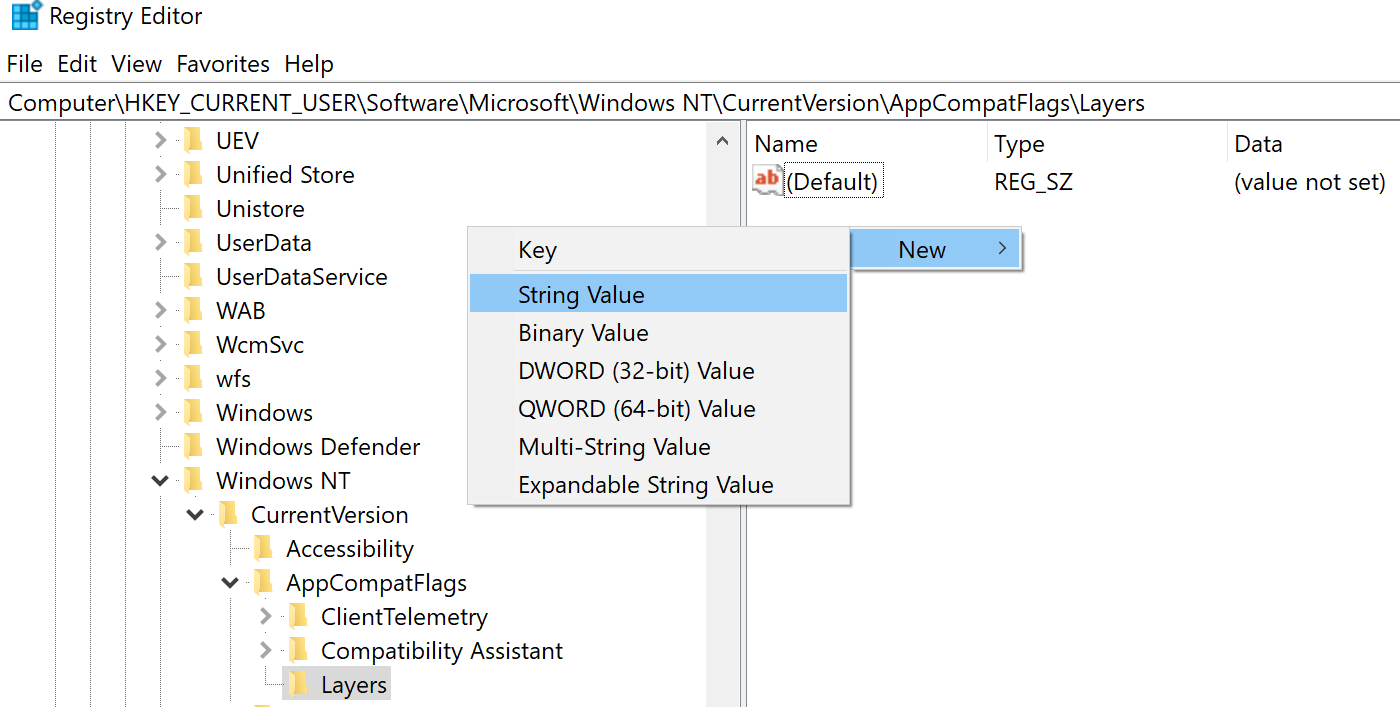
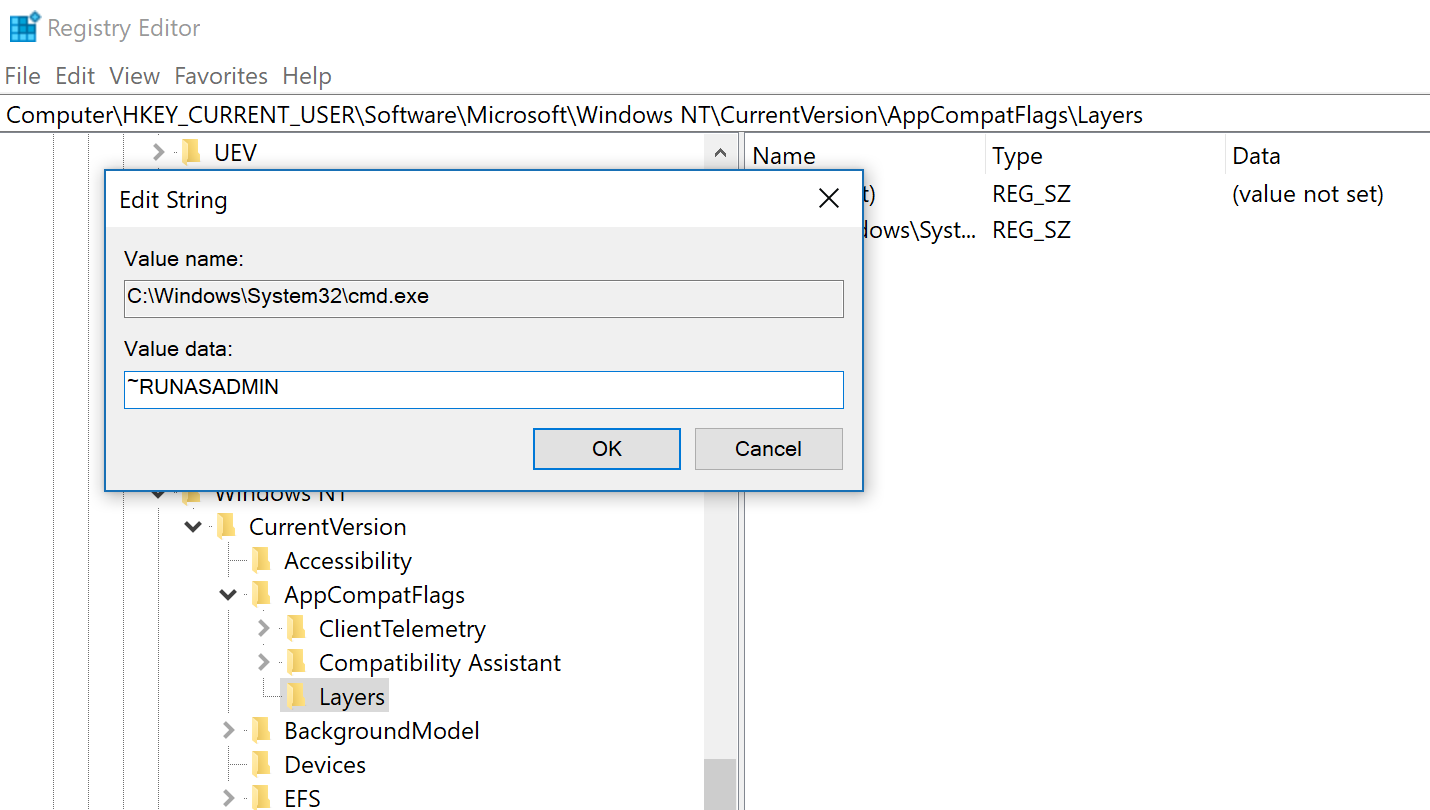
For the String Value, you need to enter the path of the application on the computer; i.e., where the application is currently located and stored. For example, if you want to use CMD, you need to enter C:\Windows\System32\cmd.exe.
Once you’ve entered the correct path for the application, double-click on it and it gives you the option to edit the String. Where it has an empty field available for the Value data, type “~RUNASADMIN” and then click on the “OK” button when you are done. The application is now going to be running with administrative rights whenever you use it. (Remember, the application is always running with admin privileges now and not just sometimes. You’ll need to undo what you did from the Registry Editor to return it to normal again at a later time.)
The above steps in the Registry Editor were for if you wanted to run an application with admin rights from the current user account. It’s also possible to do for all users if you prefer. If you wanted to do that instead, then you need to follow the HKEY_LOCAL_MACHINE\SOFTWARE\Microsoft\Windows NT\CurrentVersion\AppCompatFlags\Layers path.
If you haven’t had to run any applications as an administrator yet, that day will likely come sometime in the future if you keep getting to know Windows. Certain commands will not be able to be executed from the Command Prompt or the Windows PowerShell, for example, unless you grant it the admin rights first.
You might also be interested in:
- How to Remove Old User Account Pictures in Windows 10
- How to Change Visual Effects Settings in Windows 10
- How to Open Control Panel in Windows 10
You can subscribe to our RSS, follow us on Twitter or like our Facebook page to keep on consuming more tech.