Though it is not advised for everyday computer users to follow them, there are tutorials out there that allow you to prevent Windows Update from updating the computer as well as tutorials for preventing new device drivers from installing across all devices on the computer. However, what is less understood is how you can prevent Windows Update from updating an individual device driver as well.
Preventing the update of one of many specific device drivers—or perhaps two or three device drivers if you use enough programs—is something that those who work behind computers, in particular, may have to do overtime as their laptops and desktops fail them. Still to this day, it is not uncommon to buy a top-of-the-line laptop from Dell, for example, and then find out your speakers are not working as they should. Often when this happens the problem isn’t with the speakers themselves but rather with the driver updates that made a new problem on your computer that wasn’t there before.
There is any number of scenarios where you may have ended up with a situation where your current device drivers are the ones you want to keep for a specific device. But most often it is because you wanted to roll back a driver and use an older version because the newer current version didn’t operate as it was intended on your machine.
When this situation occurs, you have two problems. One is that your default apps that come with your computer due to the manufacturer that you use may have apps that automatically apply updates; the second problem is Windows 10 as an operating system in and of itself is going to want to potentially update those drivers during a future Windows over-the-air software update as well. The first problem can be resolved by not running new scans on your computer whenever you open one of those default apps and by making sure they are not set up to automatically scan your PC. If that proves too difficult to handle, you could always remove those default apps from your computer as they can always be uninstalled by opening the Settings app and uninstalling them as you would any other apps that you have installed. The latter problem regarding Windows Update can be solved by following the tutorial below.
See also:
- How to Enable/Disable Windows Update Automatic Updates in Windows 10
- How to Turn On/Off Automatic Updates for Offline Maps in Windows 10
- How to Schedule Restart Time for Windows Update in Windows 10
- How to Uninstall a Windows Update in Windows 10
What Microsoft has to say about preventing the installation of a device by hardware ID:
You can use this procedure to prevent installation of any device that matches a specified hardware ID.
You can choose any of the hardware IDs that apply to a device, from the very specific to the very general. If you choose a more general ID, then you prevent installation of an entire set of devices, rather than just one device.
If this policy is enabled, in addition to preventing installation of the affected devices, it also prevents users from updating the device drivers for already installed devices that match the policy setting.
Membership in the local Administrators group, or equivalent, is the minimum required to complete this procedure.
And what Microsoft writes as additional considerations:
- You do not have to include more than one hardware ID for any single device. If any hardware ID in the policy matches any hardware ID associated with a device, then the installation is prevented.
- To determine the hardware ID for your device, see Determine the Hardware IDs for Your Device.
- To prevent this policy from affecting a member of the Administrators group, see Allow Administrators to Override Device Installation Restriction Policies.
- This policy setting takes precedence over any other policy settings that allow a device to be installed. If this policy setting prevents a device from being installed, the device cannot be installed or updated, even if it matches another policy setting that otherwise allows installation of that device.
- If you edit policy settings locally on a computer, you will affect the settings on only that one computer. If you configure the settings in a Group Policy object (GPO) hosted in an Active Directory domain, then the settings apply to all computers that are subject to that GPO. For more information about Group Policy in an Active Directory domain, see Group Policy (https://go.microsoft.com/fwlink/?LinkId=55625).
Read more: Prevent Installation of a Device by Hardware ID
The following tutorial demonstrates how you can prevent Windows Update from updating an individual device driver when you are using a version of the Windows 10 operating system.
1. Update the Driver
Like with solving many problems to do with Windows, you first should update the device driver which can be done from Device Manager in Windows 10. You do not have to do this without an internet connection to prevent Windows Update from updating your drivers, but you may want to open your default apps from the manufacturer to make sure those will not update your drivers. For instance, Dell as a manufacturer is quite aggressive with having its default apps offering you an all in one solution to periodically keep your system updated; it does this with its Support Assist app. Other manufacturers such as HP may have something similar while others such as Razer can be far more lax.
a. Download the device driver you want.
Note: You may find many of the drivers you need from your manufacturer’s website, where this is usually a dedicated drivers page for you to download all drivers. (If you have a smaller manufacturer, this might not be available.)
b. Remove any default apps from your computer which may result in period updates being automatically installed. (You can always download them again from the manufacturer’s site later; just note the names of the apps before you delete them.)
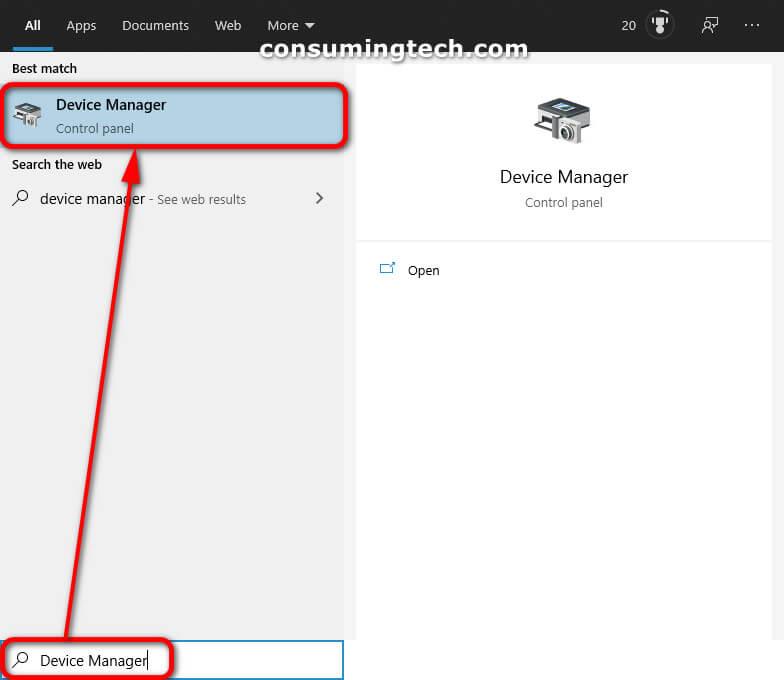
c. In the search field in the taskbar, type Device Manager, and then click on the Device Manager Control Panel under the Best match section.
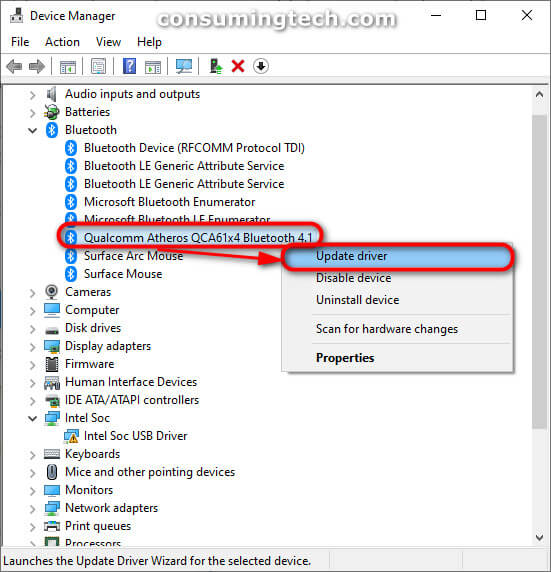
d. Location the device driver you want to update, and then do steps 5 or 6 depending on how you want to update the driver.
e. Right-click on the device, and then click on Update driver from the context menu.
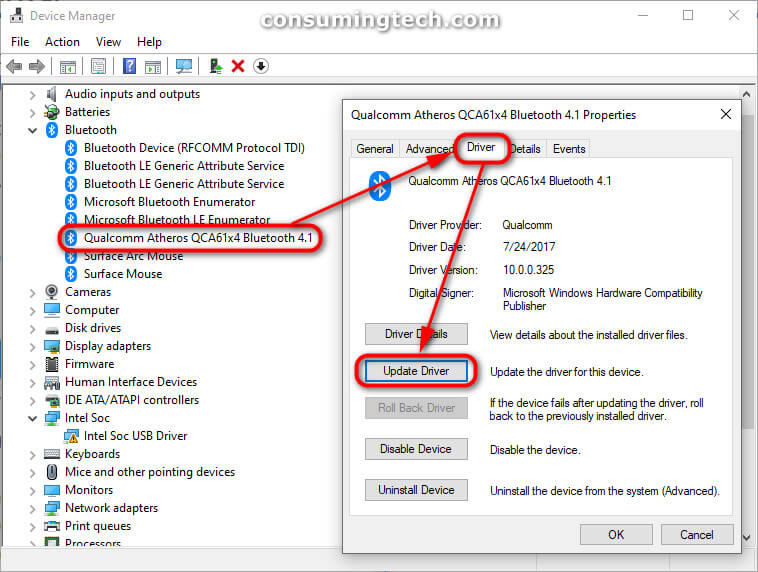
f. Double-click on the device and then from the Properties dialog, click on the Driver tab, and then click on the Update Driver button.
2. Find the Device Hardware ID
Once you have updated the device driver, you will need to know the Hardware ID for the device before you can prevent Windows from updating a specific device driver. Here is how you can do that:
a. Using Search in the taskbar, type Device Manager, and then click on the Device Manager entry under the Best Match section.
b. Navigate to the same device as you did before.
c. Double-click on it or right-click on it and click on Properties from the context menu.
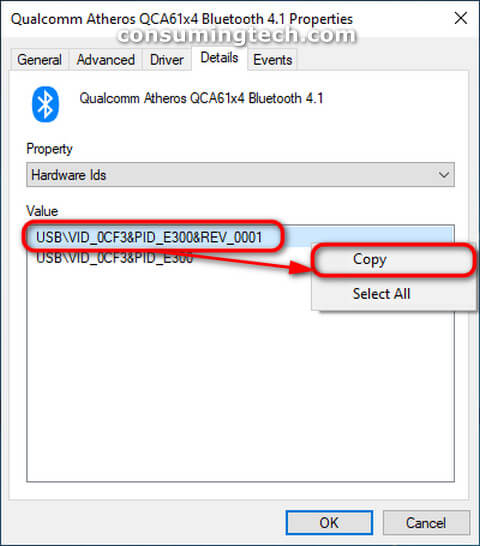
d. From the top of the Properties dialog for your driver, click on the Details tab, and then select the Hardware Ids property.
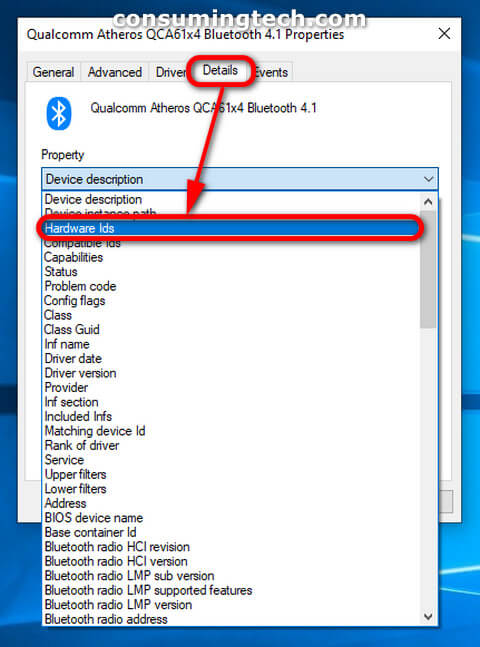
e. You should see at least two values listed for your device, though the exact number can vary. In any event, it is the top two values that are of use on most occasions. This time it is the first value that contains the hardware ID that you need. Right-click on the first value and then click on Copy so you can paste it in later.
3. How to Enable/Disable Group Policy to Prevent Driver Installing for Your Device
You can enable and disable the device driver from installing by either using the Local Group Policy Editor (which is available for Windows 10 Pro users) or by making the appropriate change to the registry (if you are a Windows 10 Home user). Windows 10 Pro users are able to just make the registry change without entering the Local Group Policy Editor if it is preferred.
1. Enable Group Policy to Prevent Driver Installation
a. Open the Local Group Policy Editor. This tutorial shows you all the different ways in which you can open the Local Group Policy Editor in Windows 10: How to Open Local Group Policy Editor in Windows 10
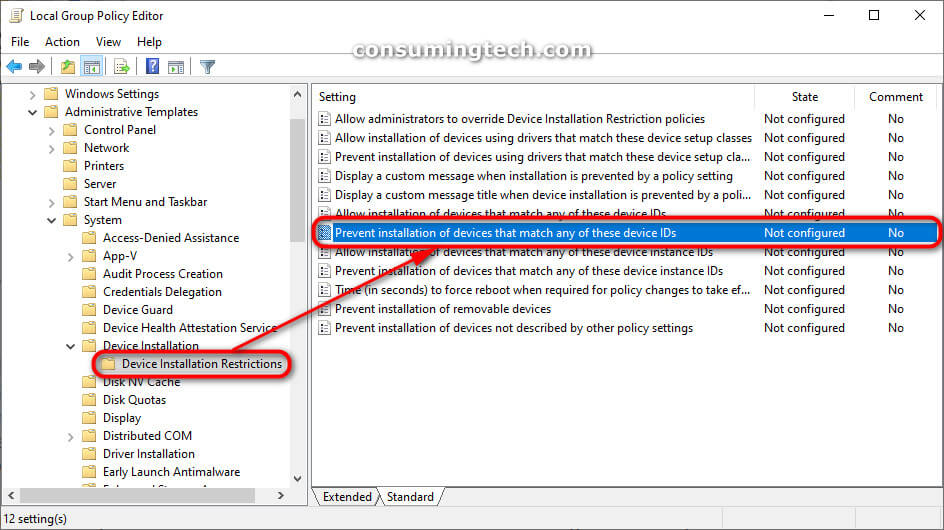
b. Using the Local Group Policy Editor’s left pane, navigate through to the following path:
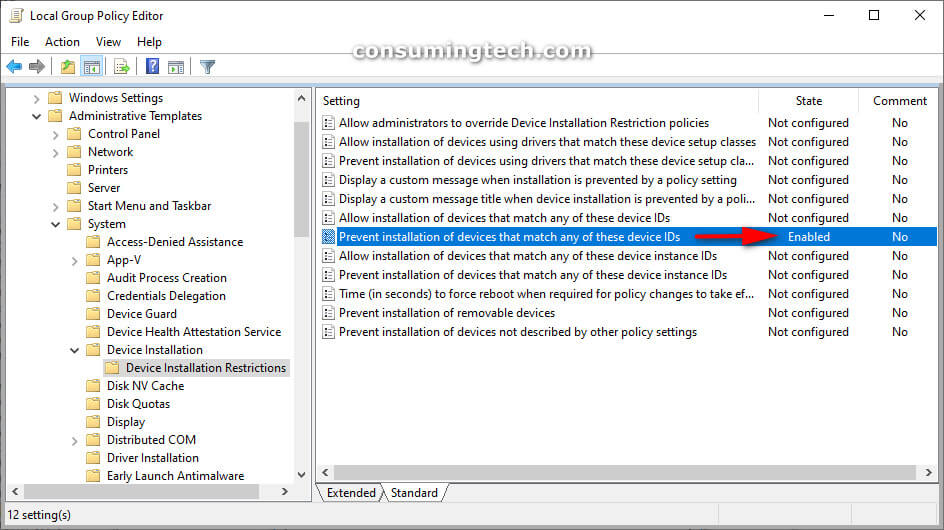
Computer Configuration > Administrative Templates > System > Device Installation > Device Installation Restrictions.
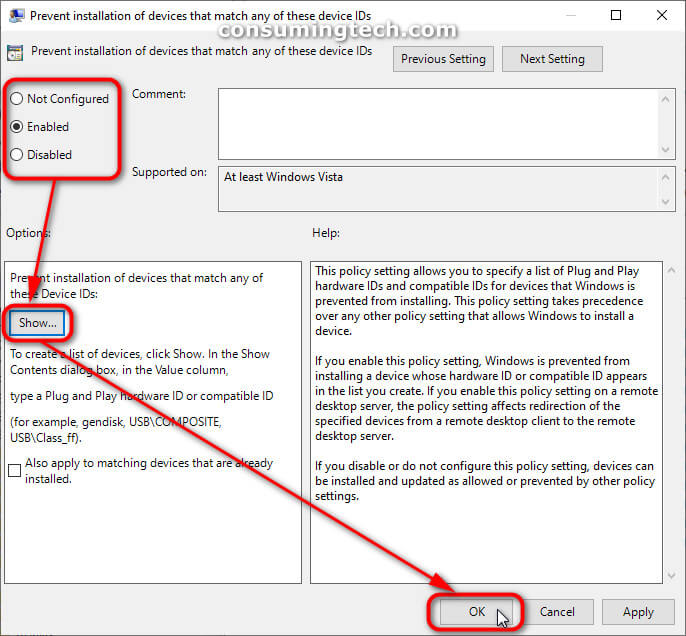
c. Double-click on the Prevent installation of devices that match any of these devices IDs policy setting.
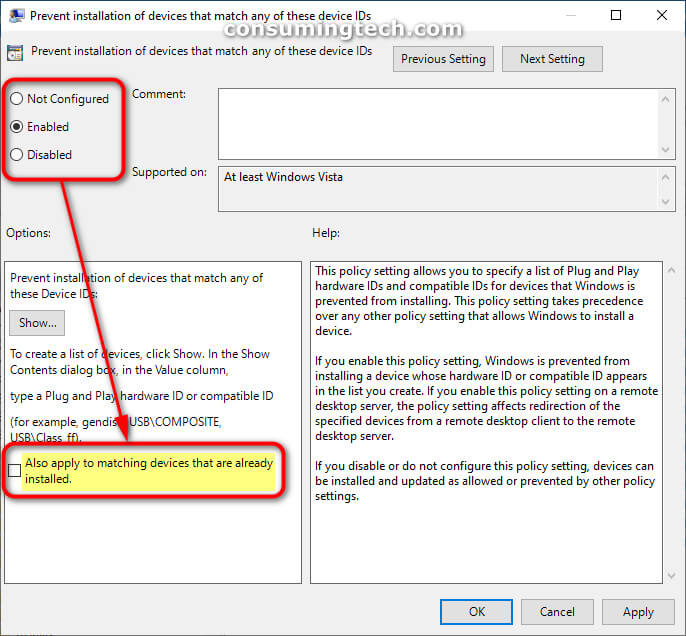
d. Click on Enabled, and then choose whether or not you would like to select Also apply to matching devices that are already installed under the Options heading.
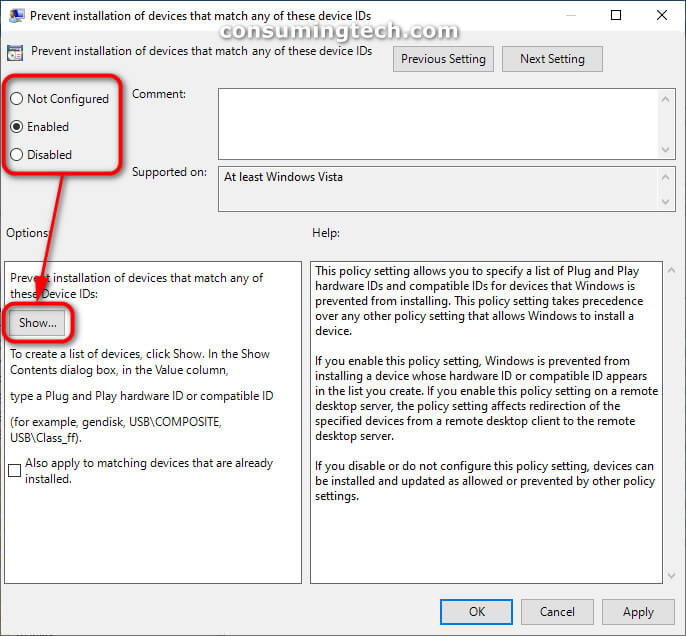
e. Click on the Show… button under the Options heading.
f. Click on the spare line to edit a value and then paste the value you got from the Properties dialog in step 2. In our examples, this value is USB\VID_0CF3&PID_E300&REV_0001.

g. Click on the OK button to save the changes and close the Prevent installation of devices that match any of these device IDs policy window.
h. The Local Group Policy Editor window will still be open, and you can see that the state of the Prevent installation of devices that match any of these device IDs is now set to Enabled.
2. How to Set Update Prevention in Registry
If you have Windows 10 Home rather than Pro installed on your computer, you will not have the Local Group Policy Editor to work with as shown in the previous part of the tutorial. Subsequently, you will have to set the software update prevention via the registry instead. Worth noting is that those of you who do use Windows 10 Pro can still use this option if you prefer it to the Group Policy.
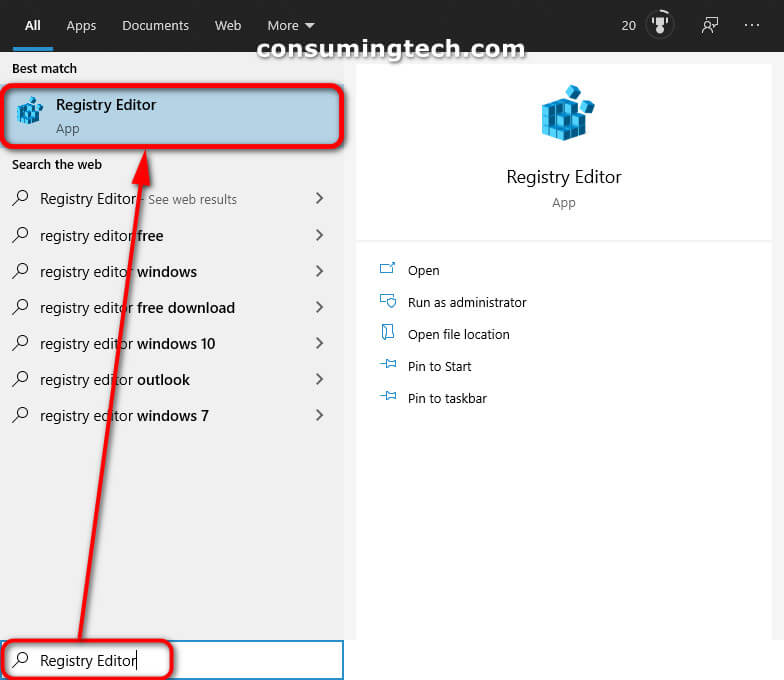
a. Open the Registry Editor. This tutorial shows you all the ways in which you can open and use the Registry Editor app in Windows 10: How to Open and Use Registry Editor in Windows 10
b. Using the Registry Editor’s left pane, navigate through to the following path:
HKEY_LOCAL_MACHINE\SOFTWARE\Policies\Microsoft\Windows\DeviceInstall\Restrictions\DenyDeviceIDs
c. Change the String value to 1 to enable the prevention of the device driver installing.
Note: You can also download the Windows registry file and automatically save the changes: Enable the prevention of installation of new drivers for device
d. To Disable the Group Policy Change
If at any time in the future you would like to reverse the changes made to the registry, you can do so by navigating through to the following path and then remove the key or change the value data back to 0:
HKEY_LOCAL_MACHINE\SOFTWARE\Policies\Microsoft\Windows\DeviceInstall\Restrictions
Note: You can also download the Windows registry file and automatically save the changes: Disable the prevention of installation of new drivers for device
That’s all.
Related Tutorials