A startup item is anything on your operating system that gets classified as an item—like an application or drive, for example—that begin running when you turn on the computer and sign into your accounts without you having chosen to run that item.
You might hear some people talk about disabling or enabling startup programs if you keep your ears open long enough. Those people are saying the same thing as we are in this guide about items, but just choosing to use different terminology.
Part of what makes a newer operating system even better than the last version—i.e., what makes Windows 10 better than something like Windows 8 or 7—is that the amount of time it takes to boot up the operating system, so you get to log in and start using the computer quicker. There are some geeky reasons why that is that we won’t go into here because they aren’t that relevant to startup item, but there is also another reason that we will touch on briefly that is.
The more items that start up when you boot the computer and log into your accounts, the longer it takes to finish loading and be a usable operating system for you to do things like browsing the interweb. Microsoft has gotten better at choosing startup items over time, and that is also a reason for quicker OS loading times. The more you use your computer, the more likely you are to start developing slower loading times because programs like to add themselves to this list of items that will start up when your computer does so they run automatically. It tends to result in more people using the programs that way for them which is why they do it most of the time. It’s another one of those cases where it’s great for them but not necessarily so great for you if it’s a program you don’t use very often.
To help keep your computer running smoothly and limit the amount of programs taking advantage of your computer, you’ll want to check out what items are set to start up automatically every so often and remove anything that you don’t think deserves your computer’s attention to be on the valuable startup items list. You should leave that for you V.I.P.’s only (as in very important programs.)
Older versions of Windows like XP had the Task Manager available, but killing a program often resulted in that program coming back again, and stopping an item from starting up was also a pain. Even for a tech guy like me, there were some programs that I just couldn’t get my computer to stop running, and I just needed to accept the fact that they were now there and chalk it up to a “live and learn” experience and just make sure I didn’t continue to add any more items to the already annoying list that didn’t want ever to go away.
Now with Windows 10, you won’t have those same problems. You can quickly kill items, and the chance to disable them as startup items is also just as bulletproof. Windows keeps the app or program in the menu from the Task Manager still for as long as it is still installed on your computer so you can easily go back into the Task Manager and reverse your choice, too.
How to add, remove, enable, and disable startup applications in Windows 10
You can enable or disable the startup programs using the Task Manager Windows 10 has on offer thanks to its own dedicated “Startup” tab. To get there, open the Task Manager, making sure that it is set to show you the More details view, and then click on the “Startup” tab. Now just look where it shows the “Status” column to see the status of the startup programs.
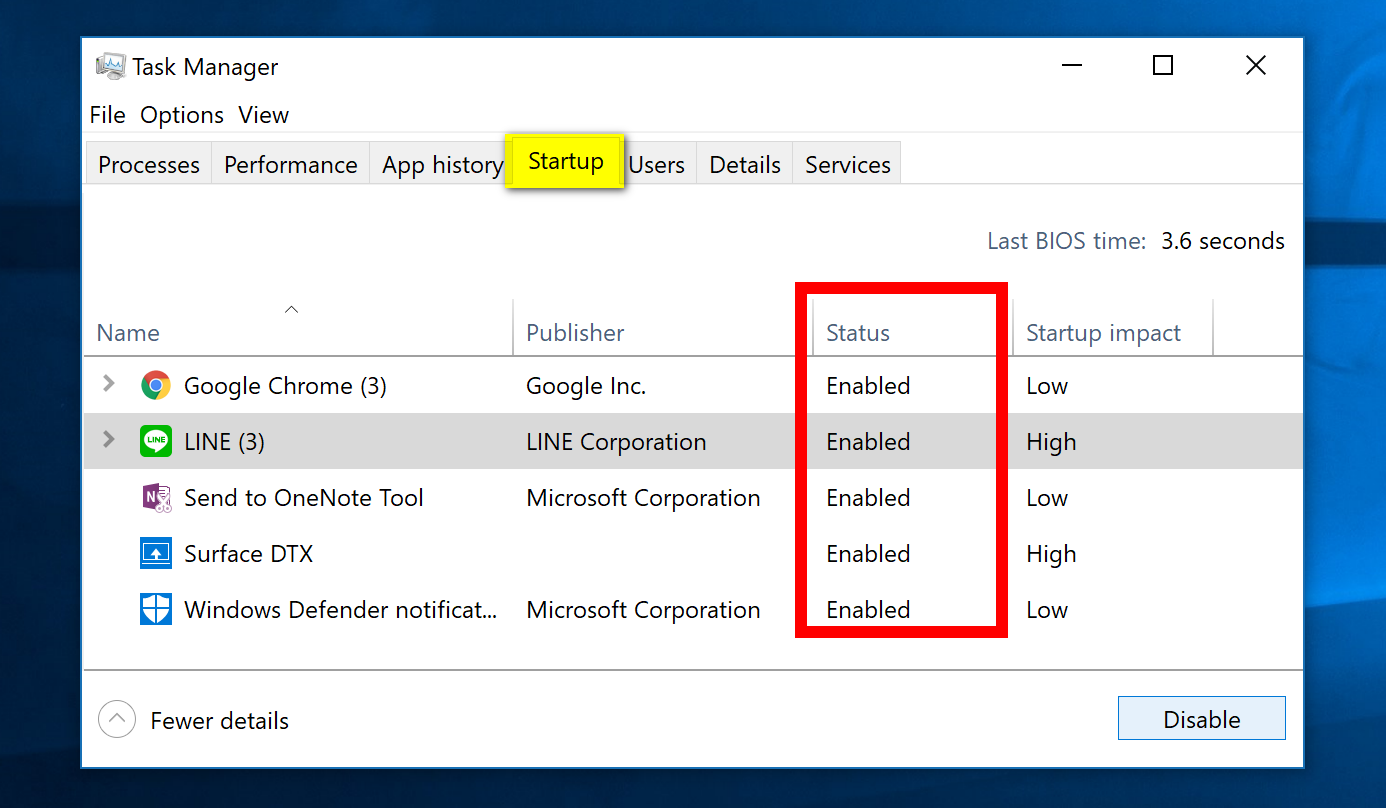
Highlight the app or program that you want to enable or disable (you’ll know it’s highlighted when it turns gray), and then click on the button in the bottom right corner of the window. If the app or program is currently disabled, then the button will read “Enable.” On the other hand, if the app or program is currently enabled, the button will read “Disable.”

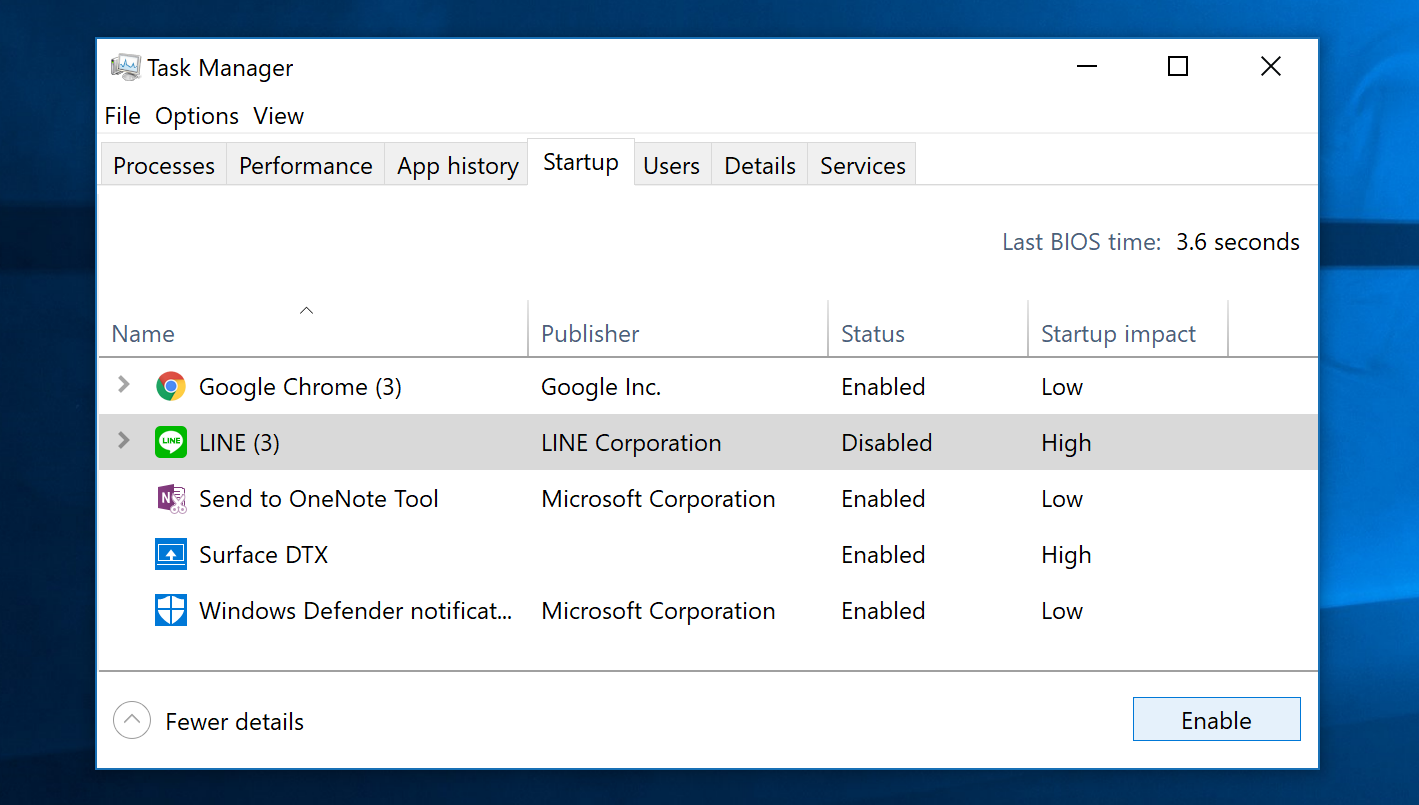
If you look in the Status column, you’ll see that the action you chose is now confirmed. In our case, that is disabling of the Line application. That will now stay disabled until you highlight it again and then click on the “Enable” button in the bottom right corner of the window. You can do that whenever you want to enable the startup items that you had previously chosen to disable as well when you need to.
The Task Manager in Windows 10 is much better than it ever has been in previous Windows versions, and being able to manage your startup programs and applications easily is a part of what’s now better. Windows now does a lot of things for everyone without them having to do anything—that’s part of what currently has the IT worker industry in shambles—but it still can’t quite do everything. If you take a few minutes a month to go over your startup items from the Task Manager using the guide above, as well as keep your apps that are running in the background in check, you should find your computer not beginning to show some of the annoying signs of aging like they used to. You should also appreciate the chance to manage your startup programs from the Task Manager as well. A few years ago you would have to enter the registry or install a third-party program like C Cleaner to manage your startup programs.
You might also be interested in:
- How to Enable/Disable Always Boot to Advanced Startup Settings in Windows 10
- How to Allow/Prevent Devices to Wake Computer in Windows 10
- How to Change System Unattended Sleep Timeout in Windows 10
- How to Change Account Username in Windows 10 When Signed In to Microsoft Account or Local Account
You can subscribe to our RSS, follow us on Twitter or like our Facebook page to keep on consuming more tech.