Placing proper credits on a photo that you have captured is a tremendous idea as that way people get to know who’s the man (or woman) behind this beautiful photo. Many websites on the Internet don’t give proper credits as a link so placing the proper credits in the photo itself is a must for you.
You can do so by watermarking the images on your computer, and especially if you happen to have a Mac, then you don’t even need to use a third-party app to get the job done every time. You can use the built-in Automator app on your Mac to create an applet that places your chosen image as a watermark on your photos.

Creating an application in Automator doesn’t require coding skills. In fact, it’s as easy as using an application like the Photos app on your Mac for managing your photos.
If you’re interested, here’s how to do that:
Watermarking Images Using an Applet in Mac
Make sure you have your credit photo available on your Mac that will be watermarked on your other photos.
Also, you’re going to need an app called Pixelmator installed on your Mac. You can get the app from the Mac App Store or you can download the free trial from their official website.
Launch the Automator app on your Mac by clicking on Launchpad in the Dock and searching for and clicking on “Automator.” The app will open.

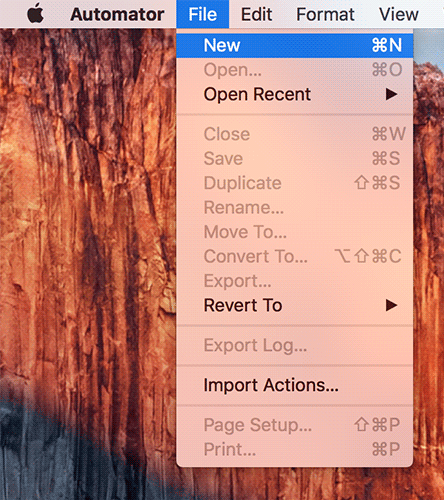
When Automator opens, click on the “File” menu at the top and select the option that says “New” to create a new document in the app.
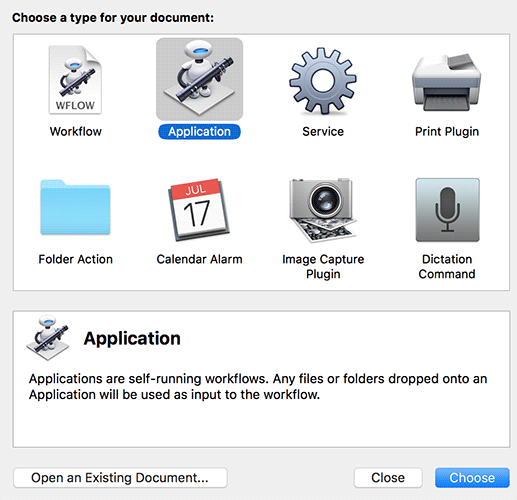
On the following screen, choose “Application” as the document type and then click on “Choose” to move forward with the process.
Now, what you need to do is drag the action named “Watermark Images” from the action panel on the left over to the work panel on the right.

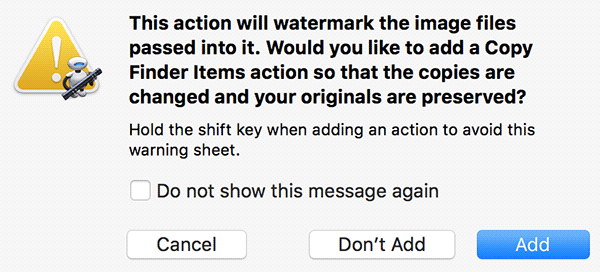
You will get a prompt on your screen that asks if you would like to add an action for copying files so that your original image files are preserved and the watermark is only applied to the duplicates. It’s recommended that you do it so click on “Add” to have it added to your application.
Locate the image you want to add as a watermark to the photos on your Mac and drag and drop it onto the Watermark Image section in the workflow section of Automator.
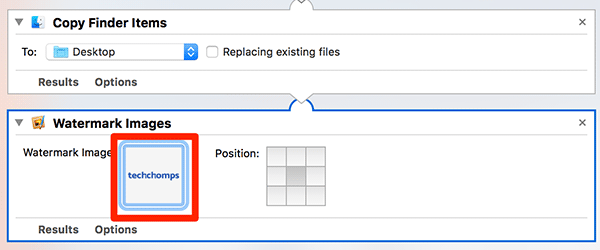
Then, from the open grid on your screen, select a place where you would like for the watermark to be applied. It’s a 3 x 3 grid, and you’re free to choose any.

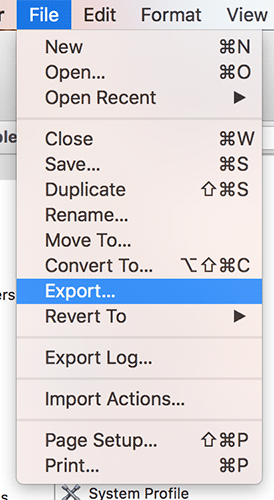
Once you’ve chosen an image for watermarking and a place in the grid, click on the “File” menu at the top and select “Export” to export your app from Automator.
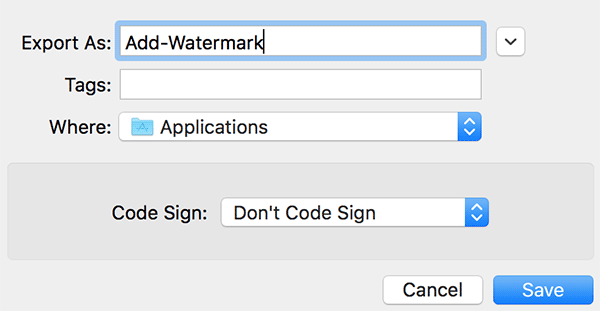
On the following screen, you’ll be required to enter a name for the app. You can enter any meaningful name you want. Then, click on Save to save the app at the chosen location in the drop-down menu.
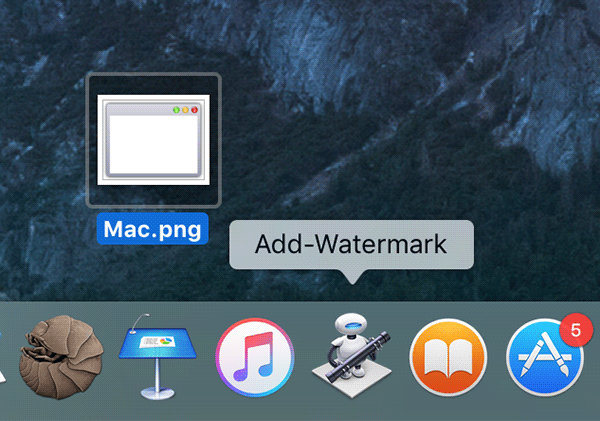
Open the folder where you saved the app and drag and drop the app onto the Dock of your Mac. The app should now be available in your Dock as shown below.

Now, locate a photo on your Mac that you want to add a watermark. It can be any photo that you have stored on your Mac.
Once you’ve found the photo, drag and drop it onto the app in the Dock. It’s the app that you just created above.
You should then see a copy of the photo on your desktop, and you can open it with any photo viewer on your Mac. You will notice that this photo now has the watermark that you added in the Automator app.

So, that was how you could watermark images using an applet on your Mac.
You can now add this watermark to as many photos as you want by just dragging and dropping the photos on the app in the Dock.
Let us know if this helped you save time that you would otherwise spend adding watermark to the photos using a photo editing app!