Odin is an official tool made available to download by the Samsung developers. The tool works for Samsung devices but won’t flash for any other smartphone or tablet coming from other sources. Additionally we know that it only works for Windows operating systems ranging from Windows XP through to Windows 8. The updated version will come out for Windows 10 after the release by Microsoft. You will find all updates coming directly to this page. Therefore, every time the Sammy team make a new copy it will come direct to this page. You do not need to search for it anywhere else.
Odin works for over 50 different Samsung smartphones and tablets and there’s no limit how high that number will reach in future as we see additional phones releasing all the time. It works in conjunction with the entire ‘Galaxy’ series, the Note series and the S series. We are yet to distinguish any manual files available for this year’s Galaxy Alpha and the S5 since they are still on Android KitKat. However, after the 5.0 Lollipop release we likely will see them available.
If you are looking to flash your Samsung firmware manually there are two main ways to do that. The most official way is by using Samsung Kies and downloading it from the Kies utility. The next way is by installing a suitable version of Odin which is also made by Samsung. Although not listed as the official flashing tool, it is ultra reliable for flashing firmware files and using other tools for unofficial operations. For example, if you are wanting root access, you can use the Odin tool for many of Chainfire’s guides with CF-Auto-Root.
The Odin pack has been around for years now and comes with five different versions. The latest version is Odin 3.10. It’s a brand new release and many of the modern-day installation guides whether it be official or unofficial don’t come with the use of Odin 3.10 yet. That said, as time goes by, the newer numbers becomes more popular.
Many people don’t know that you can use multiple version of Odin for many of the files. Just because one website is telling you to download a particular version doesn’t necessarily mean you cannot use another version. So now that we know Odin is used to flash the Samsung Galaxy, we can download the version you are looking for and learn how to flash the files.
Once you have picked the correct file choice for you guide you can click back to where you came from and continue follow the steps listed on the guide on our site. Not everyone is coming here directly from one of our guides. There’s some steps listed below for all of you who just wan ta basic understanding of how it works.
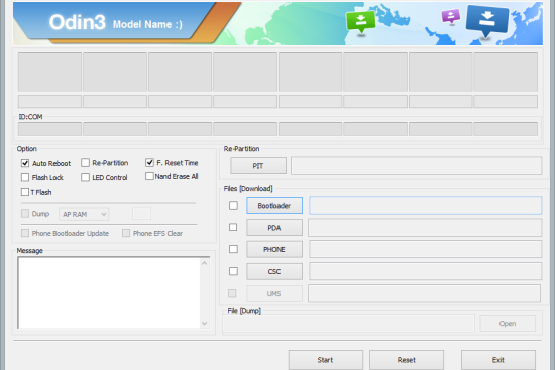
You know what to do: disable Samsung Kies and install the latest USB drivers from the respective device manufacturer. Turn the mobile device you are using on and navigate to the Settings > Developer Options and enable the USB Debugging Mode. Use the correct Odin version for your tutorial and have it running on the computer. Check the compatibility between the Odin version and your device. Simply extract and run the file without any need for other installation techniques. have it open and waiting on the Windows OS desktop. Leave the default settings as show on the screen with Auto Reboot and F reset Time options marks as working. Do not check the re-partition box. Click the PDA or AP button and upload the (tar.md5) flashing file. Click the start button when you are ready.
Odin works a charm for flashing custom ROMs, kernels, official firmware files from corresponding OTA releases and more. The application supports tar and tar.md5 files. The majority of files come in the zip format and must be un-zipped before the app can process the request.
Note: You do not need to follow this Odin installation guide if you came here from another guide. Just download the tool from the links below and head back to the how-to guide you were using before.
Direct Odin Download Links
- Odin_v1.70.zip
- Odin_v1.82.zip
- Odin_v1.83.zip
- Odin_v1.86.zip
- Odin_v3.04.zip
- Odin_v3.06.zip
- Odin_v3.07.zip
- Odin_v3.09.zip
- Odin_v3.10.5.zip
- Odin_v3.10.6.zip
- Odin_v3.10.7.zip
- Odin_v3.11.1.zip
- Odin_v3.11.2.zip
- Odin_v3.12.3.zip
- Odin_v3.12.4.zip
- Odin_v3.12.5.zip
- Odin_v3.12.7.zip
- Odin_v3.13.1.zip
- Odin_v3.13.3.zip
- Odin_v3.14.1.zip
- Odin_v3.14.4.zip
- Odin_v3.14.1.zip
How to Install Odin
- Download an Odin file from the links above.
- Extract the files to the desktop of the Windows computer. You can only use this tool for Windows PCs, notebook or laptops.
- Right-click the extract executable file and select to run as the administrator.
- Have the Odin app open on the desktop.
- Find the Samsung Galaxy you wish to flash.
- Boot the Galaxy in Download Mode by powering down completely. Now boot it up holding the Home + Volume Down + Power buttons.
- Connect the Samsung device to the computer with the USB cable.
- You must have the latest USB drivers working on your device if you want Odin to work with the device.
- Watch the ID:COM port change colors once the drivers are detected.
- From here you should follow the guide for the flashing of your choice because each guide is different.
- By default, most guides involve clicking the AP button and uploading the file to this location.
- The other buttons you see must be customized for what you are doing.
- Flashing official firmware builds from Sam mobile or other trusted sites require you leaving the default settings.
- Now click the start button and wait for the flashing process to finish.
- The Odin application will say “pass” or “fail” on the screen. A pass means you can safely disconnect the device from the computer. A fail means you should download new USB drivers and try again.
In conclusion, that is all you need to download and install the Odin flashing application on your Windows computer. If you aren’t having much luck getting your files to flash with Odin then you might need to install the USB Drivers for your device on the computer and try again.