There are two types of IP addresses that a computer can have assigned to it: private and public. The private IP address gets its name because it isn’t able to be seen by anyone on the internet, they literally can’t get to it no matter what. Everyone outside of its own private network is completely shut out from view. A public one, on the other hand, can be seen by anyone on the internet—you can even search for it yourself using most leading search engines, which we’ll show you later in the guide.
There are both advantages and disadvantages to having a public IP address. Giving everyone around the world the chance to get access to your device is important at times for some people. There are security advantages to this as well. The downside to the public IP address though is that should people wish to jump on your IP it can result in you being charged for that traffic, that is especially closer to real life situations that many would have hoped when it comes to cellular companies, who often can and do do that without there being anything you can do to prevent it. Private IP’s, however, can get protection from virtual private networks, or home networks, where they protect the devices through routing rules. You can even get this same kind of routing rule protection from cellular carriers, too. To help eliminate the problems that might be presented with stuff relating to your carriers in those circumstances, you can then run specific routing rules and requests for your virtual private networks by running through those details with your carriers.
When most people have taken the time to look up their IP address in the past, they have usually found just one string of numbers making up the address. However, if you were to go searching with the options available to you in Windows 10, you’ll often come across an IPv4 and an IPv6—these are listed as two completely different addresses, and you’ll need to know the difference between them to understand which one you want for the task at hand, so lets run through that now.
IP stands for “Internet Protocol,” making the IPv4 and the IPv6 two separate internet protocols. These protocols are like sets of rules that are applied when information is being transferred between devices. Internet protocols are there to help make things that get sent in packets or datagrams more efficient, similar to the same way your mail needs to have an address on the front of an envelope. The other reason internet protocols exist is for routing requirements, which is just like choosing a route for your mail to take around the world when you’re shipping it from country to country. IPv4 has been around since the early 1970’s and hasn’t had much development since then, inevitably leading to some limitations that are ironed out with the IPv6. IPv4 was the first reliable protocol used, but it was also around well before we had things like mobile devices that have only been considered necessities and everyday items over the last decade. The internet has expanded a lot since IPv4 was first thought up and IPv6 has been brought in to solve many of the problems that were created by the original technology. What the largest brick wall of all that IPv4 ran into was that it could only handle four billion unique addresses—give or take—which sounds like it would be enough to do the job still, but it falls short of being able to handle every device on earth already. As such one should consider the IPv6 as the next generation of IP addresses that each computer will eventually use. Given that IPv4 could only equate to 4 billion addresses, naturally this means that IPv6 IP addresses would have to be longer, and that would give the chance of more devices to have more addresses. That is, in essence, what IPv6 is: it changes from being a 32-bit numerical address to a 128 hexadecimal bit address. A hexadecimal address consists of both letters and numbers, and can produce up to 340 undecillion addresses, which means it’s a much wiser choice and likely the only IP address protocol we will need at least for a few more lifetimes.
How to Find Your IP Address Using Microsoft Edge Web Browser
You can find your computer’s public IP address in Windows 10 by using the Microsoft Edge web browser. Just click on the “e” icon in the taskbar to open Edge first.
![]()
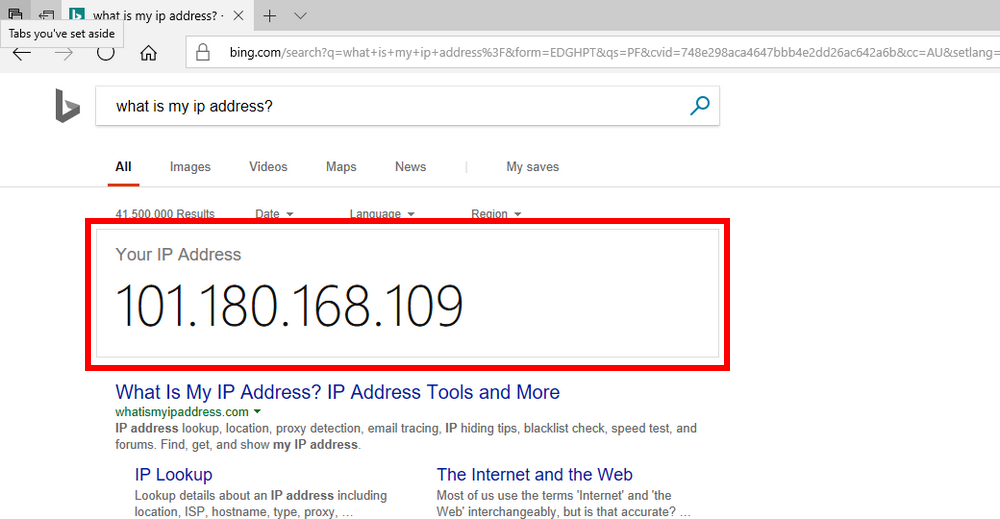
And then type the words “What is my IP address?” into the address bar at the top of the browser window and hit the “Enter” key on your keyboards.

The results page then lists your IP address in nice big numbers so you can’t miss it.
Note: The same tip as above actually works using most of the leading web browsers and not just Edge. It’ll also work using most leading search engines and not just Bing. In other words, feel free to open up Google Chrome and enter the same command using the Google search engine if that is more your thing. . . .
How to Find Your IP Address Using Settings Application
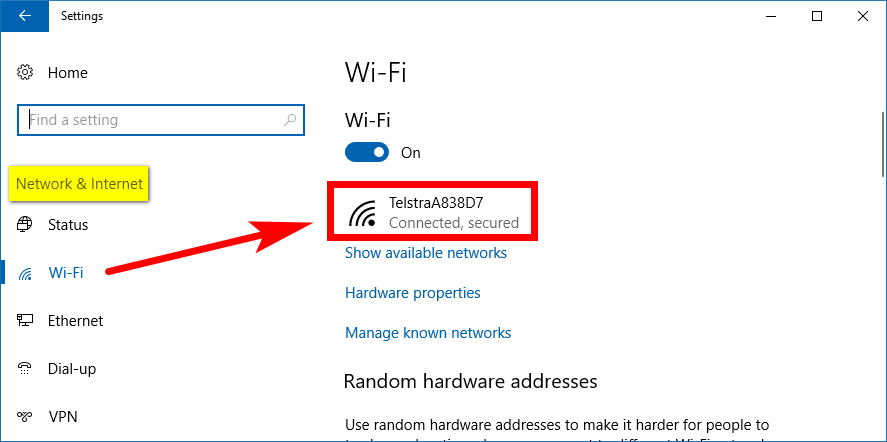
You can use the Settings application in Windows 10 to find your private IP address if you like. To do that, open the Settings app from the Start menu and then click on the “Network and Internet” link from the Windows Settings page. Next, click on the “WiFi” link in the left pane, so you get everything related to the WiFi appearing in the right side pane. You’ll see your WiFi network name listed in the right pane. Click on it.
Scroll down the page a bit, and then you’ll see the IPv4 and the IPv6 private IP address that are listed for your computer.

Note: the above example is assuming you have a WiFi connection and not Ethernet since that is what the vast majority of people use these days. However, if you do have the Ethernet, then instead you need to click on the “Ethernet” link from the same left pane as the WiFi link in the example above.
How to Find Your IP Address from network Connections in Control Panel
It’s also possible to find your private IP address from Network Connections in the Control Panel. Open the Control Panel if you want to do it this way, so that it is showing the classic view with the smaller icons, and then click on the “network and Sharing center” link from the list of all Control Panel items.

You’ll then see a few connections, one of them being the one you are currently connected to the internet with. You’ll be able to tell this by observing the red “X” on the ones that you are not connected to, and the green bars being on display for the one that you are connected to. Click on the one you are connected to.
![]()
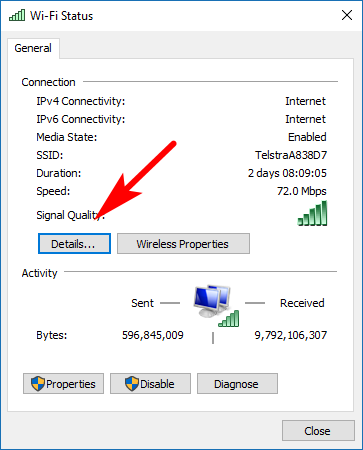
You’ll then have its status dialog box open. Click on the “Details” button next which is found under the General tab.
How to Find Your IP Address from Task Manager
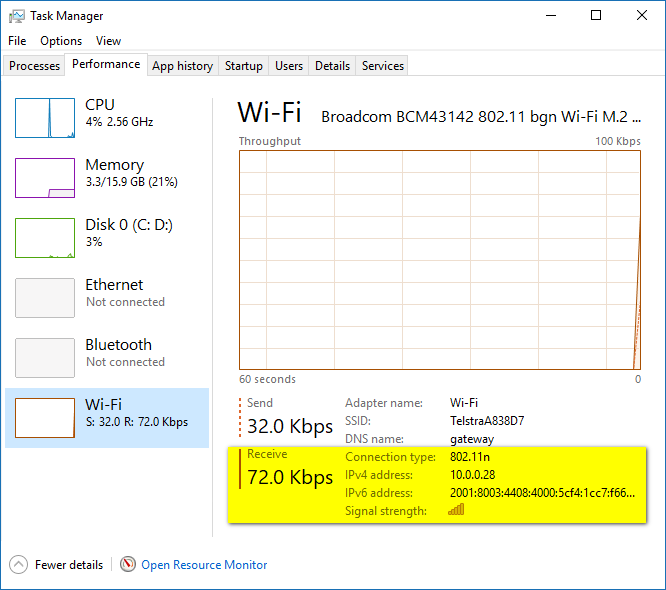
You can also find your private IP address by using the Task Manager in Windows 10. To get started, right-click the taskbar and then click on the “Task Manager” link from the menu. You’ll see some tabs at the top of the Task Manager window, one of which is the “Performance” that you need to click. Click on either the “Ethernet” or the “WiFi” options depending on what you have connected to use the internet. (Only click on it once to highlight it. If you click on any of these options in the left pane twice, the rest of the Task Manager window collapses. You can get it back again by double-clicking on the links.) You’ll then see the IP addresses—both the IPv4 and the IPv6 if you need them—in the right side pane.
How to Find Your IP Address Using Command Prompt
You can also find the private IP address for your computer in Windows 10 by using the Command Prompt. Open the Command Prompt window any way you prefer—it doesn’t have to be an elevated version of the Command prompt this time—and then type ipconfig /all and then hit the “Enter” key on your keyboard. It’ll give you quite a lot of information within the Command Prompt window now. Toward the top of it, all is one section with the heading “Ethernet” and the other “Wireless.” Look under the one that you are connected to.
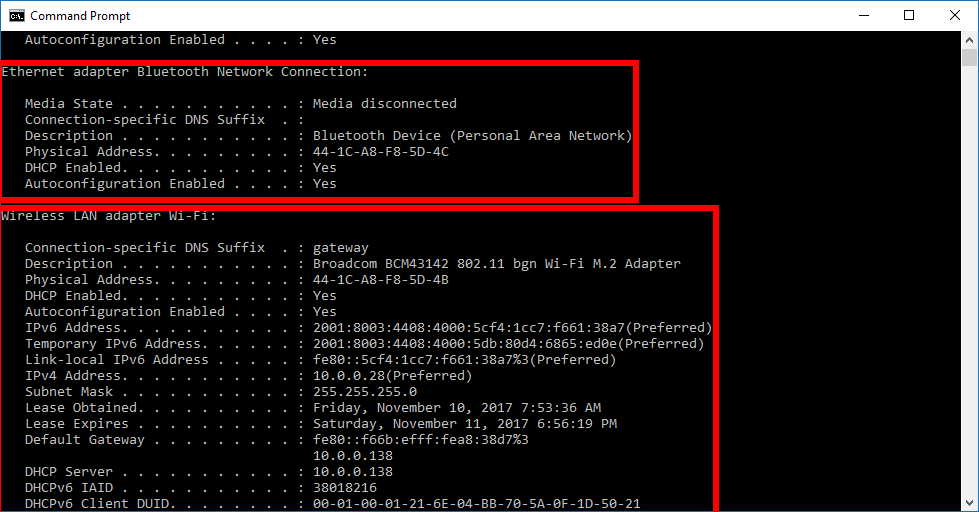
If yours is a wireless connection like ours is, then you’ll see the two IP addresses listed in the details.

Assuming you’re doing business with a standard ISP, you all will have a public and private IP address. The private one being assigned to your private network and the public one being automatically assigned by the ISP that people can see over the internet. Don’t worry about that public one, it’s perfectly normal, and everyone has one. The public one doesn’t give away any hints as to what your private one will be. That’s important because you’ll want to keep the private one to yourself for security reasons.
You might also be interested in:
- How to Set CPU Process Priority for Applications in Windows 10
- How to Encrypt Single Files and Folders in Windows 10
- How to Encrypt Internal Hard Drive in Windows 10
- How to Create a Recovery Image to Reset Windows 10
You can subscribe to our RSS, follow us on Twitter or like our Facebook page to keep on consuming more tech.