The Windows operating system comes with “clean” and “clean all” Diskpart commands which will wipe a disk, so it is not allocated or initialized.
There are some differences between the “clean” and “clean all” commands that you may wish to note before getting started.
The “clean” command removes all partition and volume formatting from the disk with focus. There are some exceptions, though. For instance, the master boot record (MBR) disk only has MBR partitioning information and hidden sector information overwritten. Additionally, the GUID partition table (GPT) disk has the GPT partitioning information overwritten—and that includes Protective MBR—but there is no hidden sector information. All data on the disk is marked as deleted, but the “clear” command does not zero or secure erase the disk as the “clear all” command would.
The “clean all” command does all the same processes as the “clean” command but also includes that each sector on the disk is secure erased which is to say that all data on the disk is removed in its entirety. When data is securely erased and zeroed, it means that any data that was on the disk is unrecoverable. Before performing the “clean all” command assuming that it’s a no-brainer, you should also note that it takes much longer to perform this action—around 320GBs of data will be wiped per hour—so you may wish only to use this function when selling a device, throwing it away, or are in need of preventing others from seeing what was on the drive.
How to Erase a Disk Using Diskpart Clean Command in Windows 10
1. Open a Command Prompt window so you can use the command line—it can either be the elevated Command Prompt or the Command Prompt at boot.
Note: You’ll need to choose the Command Prompt at boot if you want to run the “clean” or “clean all” on the same disk that you have Windows installed on.
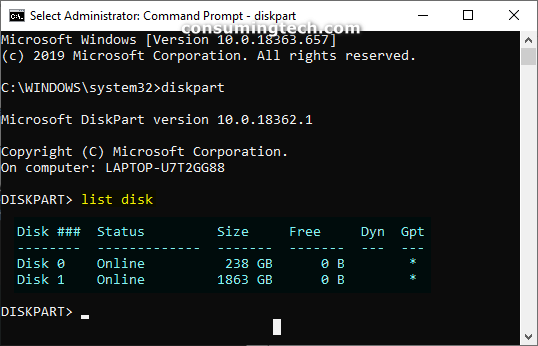
2. Type the diskpart command and then press the Enter key.
3. Type the list disk command and then press the Enter key.
4. Type the select disk # command and press the Enter key.
Note: Change where it shows the “#” symbol for the actual number of the disk you want to use aka “select disk 1” if you want to select disk 1.
5. You can now initialize the disk, or convert it to MBR or GPT.
To initialize a disk, open the Device Manager and then right-click on the drive and select the option to initialize it.
That’s it.
(This article was last updated on March 13, 2020.)
Related Tutorials
- How to Add Remote Desktop Connection in Remote Desktop app on Windows 10 PC
- How to Collect System Specifications in Windows
- How to Change Default Sound Input Device in Windows 10
- How to Turn On/Off Allow Pen to Act as a Mouse in Windows 10
- How to Set Preferred GPU for Apps in Windows 10
- How to Turn On/Off Mouse ClickLock in Windows
- How to Enable/Disable Automount of New Disks and Drives in Windows
- How to Install Windows 10 Virtual Machine in VirtualBox
- How to Choose Default Operating System to Run at Startup in Windows 10
- How to Change Windows To Go Startup Options in Windows 10

