Something you should think about doing moving forward through the next few years is starting to encrypt your hard drives (I’ll assume you already know what a hard drive is in this article—but if not, you all have one on your computers internally already, and it’s where a lot of your data is stored when you chose to store things). It’s especially going to be important if you are someone who travels around the world a lot. The rights that you have along the borders of places like the United States are actually not the same rights you have as a person if you were to be in the middle of the main street of your local town in the United States. The problem for the rest of the world is that often the United States is the backbone of any rule, so if governments from other countries are seeing the United States doing it, then other governments will begin to do the same thing. I believe this is also something happening in England, and probably Australia and other western countries soon as well as the threat of terrorism becomes ever more real.
One thing that the US government has managed to do is make it perfectly legal for security you face on the borders—like customs, for instance—to take your laptop from you and do whatever they want with it. They can ask you for your passwords and see what you have been up to within your Microsoft accounts or local user accounts. Some civilians like that idea to help keep everyone as safe as possible and others find it a breach of privacy. Regardless of your stance on that, it won’t make you less embarrassed if you aren’t a criminal, but you have things you would have preferred keeping private now being looked at by many sets of prying eyes, acting as though the part of their job where they get details of your private life isn’t what helps them get out of bed in the morning. Who knows what they will do with it while you aren’t looking, but the consensus is that they can and will most likely check out what is stored on your computer locally when they have that computer. That means anything you have saved on the hard drive or just stored in a folder will be available to them to scrimmage through and see—be it pictures, text or whatever else can be and most likely will be looked at by those officers checking you out.
Being the tech-savvy people that you are—partially due to all the great stuff you read on ConsumingTech—it’s only fitting that you protect yourselves from these situations that you might one day find yourselves in. There are a couple of obvious ways around it if you don’t want anyone checking out stuff you want to be kept private.
You could back up all of the data that you had locally on the hard drive to a cloud storage service like Microsoft OneDrive or Google Drive to help solve the problem. The internet is teeming with third-party cloud storage services that would love your business, and they mostly come at pretty competitive prices. Once you’ve done that, delete all of the data that you had locally for the time being until you are done with your traveling. Lots of people are skeptical about privacy in the cloud and whether the companies like Microsoft and Google will look at your stuff, but it will at least prevent border security from seeing it. You should also install an application on your computers that allows for secure deletion. Most of the time deleting the data isn’t enough to stop people from being able to view that data again because deleting isn’t actually what’s happening to that data when it is removed. What usually happens is whatever was pointing to that data is then deleted but not the date itself. That then would be enough to act as though the drive space is available for you to use again and for new data to override the old data. If you install an application that allows for secure deletion, then what that app will start doing is override your old data with a bunch of stuff that then prevents anyone from being able to see what is now overridden.
The other thing you can do is say “screw it I’m not going to go to the trouble of backing up all my stuff to the cloud; I’m just going to encrypt my hard drive instead so all of my stuff stays locally on my computer and is locked behind an encrypted password.”
To be clear, neither of those two options is going to save you if you all of a sudden have three out of four screws loose in your head and have decided to become a terrorist and the government has already picked up on that. So if you are planning on joining ISIS, this guide won’t help you. But if you are just a regular human who has been pulled aside for a random check, or you looked slightly suspicious, they probably won’t go to the trouble of breaking through your encryption (which can take weeks with the best people on the job) or contacting your Cloud storage provider to hack your accounts that way either.
BitLocker is Microsoft’s Default Encryption But It Doesn’t Work on Windows 10 Home
You’ll likely know by now if you read enough of our stuff that there are a few different editions of Windows 10 that you can have running on a computer: Windows 10 Home, Windows 10 Pro, Windows 10 Enterprise and Windows 10 Education. The Windows 10 Home is the edition that is running on most computers out there, and it is the cheapest. Most expensive computers you buy will come with the Windows 10 Pro just because it’s assumed that anyone spending a lot of money on a computer probably is a working professional. As we move further into the future we are seeing less and less professionals making up the owners of the expensive computers—tradesmen and just normal 9-5 workers are beginning to love buying Macbooks and Surface devices thanks to people who aren’t necessarily geeks anymore loving to use the internet for a variety of things—but Microsoft still makes sure it is the Pro version of Windows 10 always going on these more pricey devices just so the professional does have it and because it’s only fitting that the more expensive operating system is running on the expensive device, much the same way you want the wheels on an expensive car also to be expensive.
It also just so happens to be that the Professional edition of Windows 10 is the first jump up from the Home, making it the first of the three editions that does come with BitLocker.
There has been quite a lot of fuss kicked up about why Microsoft didn’t allow any drive encryption for the Home version of Windows 10, mainly from the Home edition owners who wish they had it. But it does make perfect sense why Microsoft opted to leave it off the Home version. Since most people who want the encryption are the working professionals, and since most working professionals have the devices closer to the top of the range, Microsoft made one of the features that entice people to run Windows 10 Pro the BitLocker encryption.
There are also many I.T. professionals out there who don’t recommend running with encryption because it can be more trouble than its worth. The less you know about computers, the more trouble it can become. Encryption is considered to be such a nuisance by some I.T. guys that they prefer not using it at all. The thing they don’t like about it is that if something goes wrong with your hard drive then sometimes you won’t ever get it back and that encryption that you thought you initially loved to have all of a sudden has become an evil double-edged sword. There is also the part where you need to know the recovery key to recover your data and if you lose the recovery key (which is just a string of digits, long enough for you to never guess ever again) you won’t be able to get your data back. That immediately stops me from recommending encryption to most people I know because they just aren’t really that into their computers to go to the effort of remembering where they put the recovery key. My parents are a definite no-no for this: I already know I could tell them about what this recovery key is and why they need it ten times in a row and then if I didn’t mention it again for a few years and needed to bring it up, they wouldn’t have any clue what I’m talking about. That’s also precisely why Microsoft knew this feature was best left off the Home version of Windows 10 since these are likely the kinds of people who are running Windows 10 Home more often than not.
Having no encryption doesn’t solve the problem of you having the best security out there, but you also need to ask yourself if the things you are hoping to encrypt really truly need to be encrypted. A lot of the times they just don’t. If you did have some important information that you wanted nobody seeing, then it might be a better option to encrypt those individual files instead of using the full drive encryption. And the beauty about that is anyone can do that at any time. If, however, you definitely wanted to have encryption and you wanted to keep Windows 10 Home there are still some things you can do. You’ll want to check out the best third-party tools out there that offer encryption on Windows 10 Home. Microsoft also has a different type of full drive encryption called Windows Device Encryption that you can find on some devices that don’t come with BitLocker, but there are some hardware restrictions which make it hard to know which devices will have it and which ones won’t. Some of them are even available for free. More on that at the bottom of this article. . . .
How to Turn On BitLocker
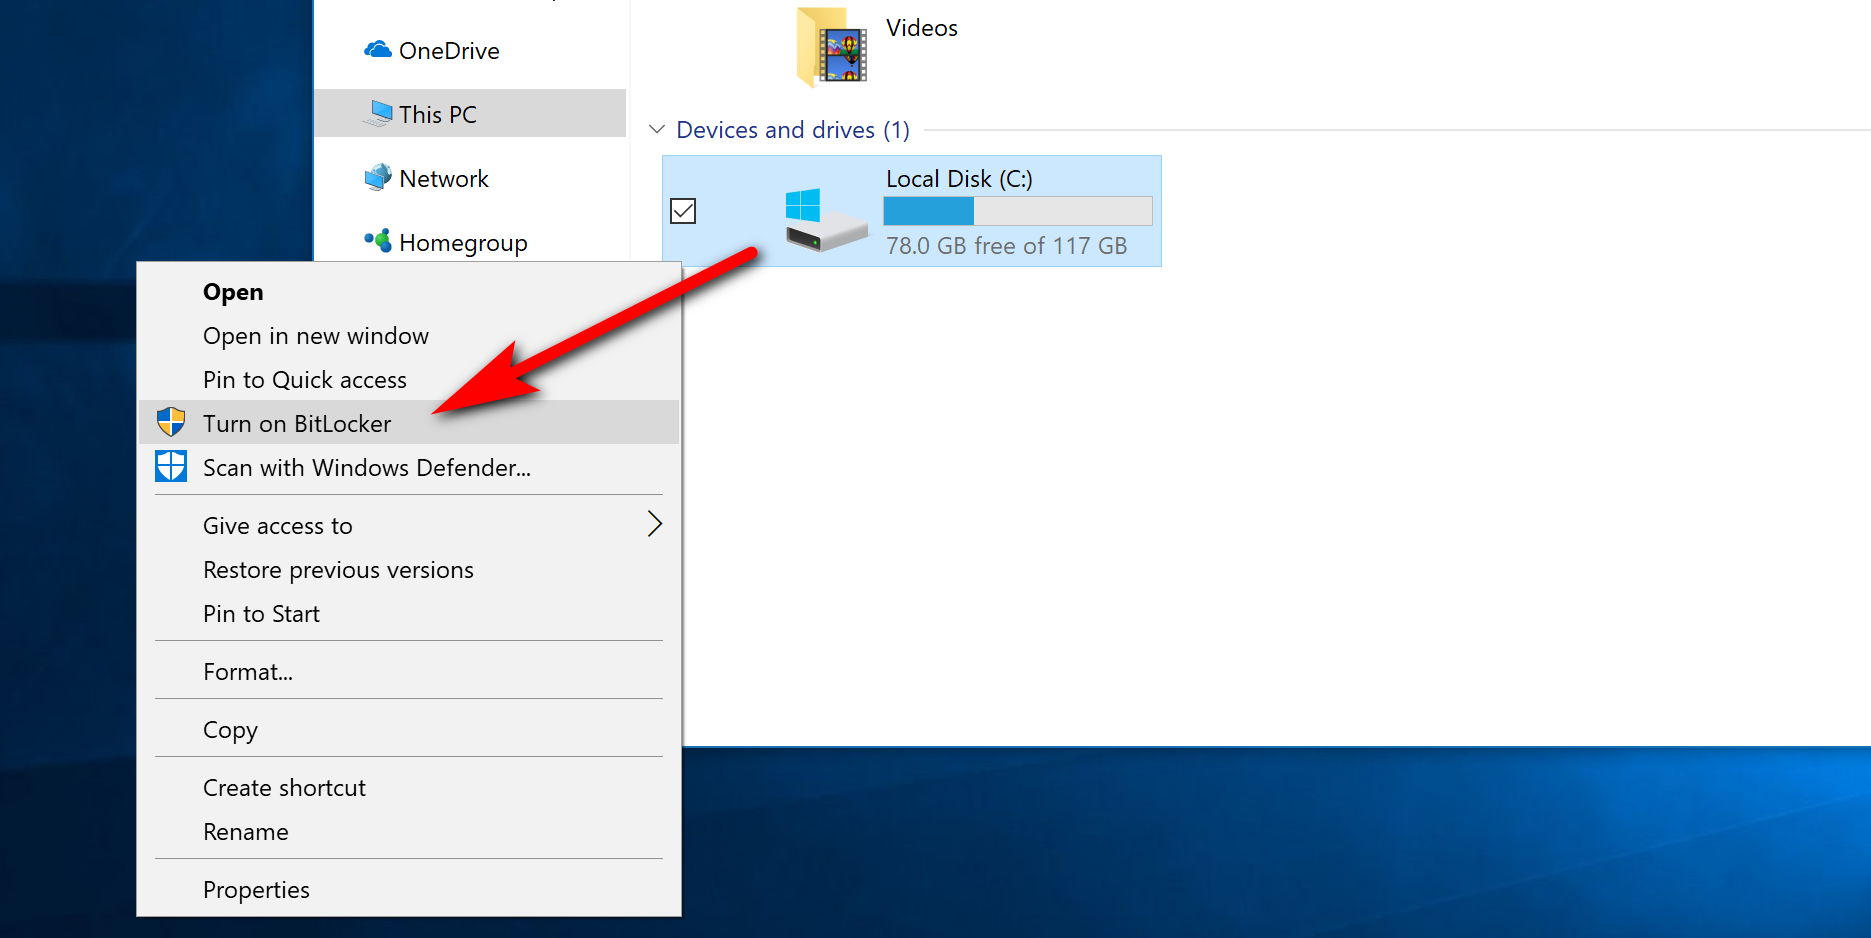
BitLocker is always installed on computers that Microsoft wants it running on, which is from the Windows 10 Pro edition and up. Many of you might find your BitLocker encryption is already turned on by default as Microsoft has shipped many a computer with it turned on already. Not all PCs will have it turned on by default, though—the one I’m writing this on now has it turned off, and yet we haven’t touched it. If you don’t think that yours is turned on or you aren’t sure how to check that it is, you can follow this part of the guide and check it out. Start off by opening up the File Explorer by clicking on the “File Explorer” icon from the taskbar. Now look in the left side pane of File Explorer for the “This PC” link and click on it. You’ll then see the Devices and drives heading in the right side pane, and your local disk will be listed under it. Right-click anywhere on the C: drive Local Disk and then click on the “Turn on BitLocker” link from the context menu.
The one reason why you might want to reconsider not turning on your BitLocker encryption is that you’ll need to make sure you don’t lose the recovery key just in case you need it. The recovery key is a bunch of digits that will be very difficult to crack naturally with your hacking skills should you not be able to come up with it. If you think you can handle it, then choose the way you want to back up your recovery key from the list. We recommend saving it to your Microsoft account. We’ll show you how easy it is to find from your Microsoft account a bit later in the guide.

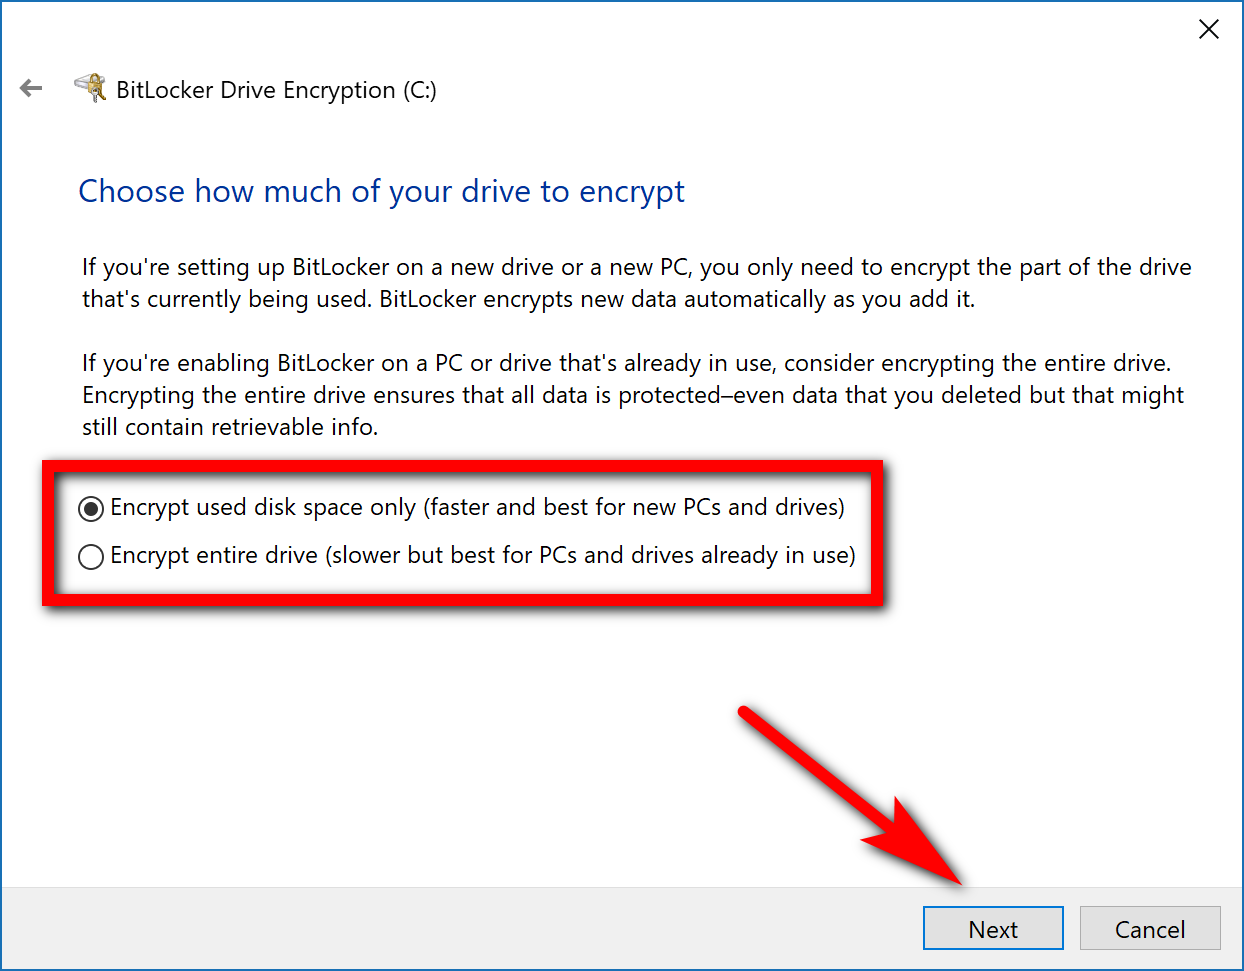
You then get to choose between how much of the drive you want to encrypt: the disk space that is already being used or the entire drive. If you have already owned the computer for a while and have built up quite a lot of stuff on it, you might want to choose the option to encrypt the full drive, but you don’t have to. What should be noted though is that when it says “for new PCs” it isn’t talking about the age of your computer. It is just referring to the fact that computers that aren’t new usually are being used and as such as building up data on the drive.
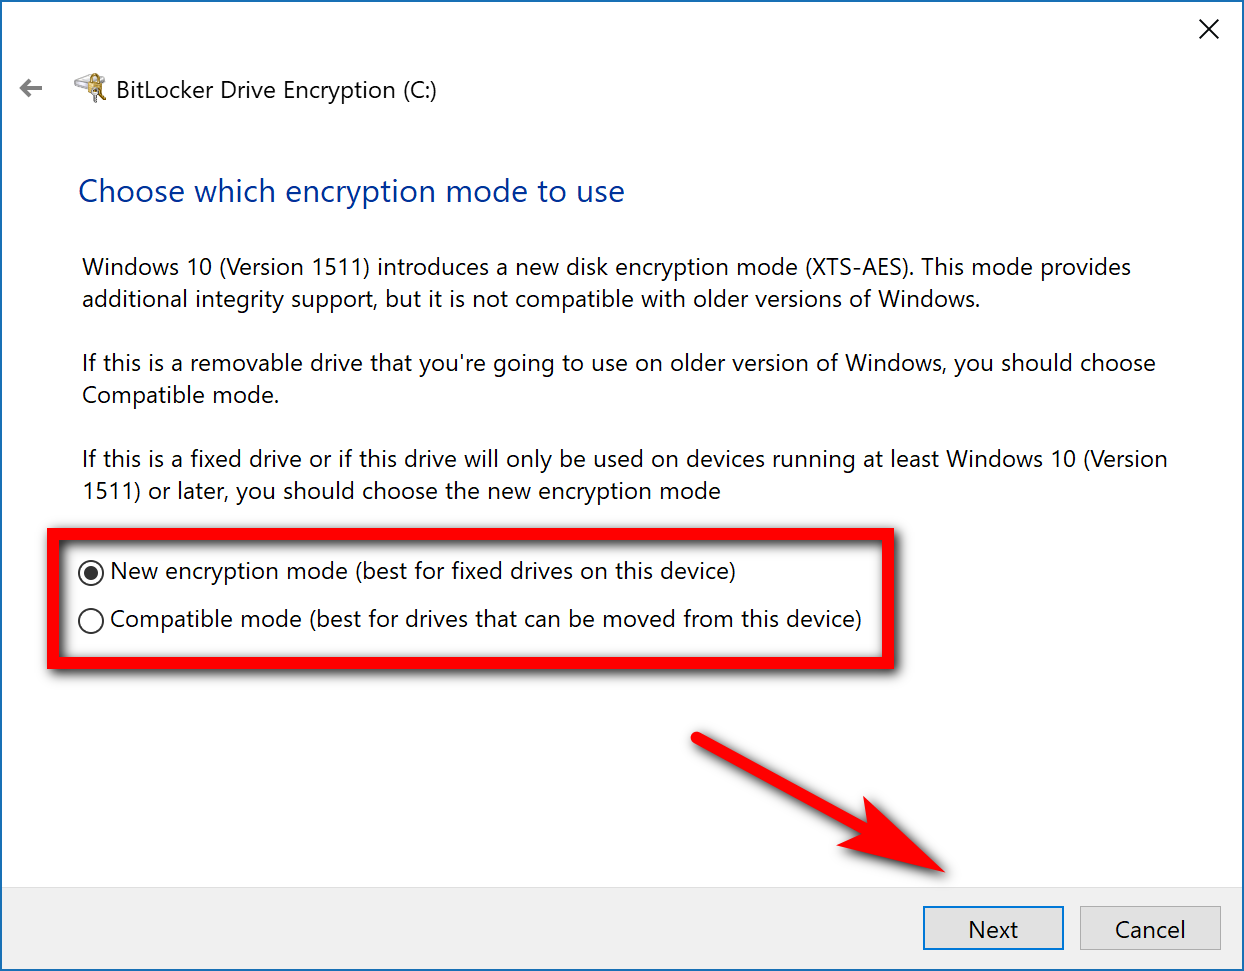
If you’re just using your standard C: drive for the encryption then you can leave it on the “New encryption mode. However, if you have an external drive or something of that nature you might want to choose the “Compatible mode” instead.
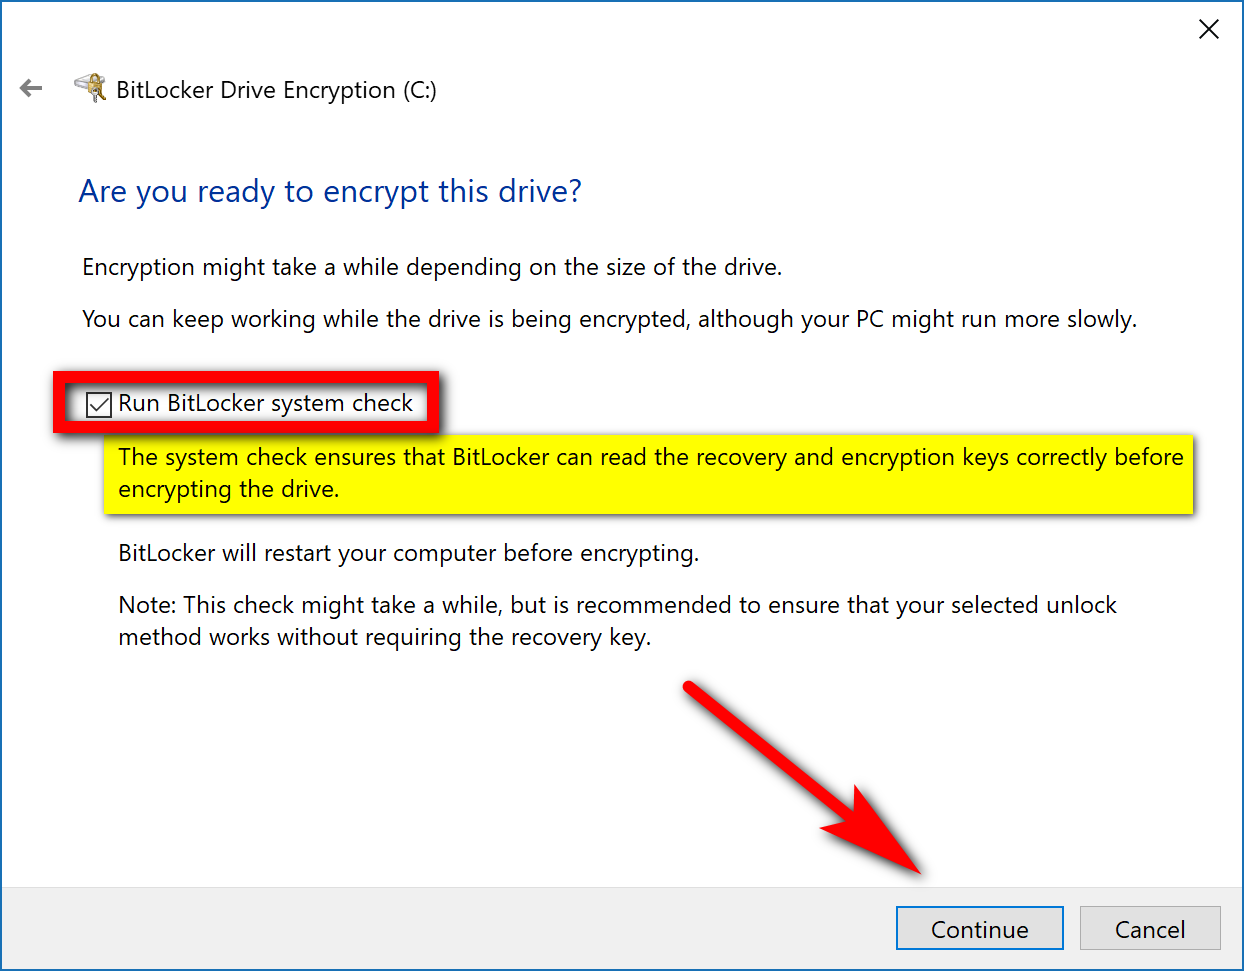
This next one is one of the more essential choices: there’s a checkbox available for running the BitLocker system check, which means it’ll run through things and make sure that it can read the recovery and encryption keys before encrypting the drive. You should check this box and do it unless you are really stretched for time. One gets the feeling that the only reason you have this as an option is that Microsoft was worried about taking too long for some people to be satisfied with their experience. But it’s also definitely a couple of minutes well spent.
It’ll then direct you over to sign in to your Microsoft account. Enter your email and password for the Microsoft account, which is the same password you use for your emails but not necessarily the same password that you use to log in to your Microsoft account. The reason you want to do this part is that it is going to show you your recovery key details.
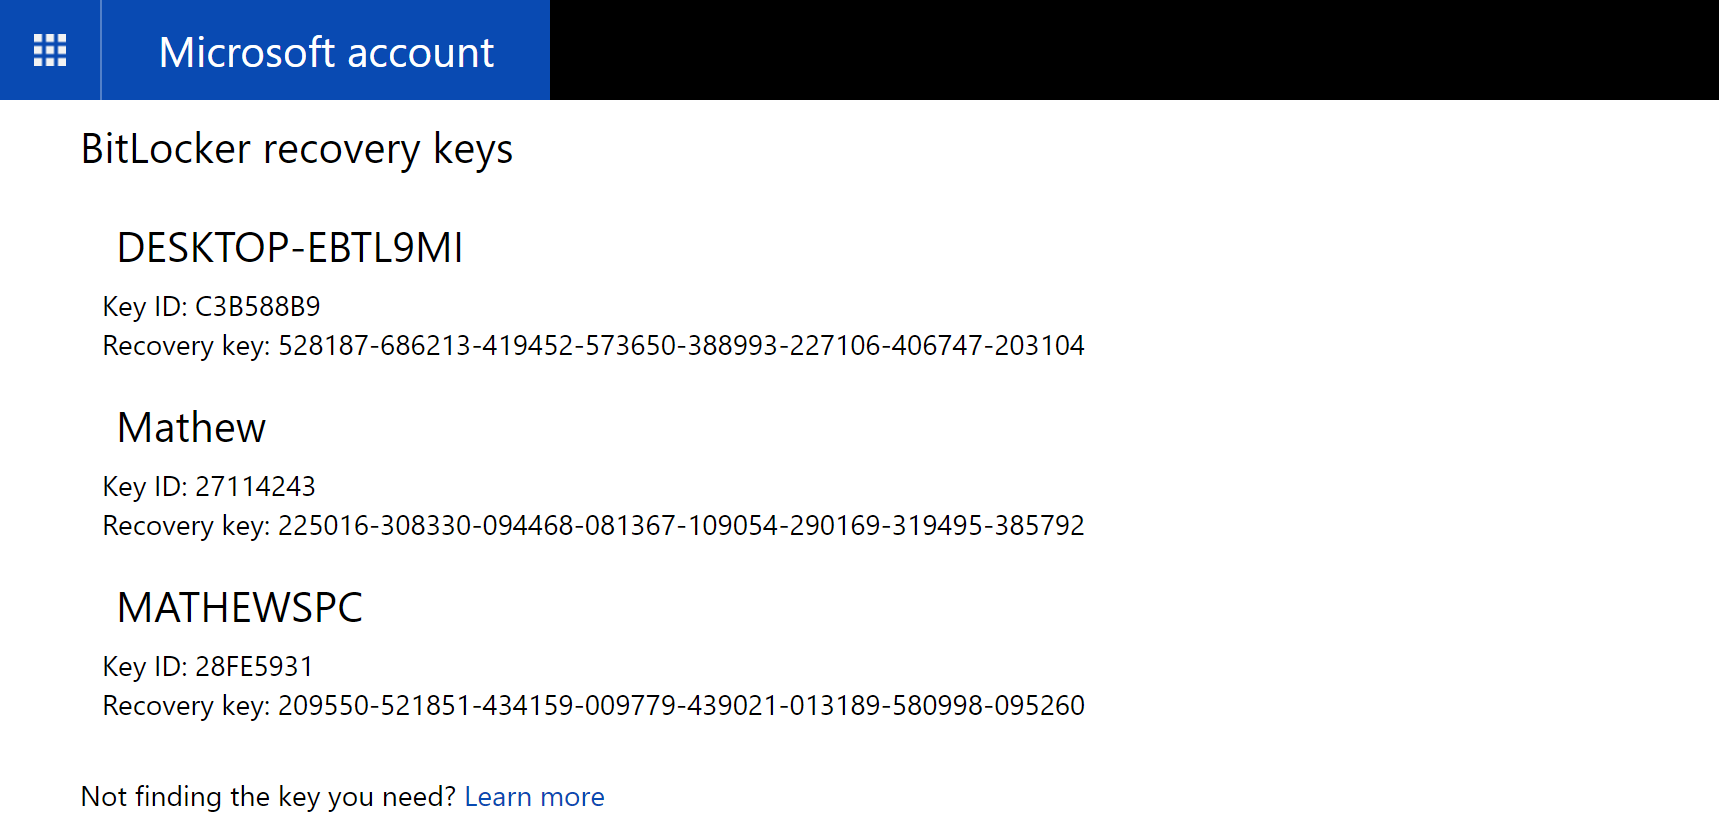
Once you’re in you’ll see the recovery ID for your device. If you have more than one device, then you’ll see each ID listed here, like mine is in the picture below. It’s best to store the direct URL you need to get here somewhere safe—or you could just keep coming back to this article and grabbing it. The URL you need is as follows: https://onedrive.live.com/recoverykey.
How to Turn Off BitLocker
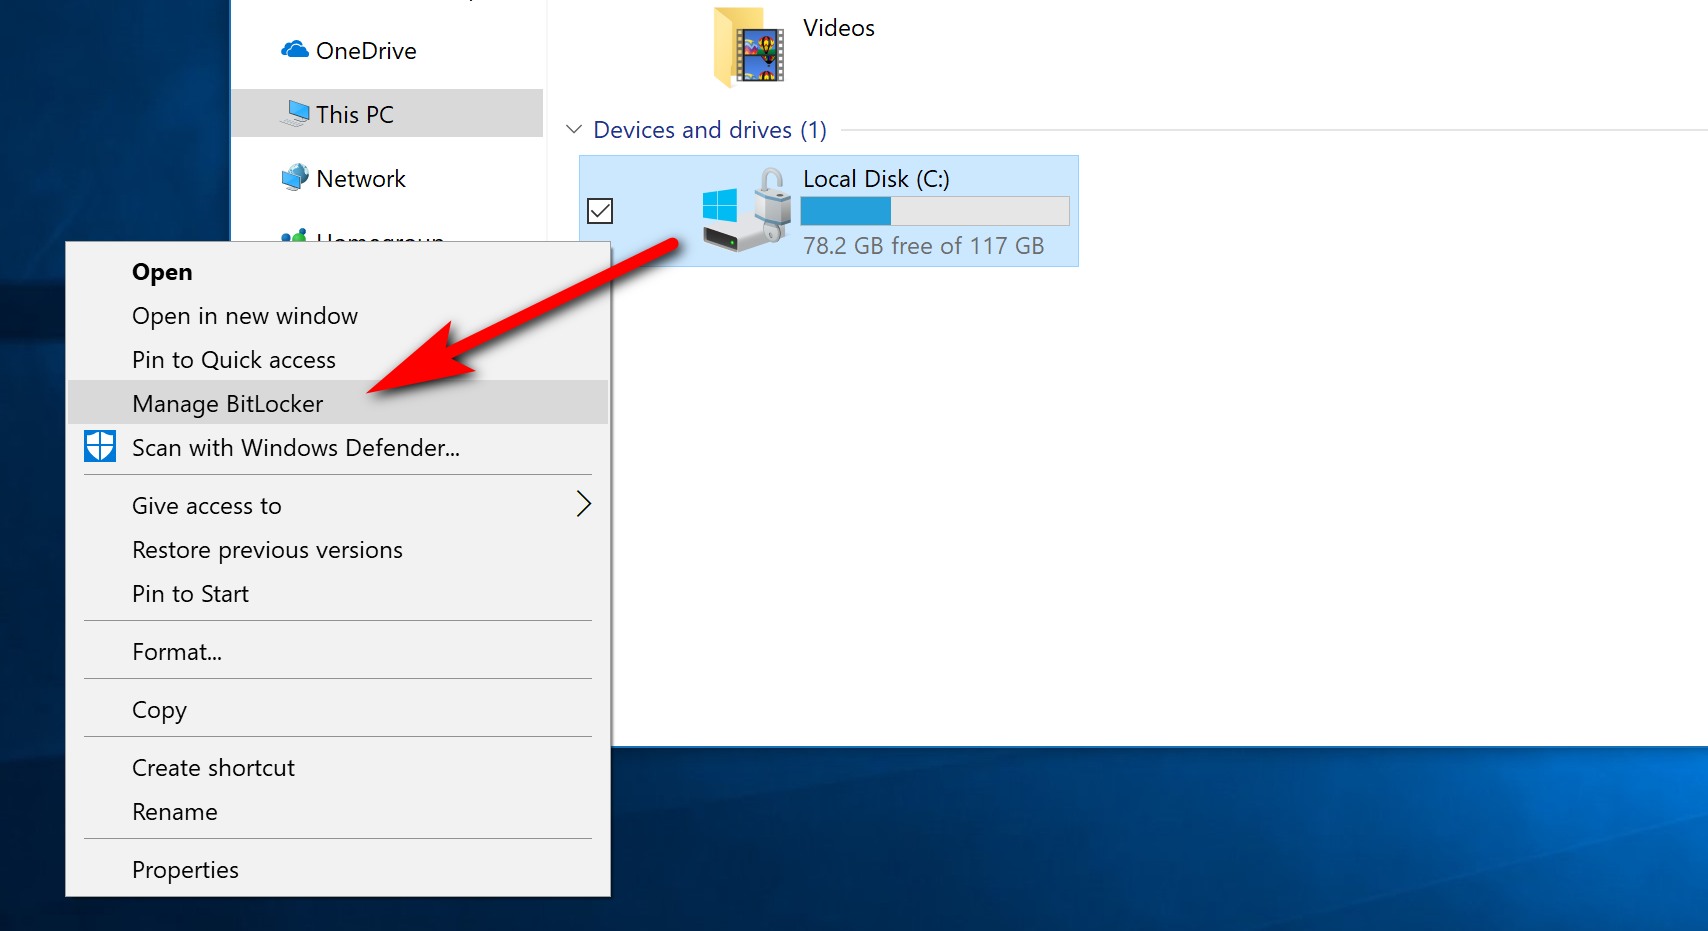
Whenever you want to turn the BitLocker encryption back on again, you can just click on the “File Explorer” icon from the taskbar again; and then click on the “This PC” from the File Explorer left side pane and right-click on the drive to find the “Manage BitLocker” link there from the context menu. When you click it, you’ll then get the chance to turn it off.
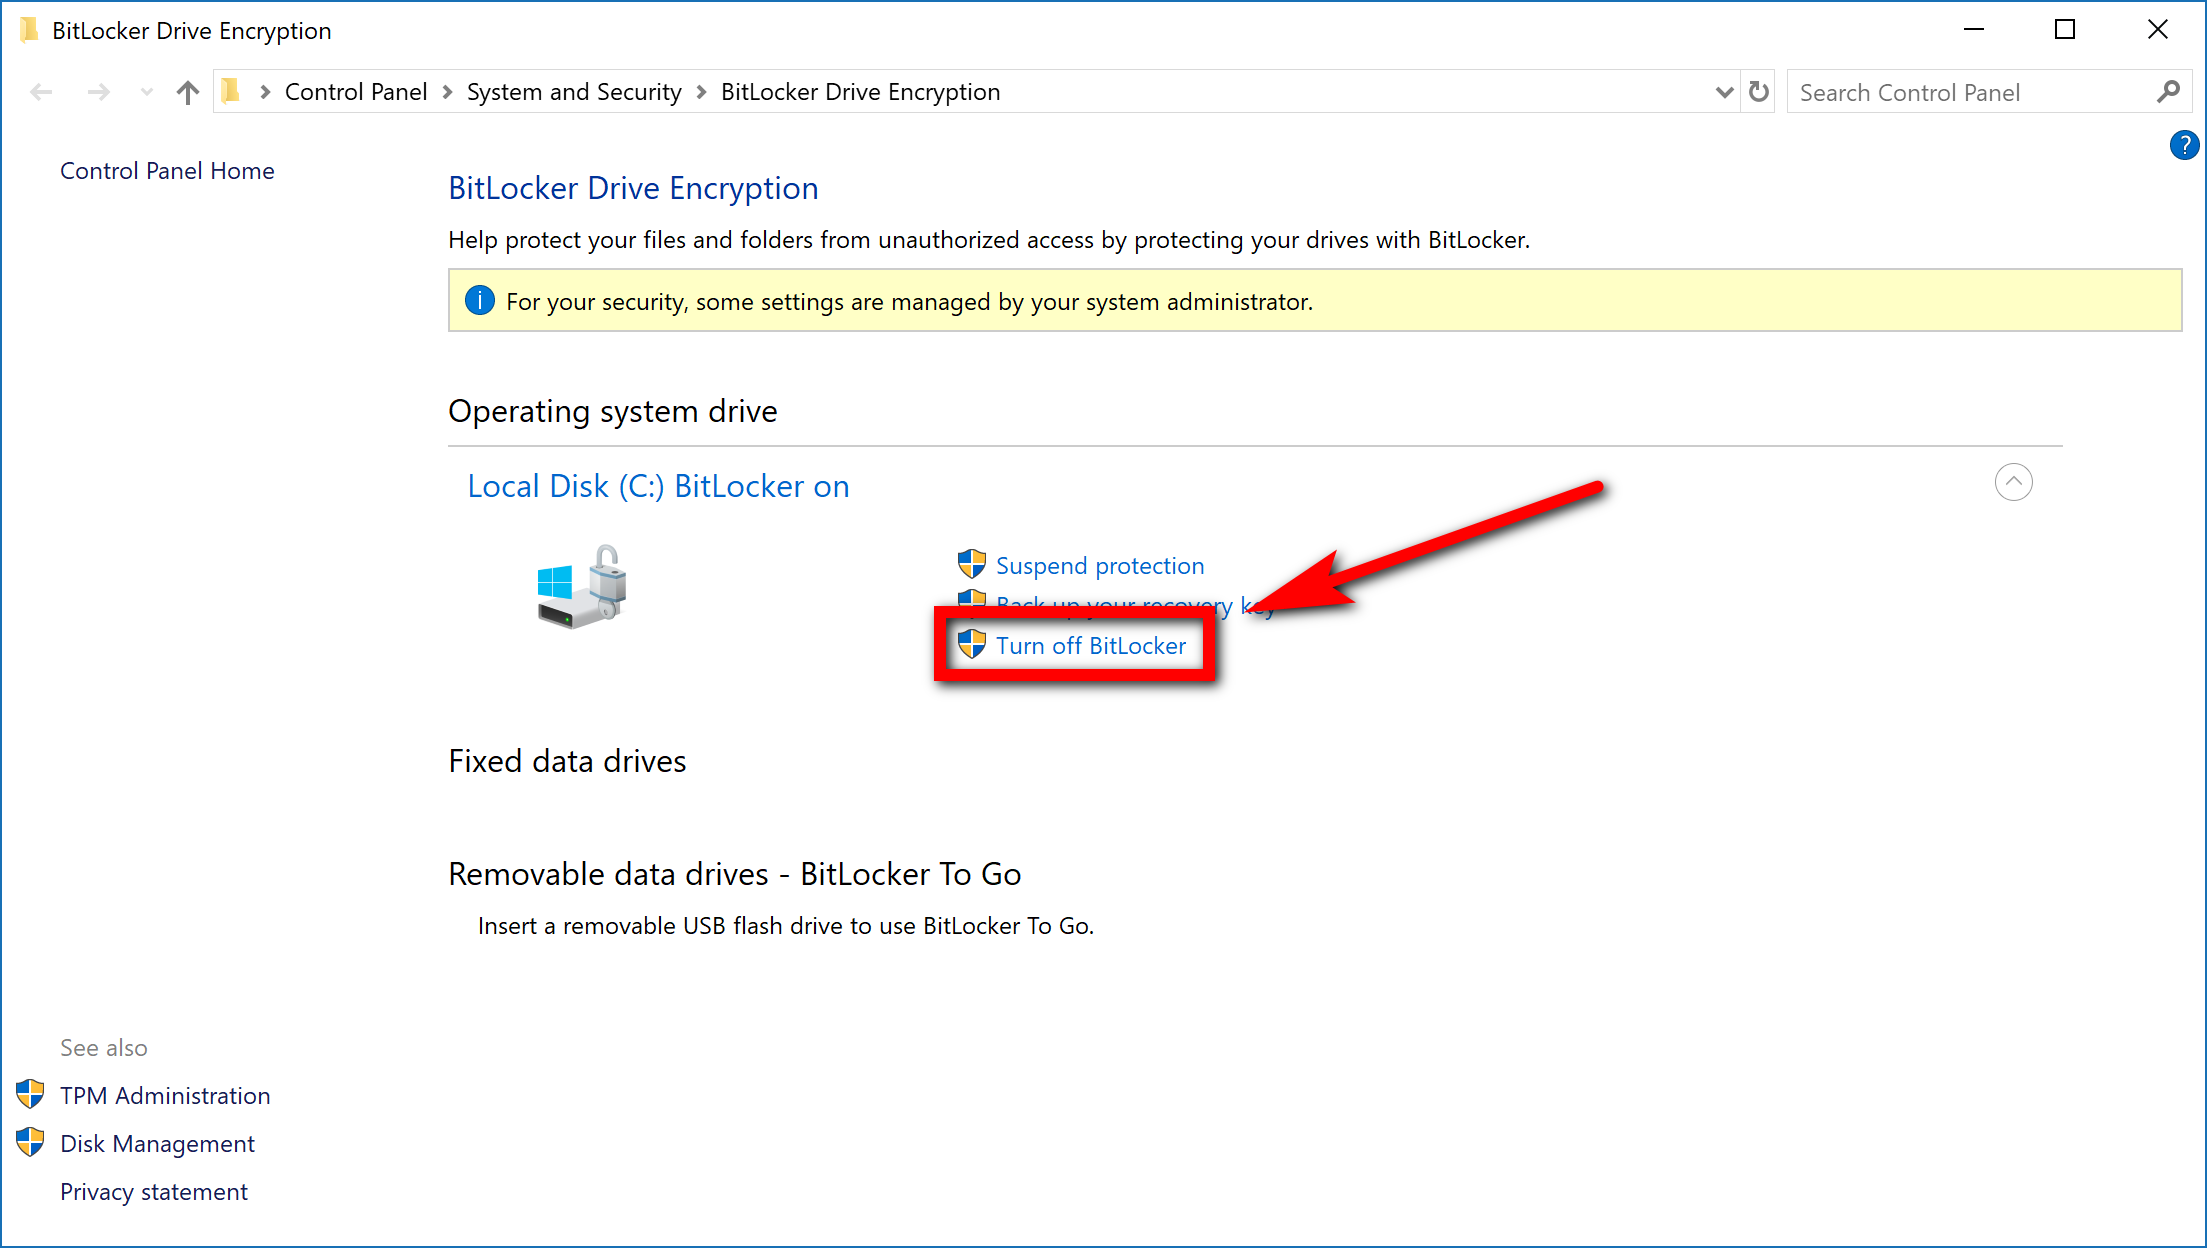
Then looking under the Operating system drive heading for the “turn off BitLocker” link.
BitLocker is turned on by default as long as you have one of the supported editions of Windows 10, which is pretty much all of them except for Home. BitLocker can work on all computers that have a Trusted Platform Module, often referred to as just a TPM. If you were to try to enable BitLocker on a computer without a TPM, you would get a message on your computer’s display letting you know that an administrator would need to set a system policy option. The only way you could bypass that TPM limitation is by using a Group Policy change.
Third-Party Tools for Encryption
“The NSA is out to get me! The NSA is out to get me!” If you were really wanting to make sure those government agents weren’t spying on you, then you could always update your Windows 10 Home to Windows 10 Pro. It’s a quick upgrade that you can get done directly from the Settings application—the only saddish part about it is that it cost so much more money to get it done (about $99 American big ones, in fact). If you don’t have that kind of money laying around, then you can also keep your Windows 10 Home and just check out some other options for encryption outside of the BitLocker. There used to be a pretty popular one called TrueCrypt, but ah, it shut down in rather dramatic fashion a few years ago. If you know someone who had TrueCrypt and got stuck not knowing what to do, you can show them how to migrate their data that is encrypted with TrueCrypt and get it working on BitLocker instead.
You might read about a lot of people still recommending TrueCrypt after the date that it stopped getting developed. The reason for that—at least sometimes—is because of the TrueCrypt 7.1, the latest build released from 2012, is still in theory, safe to use. It won’t be seeing anymore work done to it and the downloads page has been taken down, but it is still reliable for the people who have it. You just might want to make the switch over to something else in the near future, so you don’t get your data stuck in limbo at some point.
If you want something else entirely, you could check out VeraCrypt. It is another encryption software that’s free to use, and it’s based on that same TrueCrypt build that many people are still using but is no longer being developed. At least with VeraCrypt, the developers are continuing to update it which is what you want for the best security and reliability moving forward.
Windows Device Encryption
Ever since Windows 8.1, some computers have shipped with Windows Device Encryption. Entirely separate from BitLocker, Windows Device Encryption offers full disk encryption, and it doesn’t have any restrictions on what type of edition of Windows 10 you are using. This particular encryption won’t be able to run unless your device’s hardware meets certain criteria, though, which makes it a bit of a mystery what devices it is actually running on: generally the more expensive devices with, the better hardware come with BitLocker and it’s uncommon to have good hardware on a device with any of the Windows Home editions. The assumption is that the hardware requirements aren’t all that much and therefore there are more than a few Windows Home operating systems with it running, though we aren’t able to yet come up with the precise information regarding this from Microsoft or anywhere on the web.
There are also some limitations to it which make it not as good an option as BitLocker. For example, you can only have Windows Device Encryption if you use a Microsoft account. As long as you have a Microsoft account, the recovery key gets uploaded to Microsoft’s servers much the same way it does with BitLocker. You then just need to access the URL from any computer to get your recovery key data should you ever need it.
You won’t have anywhere to store the recovery key but on Microsoft’s servers: the BitLocker encryption gives you a few places you can store the recovery key data, but the Windows Device Encryption only gives you the one. If you preferred one of the other methods that weren’t having it attached to a Microsoft account, then you might prefer the BitLocker encryption instead.
If you’re really interested in having a device with encryption, but you know BitLocker is out of your sights, you could ask around for what devices do come with Windows Device Encryption when shopping. BitLocker is the go-to encryption that comes with Windows Professional, so there’s no question that some computers out there are running with Windows Device Encryption—it’s primary purpose was to satisfy users who don’t have BitLocker. It’s just a matter of finding out which ones.
You might also be interested in:
- How to Fix Taskbar Auto-Hide Feature Not Working in Windows 10
- How to Create a Recovery Image to Reset Windows 10
- How to Remove Address Bar White Space in Firefox 57
- How to Disable/Enable Library Highlights in Firefox 57 Quantum
You can subscribe to our RSS, follow us on Twitter or like our Facebook page to keep on consuming more tech.