One of the better features to come out of File Explorer in recent times is the ability to see thumbnail previews. The thumbnail preview makes it easier to identify the images that you are looking for when browsing through folders located in File Explorer because it shows you what the image is without having to click and open it.
With the thumbnail preview you just get a default stock image, which is the equivalent of a basic blue maintain in Windows 10, and lets you know that “this is out stock image we use for everything, and we aren’t showing you what’s in this picture unless you were to open it.”
We complained about some themes out there that you can run on Windows 10 that opted to leave off the thumbnail previews, like the theme that allows you to have wider borders around your windows.
Though we feel Windows is a better experience with thumbnail previews, we’ve also spent quite a bit of time reading around the web, and we know that some people prefer not having thumbnail previews. Some people have their reasons, even if we don’t quite understand them.
Windows 10 makes it possible for everyone to choose whether or not to have the thumbnail previews enabled or disabled. By default they are enabled, and you’ll need to follow the guide below and venture into the Folder Options dialog box to disable them should you wish to do that.
How to Enable or Disable Thumbnail Previews in File Explorer with Folder Options
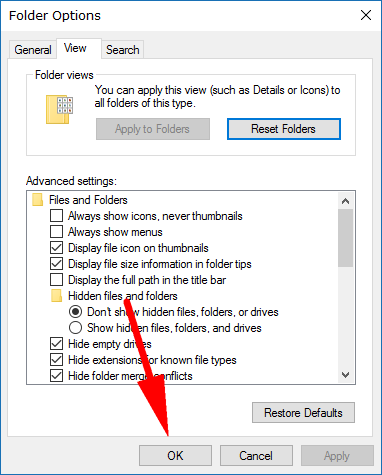
You can enable or disable the thumbnail previews that you get when browsing File Explorer files in Windows 10 by using the Folder Options dialog box. To get there, head to the Start > File Explorer > File > Change folder and search options. You’ll now have the Folder Options box open on your computer screens like in the picture below.
Look for the “Always show icons, never thumbnails” checkbox from the list and choose to enable or disable it as you want. A checkmarked box means that you won’t be seeing the thumbnails any longer.
![]()
Once you’ve made your decision, click on the “OK” button at the bottom of the Folder Options dialog box
How to Enable or Disable Thumbnail Previews in File Explorer with Performance Options
You can also choose to enable or disable the thumbnail previews by using the Visual Effects settings found in the Performance Options dialog box. To do it this way, head to the Control Panel > System > Advanced system settings and you’ll then have the System Properties dialog box open. Click on the “Advanced” tab and then click on the “Settings” button under the “Performance” section and then you’ll have the Performance Options dialog box open just like in the picture below.
With the Performance Options open, look for the “Show thumbnails instead of icons” checkbox and enable or disable it as you see fit. Having a checkmark in the box means that you will get the thumbnails showing up. Don’t forget to click on the “OK” button at the bottom of the Performance Options dialog box to apply and save the changes.
![]()
How to Enable or Disable Thumbnail Previews in File Explorer with Local Group Policy Editor
You can also enable or disable the thumbnail previews from the Group Policy. To make changes to the Group Policy, you’ll need to enter the Local Group Policy Editor and to do that requires you being logged in to a user account that has the administrative permissions assigned to it. The first user account created on a Windows PC always gets the administrative permissions assigned to it, and that admin account can then choose to hand them over to other user accounts as well. If the account you are using now doesn’t have the admin rights given to it, then you’ll need to get access to the first user account created on the computer or any other user account that does. You’ll also need to be using a Windows 10 Pro, Education or Enterprise edition of Windows 10 for this guide to work. You can’t make policy changes in the Local Group Policy Editor using the Windows 10 Home. You can upgrade from Windows 10 Home to Windows 10 Pro by heading to the Settings application if you want to be able to make changes to group policies.
Open the Local Group Policy Editor by pressing the Windows logo + R keys to open the Run dialog box and then type “gpedit.msc” and click on the “OK” button.
Note: refer to the bottom of the article for different methods of opening the Local Group Policy Editor if you don’t want the Group Policy to apply to all users.
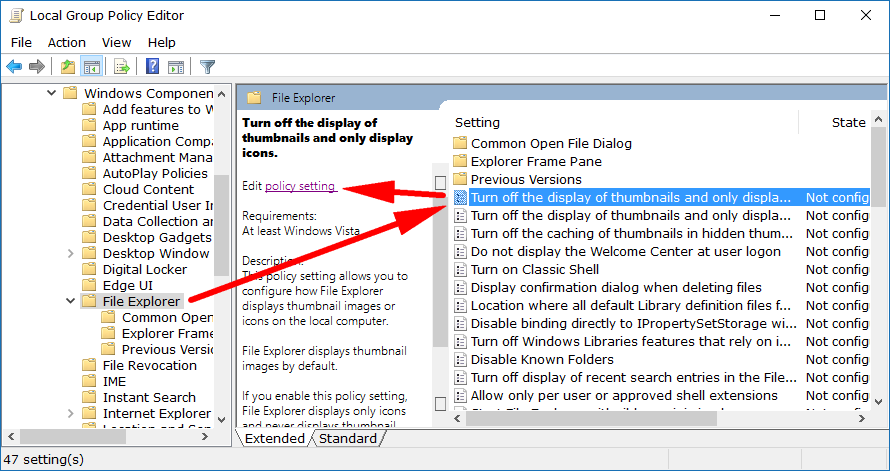
Using the keys in the left side pane, navigate to the User Configuration > Administrative Templates > Windows Components > File Explorer and then look in the right side pane for the “Turn off the display of thumbnails and only display icons.” Highlight it by clicking on it once and then click on the “Edit policy settings” link that appears in the middle column.
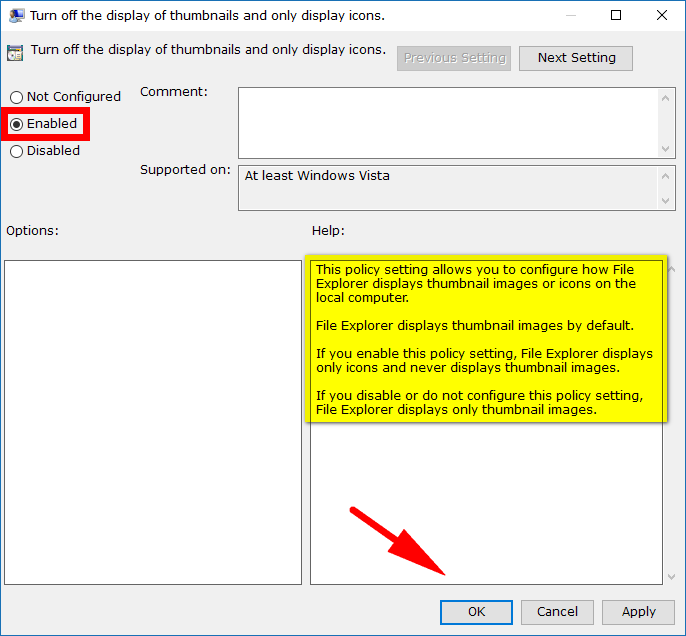
You’ll now have the “Turn off the display of thumbnails and only display icons” policy window open and by default, it’s set to be “Not configured.” Change it over to the “Enabled” option if you want to turn off the thumbnails and put it back to the “Not configured” option if you want to show the thumbnails again. Apply the changes by clicking on the “OK” button available at the bottom of the policy window.
Note: Remember that any changes you make to policies need to be undone by opening up the same policy window again.
Four different types of Group Policies can be applied—administrators only, all users, specific users or groups, or all users except administrators—and the way you do them varies. You’ll still need to be signed in to a user account that has the administrative permissions assigned to it before you can use any of the four options though.
Windows has a Multiple Local Group Policy to help manage computers that are not part of a domain. There are four Local Group Policy Objects (LGPOs) that make up the Multiple Local Group Policy. They are the Local Computer Policy, Administrators Local Group Policy, Non-Administrators Local Group Policy, and a User-Specific Local Group Policy.
All users: The Local Group Policy Editor for all users can be opened by using the Run dialog box, the search field from the taskbar, the Command Prompt and from the PowerShell by using any of the methods available in this guide.
Specific users or groups: The User-Specific LGPO applies user policy settings to specific local users. To do it, you need to press the Windows logo + R keys on your keyboard and then type “MMC” into the field and clicking on the “OK” button. Click “Yes” when prompted by User Account Control. Now in Microsoft Management Console, click on “File,” followed by “Add/Remove snap-in” from the menu. Choose the “Local Group Policy Editor” and click on the “Add” button. From the Select Group Policy Object window, click on the “Browse” button. Next, click on the “Users” tab and then choose the account name from the list, followed by the “OK” button. You’ll then be directed back to the Group Policy Wizard where you can click on the ‘Finish” button.
All non-administrators: The Non-Administrators LGPO applies user policy settings to anyone who is not an administrator/included in a group of administrators. To do it, you need to press the WIndows logo + R keys on your keyboard and then type “MMC” into the field and clicking on the “OK” button. Click “Yes” when prompted by User Account Control. Now in Microsoft Management Console, click on “File,” followed by “Add/Remove snap-in” from the menu. Choose the “Local Group Policy Editor” and click on the “Add” button. From the Select Group Policy Object window, click on the “Browse” button. Next, click on the “Users” tab and then choose the “Non-Administrators” group and click on the “OK” button. Lastly, click on the “Finish” button from the Group Policy Wizard screen.
Administrators: The Administrators LGPO applies policy settings to users who are members of the administrator’s group. To do it, you need to press the Windows logo + R keys on your keyboard and then type “MMC” into the field and clicking on the “OK” button. Click “Yes” when prompted by User Account Control. Now in Microsoft Management Console, click on “File,” followed by “Add/Remove snap-in” from the menu. Choose the “Local Group Policy Editor” and click on the “Add” button. From the Select Group Policy Object window, click on the “Browse” button. Next, click on the “Users” tab and then choose the “Administrators” group and click on the “OK” button. You’ll then be directed back to the Group Policy Wizard where you can click on the “Finish” button.
You might also be interested in:
- How to Add/Remove Network in Navigation Pane of File Explorer in Windows 10
- How to Add/Remove “This PC” in Navigation Pane of File Explorer in Windows 10
- How to Add/Remove File Explorer Default Context Menu in Windows 10
- How to Enable/Disable Numerical Sorting in File Explorer in Windows 10
You can subscribe to our RSS, follow us on Twitter or like our Facebook page to keep on consuming more tech.