Windows 10 makes it much easier to fix issues that you may be having with the operating system. The trick is knowing where to begin trying to diagnose the problem you are having. If the problem seems to be happening not long after you notice a software update, you could try solving the problem by learning what it takes to uninstall that update. The Settings application offers a few good things for that, such as the chance to roll back the recently installed build numbers from the Recovery section of the Settings app, installing Microsoft’s Show or Hide Updates tool from their website, or uninstalling the particular update directly from the Settings app as well. Anything that is related to the hard drive can be fixed by checking the drive for errors. If those options didn’t work out, then you could always try running a scan with your built-in Windows Defender antivirus and see if that helps.
Another feature that Windows 10 has in its arsenal for helping you fix computer problems is System Restore. The System Restore feature has been around for a long time in Windows versions, and it’s hopefully going to remain around for years to come. There’s chatter that Microsoft has plans to get rid of it, partially because it takes up too much disk space and because backing up is now easier and using one of the other methods for recovering or uninstalling is now possible too.
System Restore is a feature that many geeks find useful. It allows you to chose a time when an earlier restore point was made on the computer and then load it so your computer restores that snapshot of the operating system, allowing you to go back in time to before you developed whatever particular problem you were currently suffering from and then starting to use the computer again without the problem. It’s as if you were playing a game, made a mistake then had the chance to rewind to before the mistake was made so you can continue happily playing again, only this time it’s no game—it’s the real operating system you may have been using for your professional life.
How to Enable System Restore in Windows 10 So You Can Start Taking Those Restore Points You Need First
Before you can do a System Restore, you need to make sure that the computer is creating the restore points. Without the restore point being created, there is nothing for the System Restore feature to be restoring. You would assume that Windows 10 was already doing that for you—and it might be. But many computers don’t come with the System Restore feature enabled in Windows 10, which is different from the past when all computers would have it enabled. Part of the reason for that could be due to Microsoft phasing the restore feature out, though Microsoft hasn’t commented precisely why some people have computers creating restore points while others are left having to turn it on. And often when it’s too late because they only found out after the fact that they wanted to do a System Restore—one of the few things I haven’t liked about my personal Windows 10 experience so far.
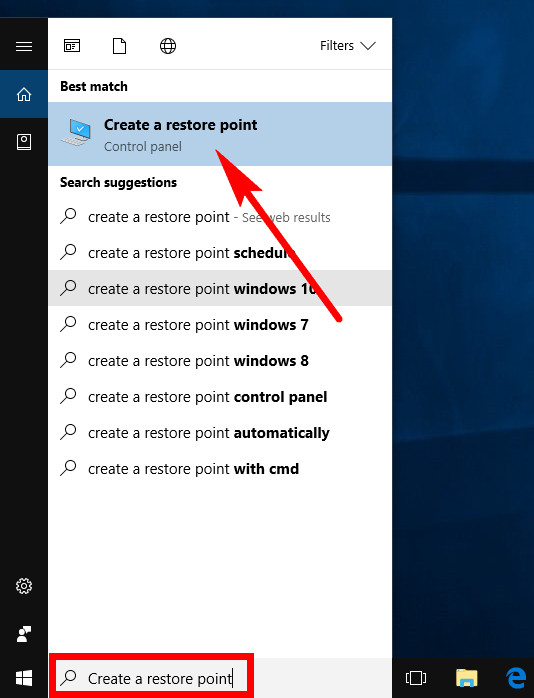
To check whether your Windows 10 OS is taking restore points and to be able to start taking them if it isn’t already, head to the search field that’s located in the taskbar and then start typing “Create a restore point” until the “Create a restore point” from the Control panel option becomes available from under the best match section and then click on it.
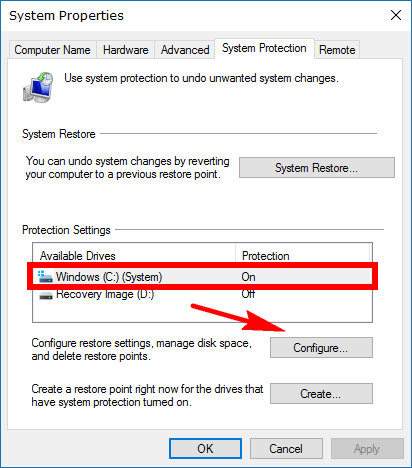
It opens up the System Properties dialog box. Look under the Protection Settings heading in the box, and you’ll see the drives associated with your computer. You can choose to start taking restore points on any of those drives, but the default option is for the C: drive only. So, if the System Restore feature is turned on for your computer already, you’ll see it say “On” under the Protection column next to where it lists the C: drive only. If yours is on already, then you can skip down to the part where you can learn how to do a System Restore because it means your computer is already taking the restore points. If yours says it is off though you’ll need to click on the “Configure” button like shown in the picture below.
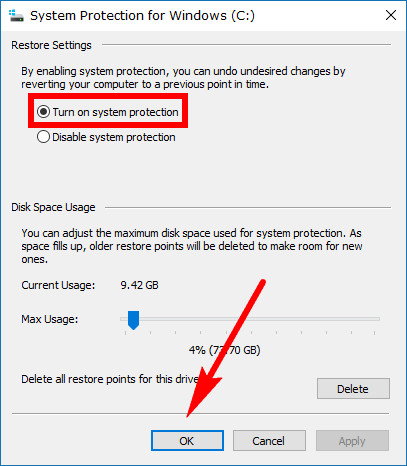
Under the Restore Settings heading, switch it over from the “Disable system protection” to “Turn on system protection” and then click on the “OK” button at the bottom of the System Properties dialog box for the C: drive so that it apply’s the changes and then closes down the dialog box.
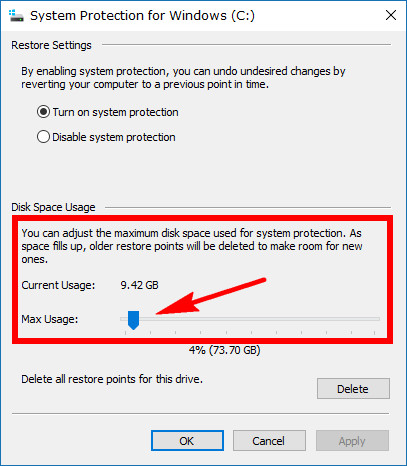
Note: if you wanted to modify the amount of disk usage the System restore feature can use when it takes its restore points, you could do so from within the same System Properties dialog box for the C: drive that you had opened in the step above. The max usage is referring to the amount of space on the hard drive that the restore points can take up. The more space you allocate, the more restore points it will take. The restore points are taken by Windows 10 when it wants to take them/when it feels there is a need for them; you are not in control of them in general–but you do have some control over how much space your drive is using on them, and that control is done from here when you want to use it.
To Do a System Restore of Your Operating System in Windows 10
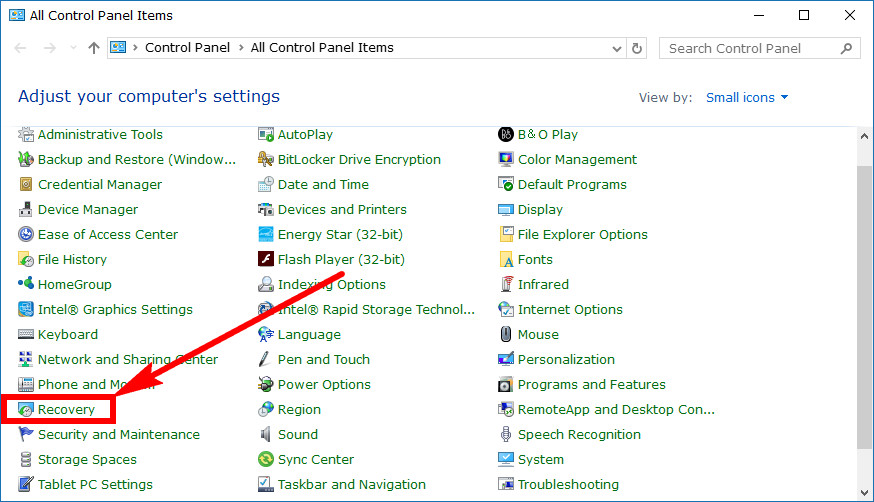
Now that you have the operating system taking restore points, you can get started with doing the System Restores, so you get that older snapshot of the operating system restored which will then hopefully eliminate the problems you face with your computers today. To get started open the Control Panel showing its classic view that has the smaller icons on display, and then click on the “Recovery” link.
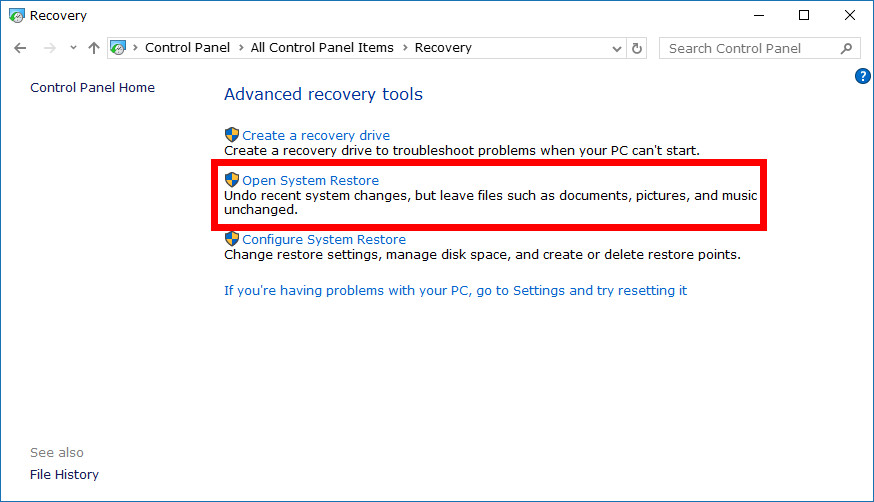
Under the Advanced recovery tools heading, click on the “Open System Restore” link.
You’ll now see what the beginning of the System Restore setup wizard is. Have a quick read of the notes that it gives and then click on the “Next” button at the bottom of the window.

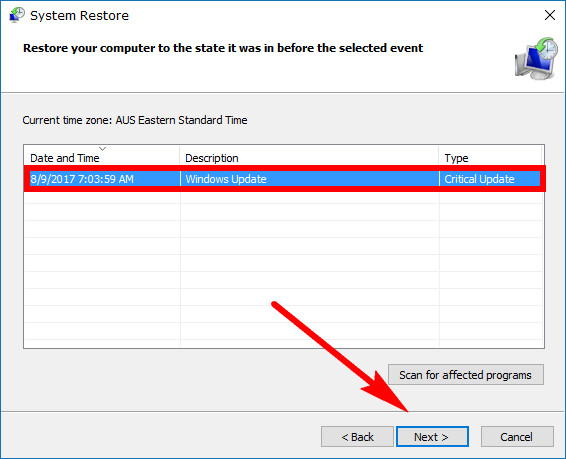
It’s here where you’ll see the complete list of restore points. If you’ve only turned it on recently, so it starts taking restore points, or if you have updated to a new major Windows 10 update like the Creators Update, you might not see many restore points available, like we don’t in the example below. Find the restore point you want to rewind the clock and have restored on the computer (by checking out the date) and then click on the “Next” button when you’re happy with your decision.
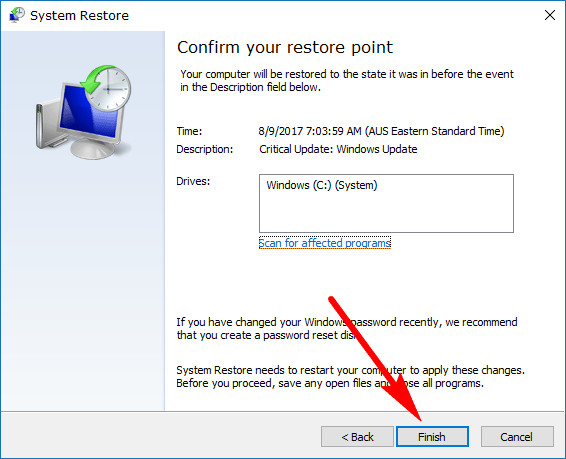
You then have to confirm that you want that particular snapshot that you have chosen to be restored by clicking on the “Finish” button.
If it was up to us, the System Restore feature wouldn’t be leaving Windows operating systems in the future because, frankly, it’s one of the better features they’ve ever come up with. But it’s also understandable that they might want to start making devices that don’t offer much disk space (like a tablet, for example), so they might be left with no choice but to think of other ideas since the restore points can take up a lot of disk space. For now, though, we recommend getting to know how to use the System Restore feature and making use of it whenever you need it. There’s always a chance you continue to use Windows 10 on the current computer you own for a very long time. And it might be a feature you get to keep on using since that desktop or laptop that most of you currently own probably has more than enough space for the restore points to be saved.
You might also be interested in:
- How to Check Drive for Errors in Windows 10
- How to Turn On/Off Sync Settings for Microsoft Account in Windows 10
- How to Turn On/Off Windows Optional Features in Windows 10
- How to Change a Network Profile Name in Windows 10
You can subscribe to our RSS, follow us on Twitter or like our Facebook page to keep on consuming more tech.
September 20, 2018 @ 22:21
Hello,
I needed to use a system restore point the other day. Everything worked well, however when I went to take a look at my drive from File Explorer I had far less space on my hard drive than before. I used to have around 20 GB’s of free space (which is space that I look to keep spare using the 10% rule of thumb to keep the hard drive healthy). So now I’m tucked right up against using almost all of my hard drive space. I heard that is not a good thing because it means it will write the disk more, but that is another story.
So my question is is this normal for using a restore point for it to have used up additional hard drive space and is there anything I can do to delete whatever has occurred?
September 20, 2018 @ 22:22
Hello Mark,
System Restore doesn’t usually use up any extra hard drive space when you restore your computer. It is likely that you’ve made a change to the computer without realizing it. Perhaps you are seeing hidden files.
Could it be that your hard drive had more stuff on it at the point in time that you’re restoring the computer to? That would be my guess.
It might be easier to try using some tools — TreeSize Free, Antibody software, so forth — to find out what is using up your hard drive space rather than trying to work out where your lost hard drive space has ended up. That way you can see what files and folders are using up the most space and possibly deleting the ones that you don’t need.
A word of warning when it comes to deleting files though: there are many files located in File Explorer that your operating system actually needs, so only delete the files that you know are irrelevant to your OS. For example, if you were to uncover an orphaned System Restore folder, then go ahead and delete that. But stay away from other folders unless you know what they are.
September 20, 2018 @ 21:29
Hello,
I have followed your guides in the past for setting up system restore and getting my computer to take restore points, as well as implementing some of those restore points. And all the while never running into any problems at all (apart from missing some apps that I had forgotten about and then undoing the restores).
However I have developed a problem where Windows built-in antivirus is preventing my system restore from working. The message I get from Windows is Windows could not access a file and it’s likely due to antivirus.
September 20, 2018 @ 21:37
Hello Jascha,
There are a couple of things you could try that I can think of.
First of all, if you’re willing, you could disable the antivirus for the time being, then try using the System Restore and see how it goes. You’ll hear everyone say never use a computer without antivirus, but as long as you don’t get bored and start browsing the Web, you should be able to restore your computer with System Restore and avoid any problems with viruses since you aren’t using the Internet or downloading.
The second option would be to use third-party tools that you might already have on your computer to back up a system image. You might have heard about the popular Macrium Reflect before, which we also recommend as a great tool for making system image backups. Windows hasn’t put that much time into developing such features, so third-party options are often better in this area for now.
September 20, 2018 @ 21:20
I used System Restore to restore my computer to an earlier date to get past a problem but I am missing important documents that I had forgotten I would need.
Is it possible to undo the System Restore that I took?
September 20, 2018 @ 21:21
Hello Mark,
Yes, you can undo a System Restore: https://consumingtech.com/undo-a-system-restore-in-windows-10/