There are some not so subtle differences between using a local user account and a Microsoft account, like being able to sign in from only one device or any device right around the world and then there are some subtle differences, like having OneDrive set up for you already and having to set it up manually instead.
If you have a Microsoft account, you’ll already have OneDrive on the computer. You might have noticed the OneDrive icon in the taskbar and wondered how to get rid of it on previous occasions when using your computer. Sometimes people like only to have the minimum amount of processes running as necessary to take the maximum amount of stress away from the hardware (usually people who have been using computers for a long time, back before there were 64-bit processors powering them like they are today), and removing the icon from the taskbar achieves that.
If you are using a local user account, then you’ll get a “Set up OneDrive” pop-up appearing on the screen instead which you would then need to follow before you could use it. OneDrive is a kind of cool file storage website owned and operated by Microsoft that can help make life easier for doing things like uploading photos to the computer from a smartphone for the layman, but not everyone cares for anything that OneDrive offers and would prefer just not to have it instead. It’s super convenient because Microsoft chooses to make it the most convenient since they own both it and Windows—no surprises there.
What’s more, sometimes people do like what file storage startups bring to the table but just don’t have any interested in OneDrive—they might prefer using other services like Google Drive, DropBox or any of the other multimillion-dollar startups that offer a similar service.
Windows 10 doesn’t provide any way to stop seeing the “Set up OneDrive” popup message from the Settings or Control Panel, and it’ll continue to show each time you log in to the local user account and aren’t signed in to OneDrive. It’s probably not high on Microsoft’s priority list to change that since it is doing them a service and advertising their brand each time you see it, in the hopes that maybe, just maybe, one day you change your mind and start using it instead of that other service hardhearted not far up the road in Silicon Valley you currently prefer.
What Microsoft does do is make it possible to remove the “Set up OneDrive” popup message by entering a command into the command line or by making a change to the Local Group Policy Editor. For you to be able to do the latter, you’d need to have an edition of Windows 10 Professional, Enterprise or Education, because the Home edition doesn’t have the Local Group Policy Editor. However, as long as you can log in to an account that has the administrative permissions, you can use the Command Prompt method instead on all editions of Windows 10, including Windows 10 Home.
Note: You’ll need to be using a Windows 10 Pro, Education or Enterprise edition of Windows 10 for this guide to work. You can’t make policy changes in the Local Group Policy Editor using the Windows 10 Home. You can upgrade from Windows 10 Home to Windows 10 Pro by heading to the Settings application if you want to be able to make changes to group policies.
How to Disable “Set Up OneDrive” Popup Message from Local Group Policy Editor
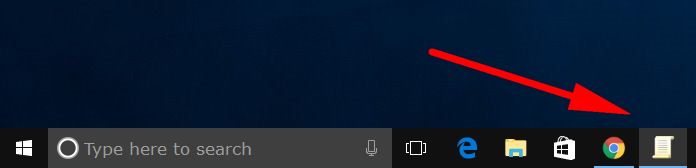
You can disable the “Set up OneDrive” popup message using the Local Group Policy Editor in Windows 10 as long as you don’t have the Home edition. (If you do have the Home edition, refer to the Command prompt method below instead.) To get started, open the Local Group Policy Editor by typing “Gpedit.msc” into the search field in the taksbar at the bottom of your computer’s display and then clicking on the “Gpedit.msc” Microsoft Common Console Document entry at the top of the window that appears.
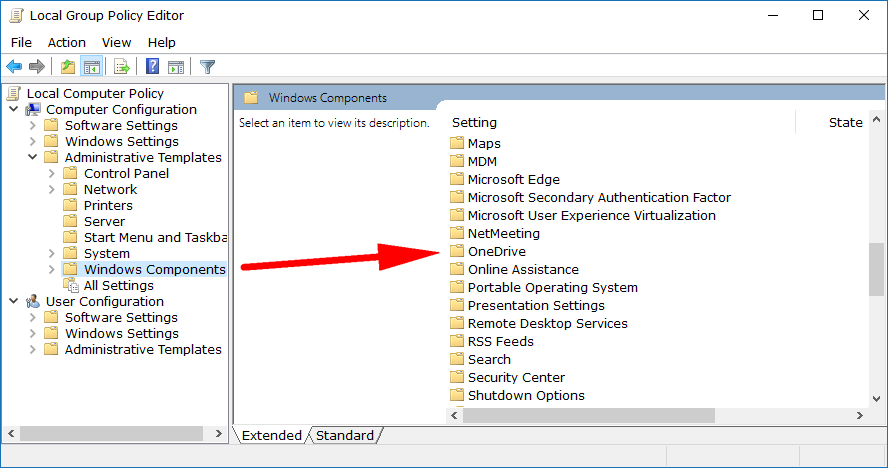
With the Local Group Policy Editor window open, use the left side pane to navigate to the Local Computer Policy > Computer Configuration > Administrative Templates > Windows Components keys and then highlight the “OneDrive” entry by clicking on it once.
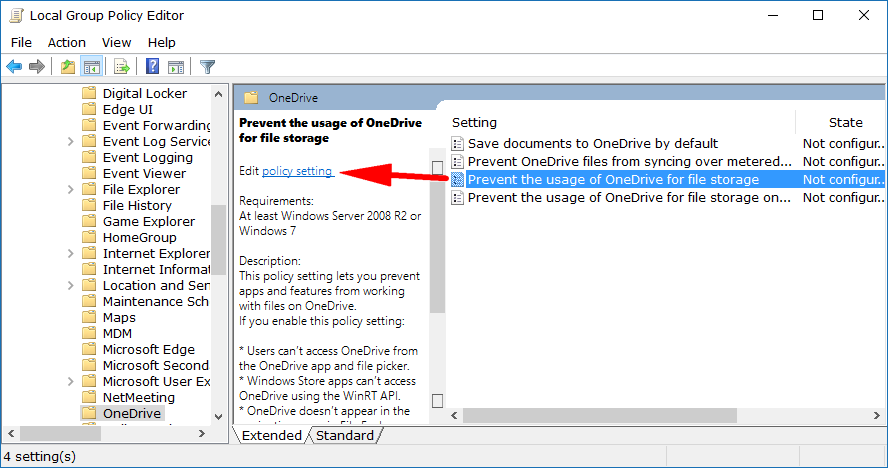
You’ll then see some more information about it in the middle column, and a link that says “Edit policy settings” that you need to click on. (You could also achieve the same thing by double-clicking on the OneDrive entry if you prefer.)
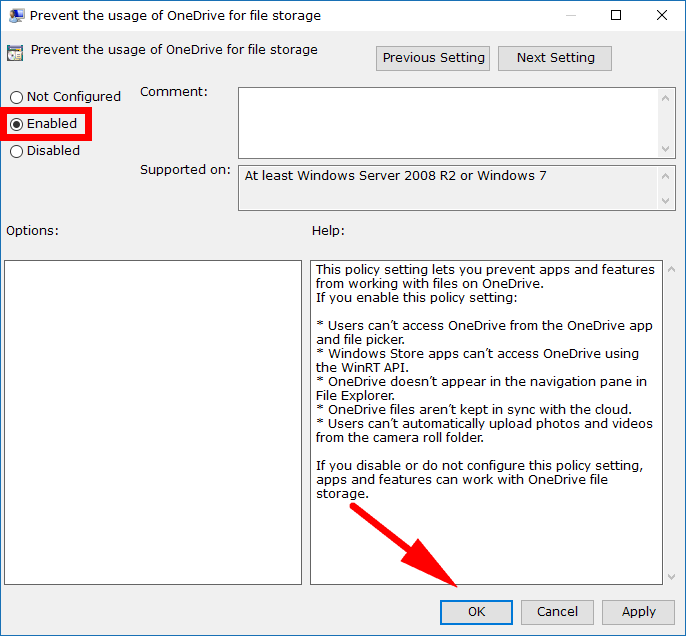
When the “Prevent the usage of OneDrive for file storage” window opens, it’s currently set on the “Not configured” option by default. Swap it over to the “Enabled” checkbox instead by clicking on it. When done click on the “OK” button at the bottom of the window to apply the changes and then close the window.
Four different types of Group Policies can be applied—administrators only, all users, specific users or groups, or all users except administrators—and the way you do them varies. You’ll still need to be signed in to a user account that has the administrative permissions assigned to it before you can use any of the four options though.
Windows has a Multiple Local Group Policy to help manage computers that are not part of a domain. There are four Local Group Policy Objects (LGPOs) that make up the Multiple Local Group Policy. They are the Local Computer Policy, Administrators Local Group Policy, Non-Administrators Local Group Policy, and a User-Specific Local Group Policy.
All users: The Local Group Policy Editor for all users can be opened by using the Run dialog box, the search field from the taskbar, the Command Prompt and from the PowerShell by using any of the methods available in this guide.
Specific users or groups: The User-Specific LGPO applies user policy settings to specific local users. To do it, you need to press the Windows logo + R keys on your keyboard and then type “MMC” into the field and clicking on the “OK” button. Click “Yes” when prompted by User Account Control. Now in Microsoft Management Console, click on “File,” followed by “Add/Remove snap-in” from the menu. Choose the “Local Group Policy Editor” and click on the “Add” button. From the Select Group Policy Object window, click on the “Browse” button. Next, click on the “Users” tab and then choose the account name from the list, followed by the “OK” button. You’ll then be directed back to the Group Policy Wizard where you can click on the ‘Finish” button.
All non-administrators: The Non-Administrators LGPO applies user policy settings to anyone who is not an administrator/included in a group of administrators. To do it, you need to press the WIndows logo + R keys on your keyboard and then type “MMC” into the field and clicking on the “OK” button. Click “Yes” when prompted by User Account Control. Now in Microsoft Management Console, click on “File,” followed by “Add/Remove snap-in” from the menu. Choose the “Local Group Policy Editor” and click on the “Add” button. From the Select Group Policy Object window, click on the “Browse” button. Next, click on the “Users” tab and then choose the “Non-Administrators” group and click on the “OK” button. Lastly, click on the “Finish” button from the Group Policy Wizard screen.
Administrators: The Administrators LGPO applies policy settings to users who are members of the administrator’s group. To do it, you need to press the Windows logo + R keys on your keyboard and then type “MMC” into the field and clicking on the “OK” button. Click “Yes” when prompted by User Account Control. Now in Microsoft Management Console, click on “File,” followed by “Add/Remove snap-in” from the menu. Choose the “Local Group Policy Editor” and click on the “Add” button. From the Select Group Policy Object window, click on the “Browse” button. Next, click on the “Users” tab and then choose the “Administrators” group and click on the “OK” button. You’ll then be directed back to the Group Policy Wizard where you can click on the “Finish” button.
The changes have now been applied, and you won’t have any OneDrive messages pestering you when you log in to your user accounts anymore.
How to Disable “Set Up OneDrive” Popup Message Using Command Prompt
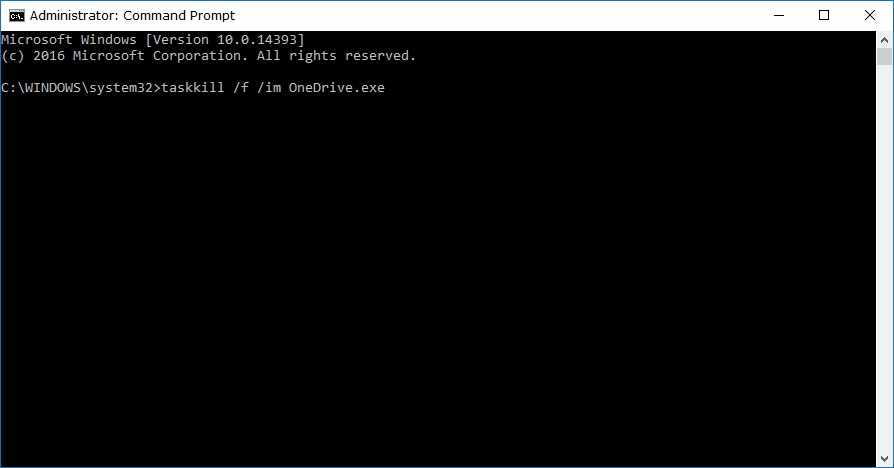
You can also get OneDrive to stop displaying the “Set Up OneDrive” popup message by using the elevated Command Prompt in Windows 10 and is the go-to method for anyone who only has the Windows 10 Home edition of the operating system. However, it’s also possible to use this method on any other edition of Windows 10 as well. Start by typing “CMD” into the search field in the taskbar at the bottom of your computer’s display and then right-click the mouse on the “Command prompt” Desktop app entry and choose to “Run as administrator” from the menu.
You’ll then have the “Administrator: Command Prompt” window open. Now type the taskkill /f /im OneDrive.exe command and hit the Enter key on your keyboard to kill any existing OneDrive processes from running if there are any.
It doesn’t matter if Windows managed to kill the OneDrive process or if there weren’t any found, as long as there isn’t one running still. Now type the %SystemRoot%\SysWOW64\OneDriveSetup.exe /uninstall command and hit the Enter key on your keyboard to execute the command that uninstalls the OneDrive setup.
Note: You’ll need to swap over the “64” part of the command with “32” if you have a computer that is running on a 32-bit processor and not a 64-bit processor. The simplest way to tell that is just by knowing the age of your computer. If you are using anything made in the last decade, then it’s probably a 64-bit processor. Windows 10 also offers something more formal if you wanted to really find out how to see if you are running 32-Bit (x86) or 64-Bit (x64) architecture of Windows 10.

Those are both of the ways for you to stop the unwanted “Set Up OneDrive” popup message from appearing when you use your accounts on a version of the Windows 10 operating system. You have removed OneDrive from the computer entirely, so the process no longer runs. You’d need to reinstall it again later if you wanted to start using it. You can do that by visiting the Microsoft Store and downloading the application or by opening the Local Group Policy Editor and putting the settings back to the “Not configured” position.
You might also be interested in:
- How to Show/Hide Pop-Up Description for Folders and Desktop Items in Windows 10
- How to Show Encrypted or Compressed NTFS Files in Color in Windows 10
- How to Change Storage Save Locations in Windows 10
- How to Reset/Restore Power Plans to Default Settings in Windows 10
You can subscribe to our RSS, follow us on Twitter or like our Facebook page to keep on consuming more tech.