The “Console lock display off timeout” setting is the time the computer remains turned on after you have logged out and the computer is locked before it turns off the display.
The Windows 10 operating system gives you a lot of choices for how you want to manage your computer’s hardware. It’s a good thing they do because the more hours you clock up with the hardware, the more likely it is to need replacing eventually.
There are two different sleep settings in Windows 10. One of them is how long the computer waits before turning the display off, and the other is how long before the computer puts itself into a lower powered state. The latter is the one you want to look at to really preserve hardware, but turning the screen off can also be beneficial to the display, if nothing more.
The following tutorial demonstrates how to change the “Console lock display off timeout” settings when you’re using a version of the Windows 10 operating system.
Notes:
- The changes you make to the “Console lock display off timeout” settings will be applied for all users on the same computer that are assigned the same power plan.
- The changes you make to the “Console lock display off timeout” settings will only be applied on the computer that you’re currently locking.
Method One: How to Change “Console lock display off timeout” in Power Options
Here is how you can change the lock screen timeout period from the Power Options dialog in Windows 10:
1. To Add “Console lock display off timeout” from Command Prompt
a. Open the elevated Command Prompt.
b. Type the following command into the command line and then press the Enter key on your keyboard to execute it:
powercfg -attributes SUB_VIDEO 8EC4B3A5-6868-48c2-BE75-4F3044BE88A7 -ATTRIB_HIDE
2. To Add “Console lock display off timeout” from Registry Editor
a. Open the Registry Editor by typing Regedit into Search and clicking on the Registry Editor app from the list of results, or by opening Run by pressing <Win>+<R> and typing Regedit into Run and clicking the OK button.
b. Using the Registry Editor’s left pane, navigate through to the following keys:
HKEY_LOCAL_MACHINE\SYSTEM\CurrentControlSet\Control\Power\PowerSettings\7516b95f-f776-4464-8c53-06167f40cc99\8EC4B3A5-6868-48c2-BE75-4F3044BE88A7
c. Double-click on the 8EC4B3A5-6868-48c2-BE75-4F3044BE88A7 string value in the right pane to change its DWORD value.
d. In the Value data field, enter 2 and then click on the OK button to save the changes.
3. Open the advanced power settings of your current power plan by navigating to the following:
Start menu > Settings > System > Power & Sleep > Additional power settings > Change plan settings > Change advanced power settings
4. Click on the Display entry to expand it, and then click on the Console lock display off timeout settings and adjust the time to how many minutes you want to have before the screen turns off when the computer is locked.
Notes:
- The default time is set to be 1 minute
- You can enter 0 minutes to make the computer always stay on if you don’t want it to turn off at all
You can now close the Power Options dialog and the Command prompt window and continue using your computer if you like.
How to Add or Remove “Console lock display off timeout” in Power Options from Command Prompt
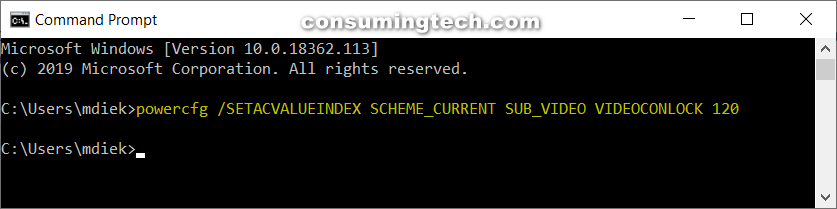
Here is how you can change the lock screen timeout period from the Command Prompt in Windows 10:
2. Type one of the following commands into the command line, depending on which one it is that you want to use, and then press the Enter key on your keyboard to execute it.
Notes:
- Change where it says for the real number of seconds that you want to use.
- The default time is 60 seconds.
- You can enter 0 minutes to make the computer always stay on if you don’t want it to turn off at all
Laptop on Battery Power:
powercfg /SETDCVALUEINDEX SCHEME_CURRENT SUB_VIDEO VIDEOCONLOCK <seconds>
Computer Plugged in:
powercfg /SETACVALUEINDEX SCHEME_CURRENT SUB_VIDEO VIDEOCONLOCK <seconds>
That’s all.