Windows 10 includes many different backup and recovery tools. We won’t run through them all here in detail, but the list includes File History, Backup and Restore (Windows 7), OneDrive, and System Images for backing up, plus System Restore, Advanced Startup Options, Recovery Drive Creator, and Reset This PC for the recovery side of things.
The list is an extensive one and is about as much as anyone could ask for out of Windows. The problem, if there were to be one, would be that some of the tools aren’t that great. From what we can gather, it doesn’t appear as though Microsoft has developed their system image backup part of the Backup and Restore feature that came over from Windows 7, and as such, taking the system image backups using this tool isn’t as good as it might have been. Plenty of third party developers have capitalized on creating businesses for themselves that purely focus on creating better system image backups that what Microsoft has on offer in Windows 10.
Macrium Reflect
Insert Macrium Reflect: probably the best of the bunch when it comes to third-party programs available out there for taking system image backups, and, without question, better than what Microsoft offers at the moment.
System Image Backups vs. Regular Backups
When you use the built-in Backup and Restore tool available from the Windows 10 Settings application, it’ll give you the option to choose between letting Windows choose what needs backing up or for you to choose only the parts you want backed up. When you opt for choosing what to back up manually yourself, you’ll see different checkboxes available to backup your stuff and then another checkbox underneath the others for choosing whether or not you want it to be backing up the system image as well.
If you choose to take the system image snapshot, then you can expect the backup to take up a considerable amount of more space. That’s because a system image is taking a snapshot of the entire operating system and is the ultimate way to take backups, so you get absolutely everything back the exact same way it was when you restore the computer. Nothing will be missing from the backup at all.
It’s best to take system image backups with an external hard drive and not just expect to fit it all on a USB thumb drive for that reason. A regular backup, on the other hand, can still take up lots of space but will mainly just copy the files only—like the stuff you have in your File Explorer libraries, for example.
Thus the advantage you have when choosing to backup a system image comes mainly from any customizations you might have made. You’ll get all those setup changes being backed up and restored later when you choose to restore the system image backup. With the regular backup, you won’t. Regular backups are aimed at protecting you when you lose data, such as files you might have added—like any of your documents you might have created in Microsoft Word, for example. Regular backups won’t help you restore all the things you’ve changed around the operating system.
A heck of a lot of users out there don’t make any changes to the Windows operating system and wouldn’t even have a clue what we are talking about when we say “customizing the operating system” and perhaps don’t even know it’s possible to do things like move the tiles around from the Start menu to better suit their needs. So choosing what option to take when backing up will come down to how much space you want that backup to take and whether or not you’ve done customizing since you started using it and whether or not you are willing to risk those changes you’ve made to the system—if there are any.
Other System Image Advantages
- A system image backup is also incredibly useful if you runt two different versions of the Windows operating system—say, one version on one partition and another version on another partition—because it’ll back both operating system versions up. That means you can run an older version of Windows like Windows 7 and newer versions such as Windows 10 from different partitions and back both operating systems up with a single system image backup.
- The Backup and Restore tool that Windows 10 offers (that is the same as the one from Windows 7) will save the system image on the root of the external hard drive that you are using for the backup. When you choose to take another system image backup a second time, instead of just using up more space, it automatically overrides the first system image backup; thus you won’t be using up quite as much space as you might have thought when you take system image backups. There’s no real reason to be taking more than one of them at a time, and Windows knows this, so it helps you out by saving the space. Any extra data from the system image backup will be carried over and use the amount of more space required for the backup while if the second backup is less space, then you’ll get that space back again from the remaining left over.
- System image backups can only be taken if you are formatting with NTFS. It will not work if you have the FAT format. While not ideal, there are ways you can switch your formatting over from FAT to NTFS if you need to, instead of buying another hard drive entirely. Switching from FAT to NTFS or vice versa is not the simplest thing in the world to do, and many people who prefer just buying the different hard drive that’s formatted correctly because it will take them too long to work out how to do it, but the option is there if you need it.
- Even if you wanted to take a system image backup on a flash drive because you think you have enough space with your large flash storage, it just isn’t possible to do. If you desperately want the system image backed up to the thumb drive/flash drive, you can take the system image backup using the external hard drive and then copy it over to the flash storage later. In other words, it will copy to the flash storage, but it just won’t take the system image backup to that location by itself.
How to Backup and Restore System Images Using Control Panel
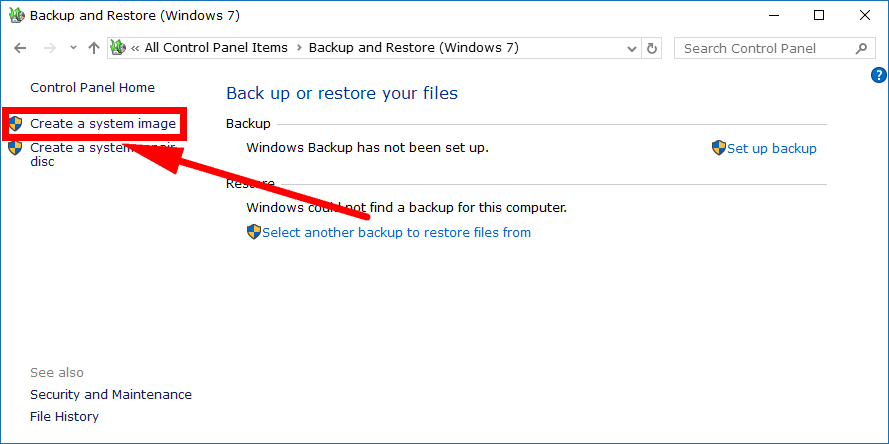
You can backup and restore system images by using the Control Panel in Windows 10. To get started, open the Control Panel so it is showing in its classic view from small icons and then click on the “Backup and restore (Windows 7)” link from the list of all Control Panel items.

You’ll then see the “Create a system image” link available from the left side of the next window that you need to click.
It’ll take a few moments to search for backup devices. That’s meaning that it is trying to locate anything you can connect to the computer for the backup, such as your external hard drive. Connect the external hard drive to the computer now so it can find it. Otherwise, insert the DVD or just let it load if you wanted to backup to the existing hard disk itself that’s already on the computer.

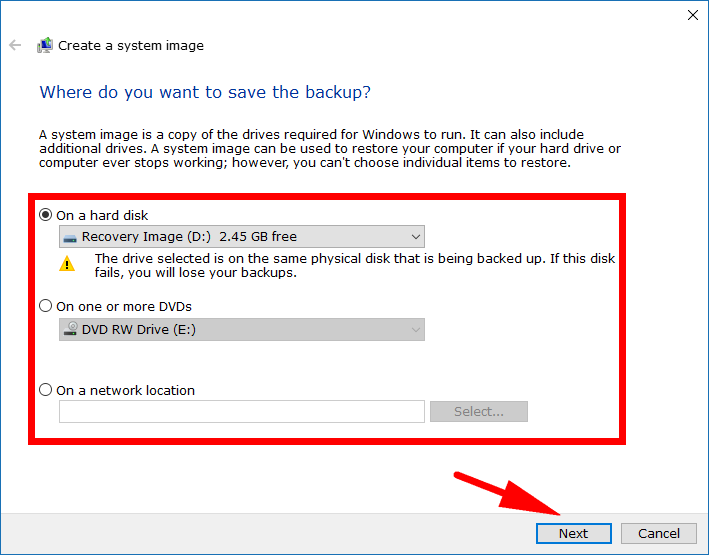
You are now at the beginning of your system image creation. You need to choose how you want to back up the system image: whether it be on your hard drive that you have already, by using a DVD/external drive or using a network location. (We recommend choosing your external hard drive. Using a network location isn’t an option for most people and using the hard disk means you won’t be able to restore it if something goes wrong with the hard disk. Backups should always be offsite whenever you can do it, so the external drive is the best option to take.)
Once you’ve chosen where you want to save the backup, click on the “Next” button.
How to Backup and Restore System Images from Settings App
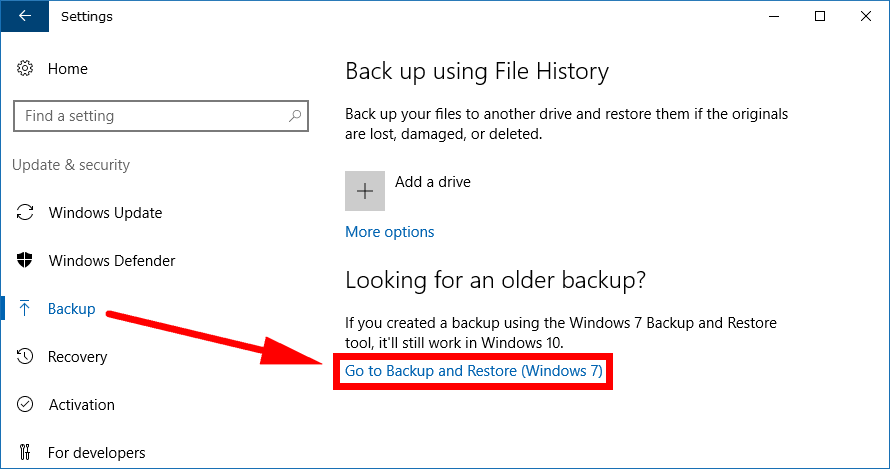
It’s also possible to backup and restore system images from the Settings application. Just open the Settings app and then navigate to the Update and Security > Backup and click on the “Go to Backup and Restore (Windows 7)” and it’ll direct you through to the same area as the Control Panel where you can then choose the backup devices for taking the backup.
System image backups aren’t made to be for everyone. They aren’t meant to be the number one choice for the average user to backup with because of the sheer size of the data required to back up all of the system files that are involved in a system image backup. It’s not uncommon for these system files to take into the 10’s of GB’s of space on your external storage, hard drives or CD’s that you are backing up to. A regular backup takes up much less space and will only backup all the things of importance, such as your documents and general files.
A system image also isn’t as important as they used to be now that Windows 10 comes with a convenient reset button from the Settings application. All you need to do now is head to the Start menu > Settings > Update and Security > Recovery and then you have the options for resetting the PC in the right side pane. Performing a reset such as this is all you need to get the computer’s operating system and software back to its initial state. Then you can just restore your backup to get the files back over the top of the reset operating system. That kind of luxury wasn’t available in earlier versions of Windows. The chance to reset the PC from the Settings app is arguably more convenient than taking a factory reset from the recovery mode of a mobile operating system, and those were a blessing when they became available during the smartphone boom years of the last decade.
You might also be interested in:
- How to Adjust Processor Resources Between Programs or Background Services in Windows 10
- How to Turn On/Off Automatic Device Driver Installation in Windows 10
- How to Show/Hide Folder Merge Conflicts in Windows 10
- How to Open Win+X Quick Link Menu in Windows 10
You can subscribe to our RSS, follow us on Twitter or like our Facebook page to keep on consuming more tech.