When you hear critics for Microsoft’s Windows operating system, you’ll likely hear about untimely updates as being one of the issues that they’re yet to get right.
Microsoft once would give you an option to “Update and shutdown” whenever you want to shutdown the computer and there was an update that Microsoft wanted to install. The update would then complete upon rebooting the computer the next time you wanted to use it. Many people didn’t appreciate not being able to use their computers the next time went to turn it on because there might have been important things that needed addressing and yet they had no choice but to wait around for Windows to complete its update.
Microsoft’s solution to this conundrum is to now still update computers when they shut down but to also finish the updating process by automatically finish setting up a computer after an update by signing into your account when you’re not there, if you have this option enabled.
The feature named “Use sign-in info to auto finish after Update or Restart” is referring to the completion of the software updates after you have reboot the computer, but mentions “sign-in” because technically you’re also having to sign in to your Microsoft account before you start using the computer. The new auto-finish feature should result in taking much of what people disliked about Windows updates away.
Windows 10 can automatically sign in to your user account to finish installing updates by creating a special token. The token will then handle signing in after the reboot, finish updating so the PC is ready for use again, and then lock the PC as well so no one else can use it before you come back.
Option One: Turn On or Off Use Sign-in Info to Auto Finish Setting Up Device and Restart Apps after Update or Restart in Settings
Open the Settings application and click on the Accounts link from the Windows Settings menu.
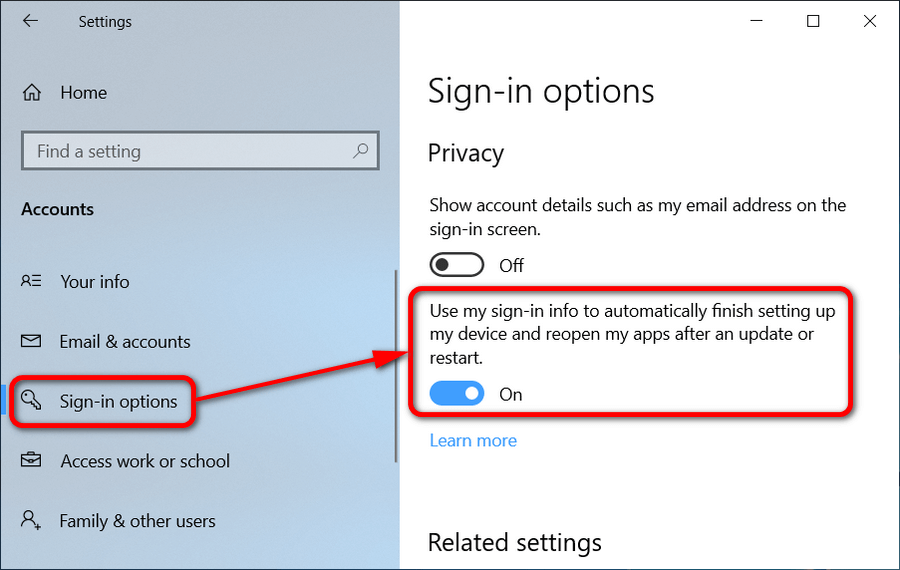
From the Accounts’ menu, click on Sign-in options and then under the Sign-in options heading in the right side of the window toggle on or off the Use my sign-in info to automatically finish setting up my device and reopen my apps after an update or restart. (click to enlarge screenshot below)
Option Two: Turn On or Off Use Sign-in Info to Auto Finish Setting Up Device and Restart Apps after Update or Restart in Registry Editor
Note: You must be signed in to an administrator’s account to do this option.
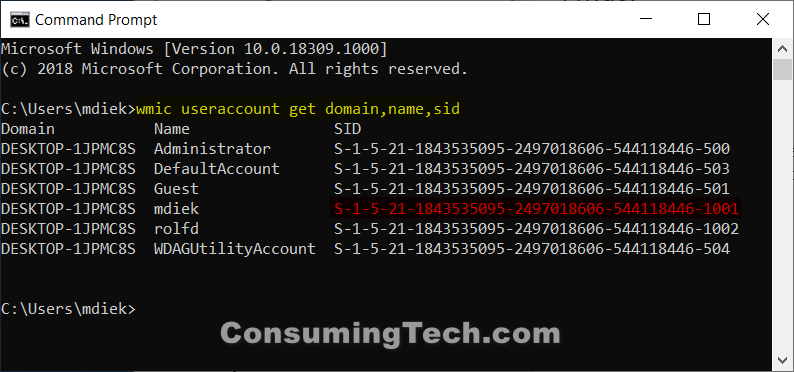
1. Open the Command Prompt and copy and paste the wmic useraccount get domain,name,sid command and press the Enter key on your keyboard.
2. Take note of the SID number because you’ll need to know what it is when you’re using the Registry Editor in the next step. (click to enlarge screenshot below)
3. Open the Registry Editor.
4. Using the Registry Editor’s left side, navigate through to the following keys: HKEY_LOCAL_MACHINE\SOFTWARE\Microsoft\Windows NT\CurrentVersion\Winlogon\UserARSO
5. Under the UserARSO key when it’s expanded, click on the same SID that showed up for your account in the Command Prompt during step two above.
6. Double-click on the OptOut DWORD in the right pane and then change the value to 0 (default) if you want to turn it on or 1 if you want to turn it off.
Option Three: Enable or Disable Use Sign-in Info to Auto Finish Setting Up Device and Restart Apps after Update or Restart in Local Group Policy Editor
Notes
- You must be signed in to an administrator’s account to do this option.
- You will only find the Local Group Policy Editor from Windows 10 Pro, Enterprise, and Education editions.
1. Open the Local Group Policy Editor.
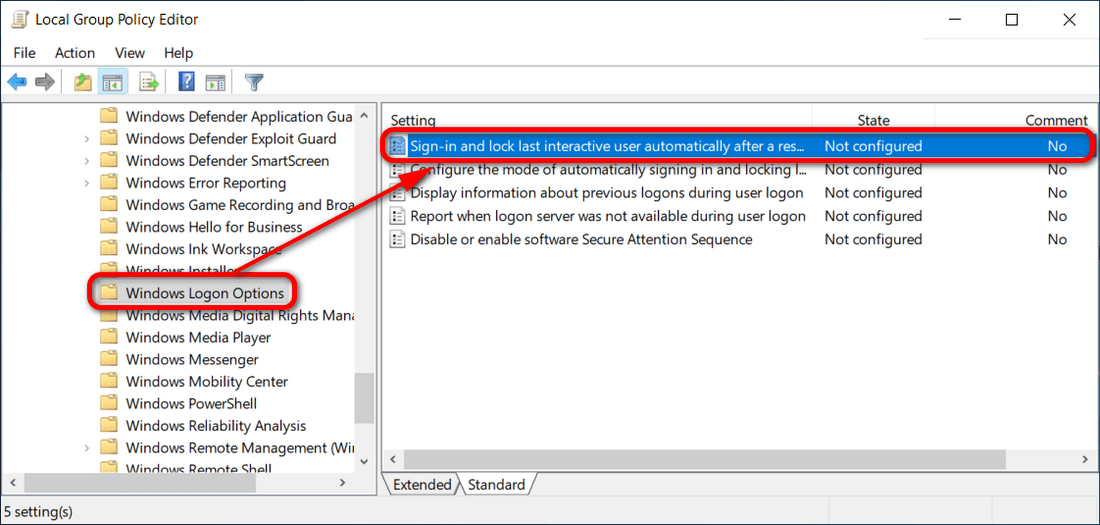
2. From the Local Group Policy Editor’s left pane, click on the Computer Configuration >Administrative Templates > Windows Components > Windows Logon Options folders.
3. From the Windows logon Options right pane, double-click on the Sign-in and lock last interactive user automatically after a restart policy. (click to enlarge screenshot below)
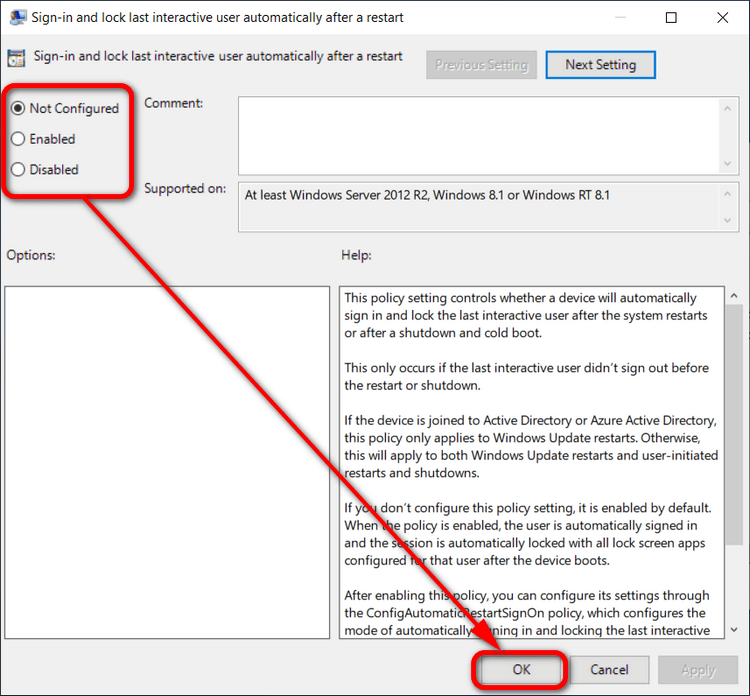
4. From the Sign-in and lock last interactive user automatically after a restart policy window, choose between Not configured (to enable), Enabled (to enable) or Disabled (to disable) and then click on the OK button at the bottom of the window.
That’s all.
(This article was last updated on May 13, 2019.)
January 29, 2019 @ 09:31
If you’re looking to keep Windows automatically signing in to finish off updates but don’t want Windows to remember what apps you last had open, there are other ways of going about turning off the later.
You can head in to File Explorer, click on View and then click on Options. From Folder Options, click on View tab and then uncheck the “Restore previous folder windows at logon.”
Note this’ll only work for My Documents and the Downloads folder but not for what you might consider to be traditional applications and definitely not third-party applications.
January 29, 2019 @ 09:20
From my understanding, this setting is talking about two different things. First, you have Windows using your sign-in information to sign in automatically. But then secondly, you’re also allowing Windows to remember the applications that you last had open on your computer and for Windows to open them.
Should those settings not be two separate things? I’m sure many people would prefer Windows to not automatically open the applications that were last open on the computer, but that doesn’t necessarily mean that same user doesn’t want Windows to finish installing updates on its own. Installing updates by itself is a great way to save a user more time. Nobody wants to wait around for that unless they’ve got a good reason (perhaps that actually want to see the updates or make sure they run smoothly and whatnot).
January 29, 2019 @ 09:13
In my opinion, this setting should be moved from the Sign in options in the Settings app to the Start apps section since this is required at startup.