VPNs (Virtual Private Networks) are becoming evermore popular as time goes on so you can prevent websites from snooping when you browse, use public WiFi securely, get access to region-restricted websites such as torrents that have been blocked by your local governments or the United States Netflix movie and TV programming selection from abroad, and more.
While widespread use of VPNs around the world could create some problems for the internet—who knows how it would support itself and how advertising would work without being able to see people’s locations—it’s probably safe to assume that more people would use one if they knew how. Using a VPN doesn’t make you a bad person either just because it might create some changes to the world, privacy is a right and VPNs are perfectly legal and currently accepted as tools that everyone can use.
When you choose to set up a VPN, if you choose to set one up, you get to pick between signing up to a website’s VPN service and allowing them to do the hosting or hosting a VPN server yourself. Before you can do the hosting yourself though you’ll need actually to have a VPN server in your possession.
If you do choose to go down the route of hosting a VPN server yourself, you’ll need to connect it up with the Windows 10 operating system. You can achieve that by using the guide below. For everyone else, there’s nothing you need to do to the Windows operating system when you sign up to a VPN service coming from someone else’s servers—like if you were to sign up to one of the leading VPN services online and use their website for example. In those cases, you will be using that companies VPN servers instead, and very little is required on your end.
How to Add VPN Connection from Network and Internet in Settings Application
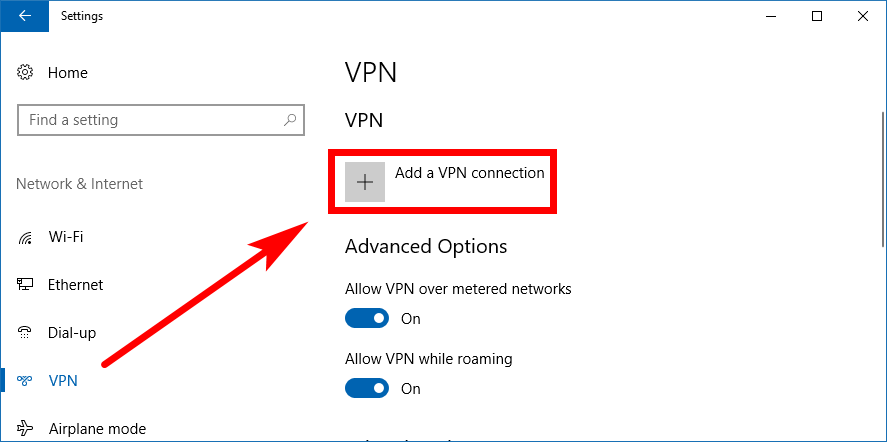
You can set up and add a VPN connection in Windows 10 by using the Settings application. Open the Settings app by heading to the Start menu > Settings gear in the left pane and then click on the “Network and Internet” link from the Windows Settings screen. Now click on the “VPN” link from the left pane, and you’ll then get the VPN heading in the right side pane just like in the picture below. Click on the “Plus” symbol for adding a VPN connection.
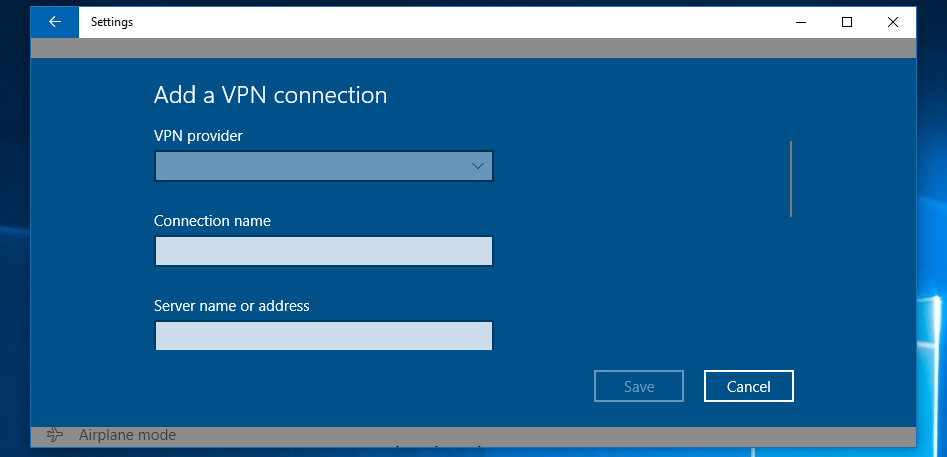
It then asks for your VPN provider, the connection name, and the server name or the server address. You have no choice but to fill in all those details accurately before it works. Click on the “Save” button at the bottom of the window before you exit or else the data won’t be saved and it won’t work. If you struggle with this area, it isn’t easy to fix because Windows 10 doesn’t give error codes like it used to–the error codes were actually pretty handy for researching what was wrong. Now, though, you’ll want to pay attention to the exact wording that Windows gives in the error and copy and paste it into a search engine and grab the results for your troubleshooting ides.
How to Add VPN Connection in Network and Sharing Center from Control Panel
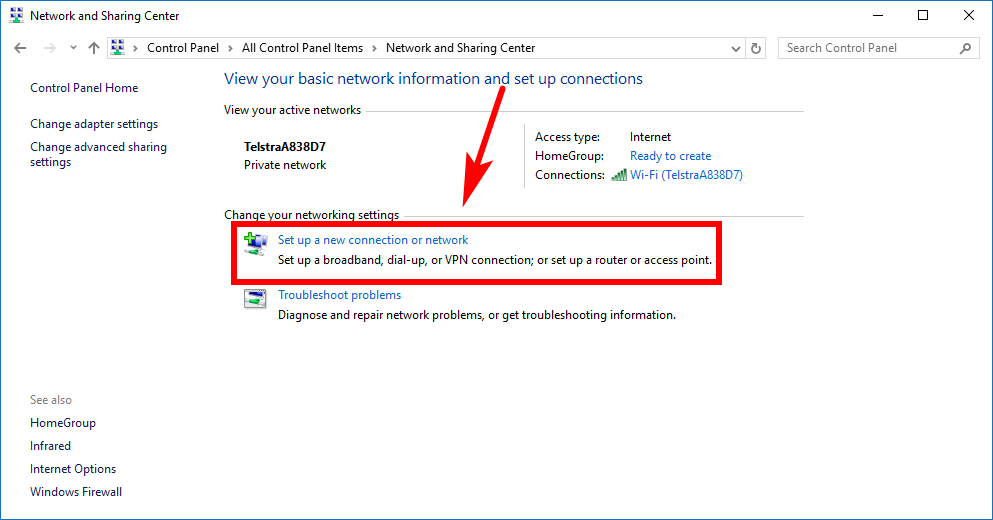
You can also add or set up a VPN connection in Windows 10 by using the network and Sharing Center from the Control Panel. Open the Control Panel by typing “Control Panel” into the Cortana search field in the taskbar and then click on the “Control Panel” result that appears under the Best match section. Next, from the all Control Panel items list, click the “Small icons” from the View by section in the top right corner, so you are viewing the items in the Control Panel’s classic view and then click on the “Network and Sharing Center” link. It’ll open up with the same picture as below where you can then click on the “Set up a new connection or network” under the Change your networking settings heading.
Highlight the “Connect to a workplace” link under where it says for you to Choose a connection option and then click on the “Next” button at the bottom of the window.

Click on the “Use my internet connection (VPN)” link under where it is asking you how you would like to connect.

You’ll then need to enter your internet address and destination name. There are also a few checkboxes down beneath that area that you could choose to alter at your own accord. By default the “Remember my credentials” is checked, so you don’t need to keep entering them the next time you go to set up the same VPN service. You might also want to allow other people to use the connection depending on your circumstances. (The same rule applies as we mentioned for the Settings app part above where if you get these details wrong it won’t work, and because there are no error codes in Windows 10, diagnosing things is a little trickier. You can still copy and paste the exact sentences that come up on the screen and enter those into Google and see what they bring up. With a bit of luck, they’ll help you troubleshoot the problem because other people will have been through the same thing. YouTube is also very helpful in this area.)

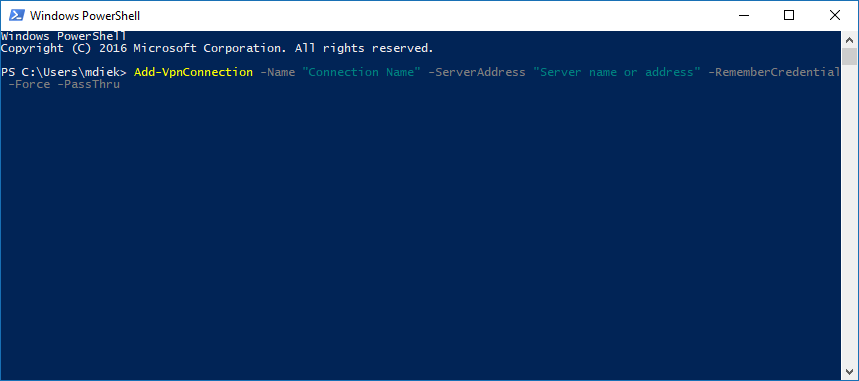
How to Add VPN Connection in Windows PowerShell
You could also use the Windows PowerShell, one of the most powerful shells in existence of all operating systems, to add or set up a VPN connection in Windows 10 as well. To do that, open the Windows PowerShell (doesn’t have to be an elevated PowerShell window) and then choose one of the two commands given below that suits your requirements.
The command that won’t remember your credentials: Add-VpnConnection -Name "Connection Name" -ServerAddress "Server name or address" -Force -PassThru
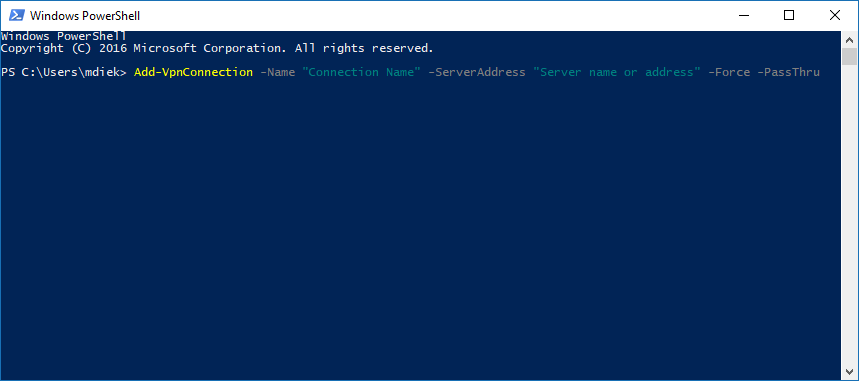
The command that will remember your credentials: Add-VpnConnection -Name "Connection Name" -ServerAddress "Server name or address" -RememberCredential -Force -PassThru
Whether you need to set up a VPN through your Windows 10 operating system or not will depend on what type of VPN services you choose—it’s there for the people who want to host the VPN server themselves instead of singing up to a service that hosts the VPN for you—but Microsoft has made it as easy to use as possible for the ones looking to use it.
You might also be interested in:
- What Is a VPN, and Why Might I Want One?
- How to Switch Command Prompt/PowerShell Items on Win+X Menu in Windows 10
- Download Windows Calendar For Windows 10 and Windows 7
- How to Use Run Command in Windows 10
You can subscribe to our RSS, follow us on Twitter or like our Facebook page to keep on consuming more tech.