When you visit the File Explorer in Windows 10, you automatically get shown everything that sits inside “This PC” which typically includes your default libraries—Desktop, Documents, Downloads Music, Pictures, and Videos—and the “Devices and drives” section where you’ll find things like your C: drive or folders related to your smartphones after you have connected them to the computer (and you need to add allowed for them too now that Android 6.0 stupid Marshmallow decided to make people pull down the notification shade and choose the file transfer option before it would show up).
For most people the “This PC” section is quite useful, but there may come a time when you want to remove it. And if you did remove it, there may come a time again when you want to get it back again.
Note: Windows 10 makes it possible to add and remove the “This PC” from the navigation pane in the File Explorer by using the Registry Editor. But before you can do anything, you need to be signed in to the computer you are using with one of the accounts that has the administrative permissions assigned to it. The first account that was set up on the computer has the admin rights, and any account that it chose to grant other user accounts admin permissions to will also have the admin rights assigned to it.
How to Add/Remove This PC in Navigation Pane of File Explorer in Windows 10
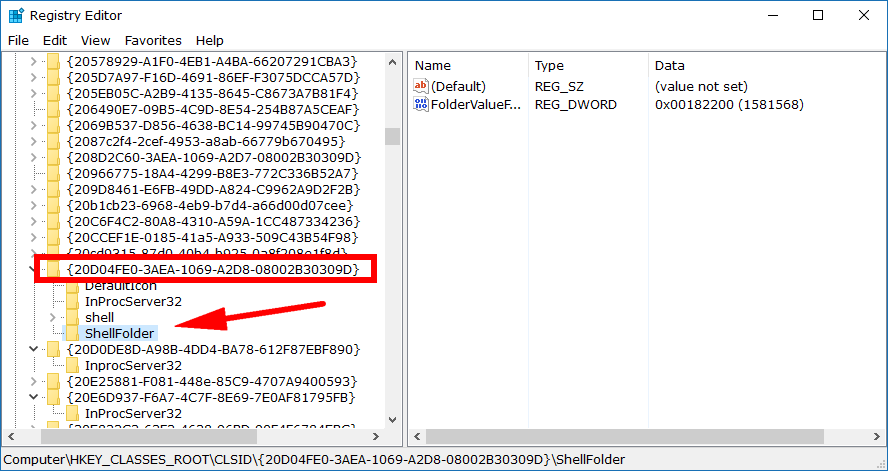
You can add or remove “This PC” from the notification pane that File Explorer has by using the Registry Editor. To get started, type “regedit” into the search box to open the registry Editor. Now navigate to the HKEY_CLASSES_ROOT\CLSID\{20D04FE0-3AEA-1069-A2D8-08002B30309D}\ShellFolder registry key path using the left pane.
You’ll need to start off by changing the owner of the Shell folder registry key to the “Administrators” group for this to work. Some of you might have done that already and some of you might not. To check/do it, you need to right-click on the “ShellFolder” key in the left pane and then select “Permissions” from its context menu.
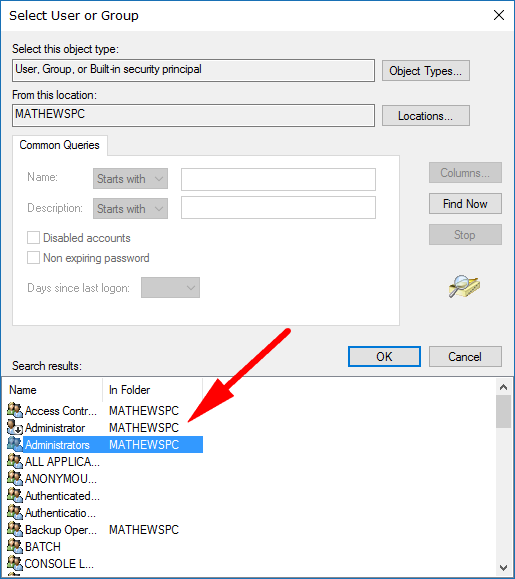
The Properties dialog box is now open. Click on the “Security” tab at the top of the box and then click on the “Advanced” button. Then at the top of the box will be a link that says “Change” in line with where it labels the “owner.” Click on that “Change” link, and it then lets you select a user or group.
Click on the “Find Now” button to the right side of the dialog box and then you’ll see a list of users who are associated with your computer. Click on the name of the account you are using now and another small dialog box opens up. All you need to do now is type “Administrators” into the available field where it says “Enter the object name to select” and then click on the “OK” button at the bottom of the window.
Refer back to the Registry Editor window now that should still be open and then highlight the “ShellFolder” under the same key as the original picture above and then in the right side pane should be the option to click on the “Attributes” link. Double-click on “Attributes” and then change the value to “b094010c” to remove the “This PC” section from the navigation pane or right-click on the “Attributes” link and choose to delete it if you want to add it.
You might also be interested in:
- How to Add/Remove File Explorer Default Context Menu in Windows 10
- How to Enable/Disable Numerical Sorting in File Explorer in Windows 10
- How to Add or Remove Libraries in Navigation Pane of File Explorer in Windows 10
- How To Disable “Set Up OneDrive” Popup In Windows 10
You can subscribe to our RSS, follow us on Twitter or like our Facebook page to keep on consuming more tech.