The Windows 10 operating system offers numerous context menus when you browse around the place, such as one for the folders, another for the drives, a commonly used one for the desktop, and a separate one for all executable files as well. A context menu is a name given to a menu that you see when you right-click on an item or backdrop. Sometimes it can just be the background setting such as the desktop picture or white pace in File Explorer and other times it can be when you have the mouse pointer hovering over the files and other items, in general.
You can’t change the way these context menus work if you are using the Home edition of Windows 10, but you can choose to add or remove them if you have an edition of Windows 10 Professional, Enterprise or Education.
Note: You’ll need to be using a Windows 10 Pro, Education or Enterprise edition of Windows 10 for this guide to work. You can’t make policy changes in the Local Group Policy Editor using the Windows 10 Home. You can upgrade from Windows 10 Home to Windows 10 Pro by heading to the Settings application if you want to be able to make changes to group policies.
How to Add or Remove File Explorer Default Content Menu in Local Group Policy Editor
You can add or remove the File Explorer context menu in Windows 10 by using the Local Group Policy Editor. To do that, use one of the ways available to open up the Local Group Policy Editor, the quickest being by typing “gpedit.msc” into the search field in the taskbar at the bottom of your computer’s display, and then clicking on the result that comes up under the “Best match” section.
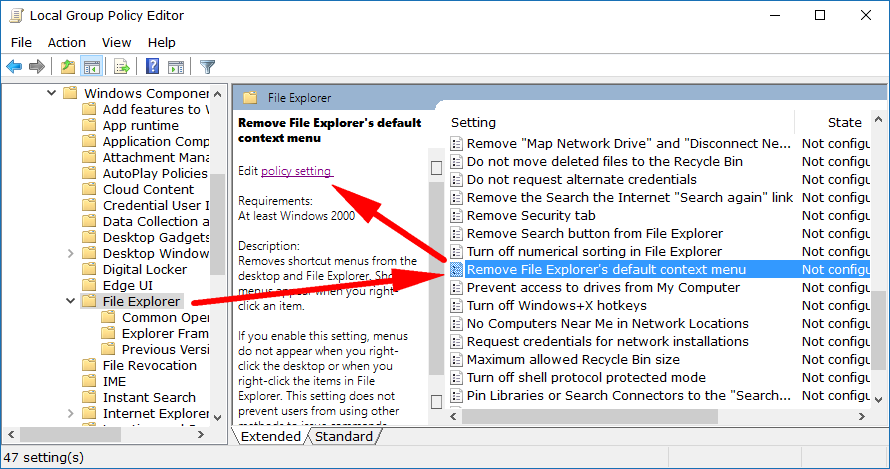
Now use the left side pane to navigate to the User Configuration > Administrative Templates > Windows Components > and File Explorer and then look in the right side pane for the “Remove File Explorer’s default context menu” and click on it once to highlight it. Then you’ll see the “Edit policy setting” link available from the middle column for you to click on that brings up the policy window.
With the “Remove File Explorer’s default context menu” policy window open, click on the “Enabled” checkbox and then click on the “OK” button at the bottom of the window.
You might also be interested in checking out the “Help” section that goes into detail about what it means when you choose to enable it. The three settings—Not Configured, Enabled, and Disabled—are always relevant to how the titles of the policy are worded. So when the “Remove File Explorer’s default context menu” isn’t configured, then it won’t be removed. When it’s enabled, then it is taken away.

Four different types of Group Policies can be applied—administrators only, all users, specific users or groups, or all users except administrators—and the way you do them varies. You’ll still need to be signed in to a user account that has the administrative permissions assigned to it before you can use any of the four options though.
Windows has a Multiple Local Group Policy to help manage computers that are not part of a domain. There are four Local Group Policy Objects (LGPOs) that make up the Multiple Local Group Policy. They are the Local Computer Policy, Administrators Local Group Policy, Non-Administrators Local Group Policy, and a User-Specific Local Group Policy.
All users: The Local Group Policy Editor for all users can be opened by using the Run dialog box, the search field from the taskbar, the Command Prompt and from the PowerShell by using any of the methods available in this guide.
Specific users or groups: The User-Specific LGPO applies user policy settings to specific local users. To do it, you need to press the Windows logo + R keys on your keyboard and then type “MMC” into the field and clicking on the “OK” button. Click “Yes” when prompted by User Account Control. Now in Microsoft Management Console, click on “File,” followed by “Add/Remove snap-in” from the menu. Choose the “Local Group Policy Editor” and click on the “Add” button. From the Select Group Policy Object window, click on the “Browse” button. Next, click on the “Users” tab and then choose the account name from the list, followed by the “OK” button. You’ll then be directed back to the Group Policy Wizard where you can click on the ‘Finish” button.
All non-administrators: The Non-Administrators LGPO applies user policy settings to anyone who is not an administrator/included in a group of administrators. To do it, you need to press the WIndows logo + R keys on your keyboard and then type “MMC” into the field and clicking on the “OK” button. Click “Yes” when prompted by User Account Control. Now in Microsoft Management Console, click on “File,” followed by “Add/Remove snap-in” from the menu. Choose the “Local Group Policy Editor” and click on the “Add” button. From the Select Group Policy Object window, click on the “Browse” button. Next, click on the “Users” tab and then choose the “Non-Administrators” group and click on the “OK” button. Lastly, click on the “Finish” button from the Group Policy Wizard screen.
Administrators: The Administrators LGPO applies policy settings to users who are members of the administrator’s group. To do it, you need to press the Windows logo + R keys on your keyboard and then type “MMC” into the field and clicking on the “OK” button. Click “Yes” when prompted by User Account Control. Now in Microsoft Management Console, click on “File,” followed by “Add/Remove snap-in” from the menu. Choose the “Local Group Policy Editor” and click on the “Add” button. From the Select Group Policy Object window, click on the “Browse” button. Next, click on the “Users” tab and then choose the “Administrators” group and click on the “OK” button. You’ll then be directed back to the Group Policy Wizard where you can click on the “Finish” button.
The context menus that are available in editions of Windows 10 are generally of use to everyone, which is why you won’t find the option available in the Home edition to remove any of them. But sometimes an administrator might want to revoke the permissions for people on the network so they can’t use the context menus, and that’s possible to do from the Local Group Policy Editor using the guide above.
You might also be interested in:
- How to Enable/Disable Numerical Sorting in File Explorer in Windows 10
- How to Add or Remove Libraries in Navigation Pane of File Explorer in Windows 10
- How To Disable “Set Up OneDrive” Popup In Windows 10
- How to Show/Hide Pop-Up Description for Folders and Desktop Items in Windows 10
You can subscribe to our RSS, follow us on Twitter or like our Facebook page to keep on consuming more tech.