After swiftly becoming the largest online retailer, the folks from the forest company quickly turned to supplying and manufacturing electrical goods such as the Kindle Fire tablets and the Fire Phone. The latter was a complete flop, as so often is the case when you see a company hesitate to release an item. We knew for years Amazon were wanting to release the Fire Phone but always changed their minds.
Anyway, something that isn’t a flop and is regarded as some of the best tablets in their class is the Kindle series. If you are a budding buyer of an Android tablet, look no further than the original. That’s the same tablet we are talking about here today. We are going to show you how to take things a step further than how you buy the tablet out of the box by opening up the system internals away from the default factory restrictions.
There are several different ways to open up the internals with root access for the Fire. We always sort after the easiest and the one that gives the best results. Look no further than the Kindle Fire utility for the best results. Supplying the tablet with root access is the way to installing custom ROMs, extra apps from the Play Store which cannot otherwise work on the device and installing versions of Android software and firmware that aren’t out yet. Another reason people love rooting the device is to remove the default applications and bloatware from the carrier network and Android. By removing the bloatware we are allowing for faster performance speeds, longer battery life and more.
Before starting the guide we are listing some of the essentials so you know the risks involved, what not to do, what to do, what you need and more. Advanced Android users can skip ahead. If you don’t remember everything you need we recommend reading the list before starting. Furthermore, only advanced Android users should follow the guide. If you don’t have much experiencing with making changes to a device, you should find a friend to help. Only if you cannot find a friend should you read over the steps. Read them twice over so you understand everything we are listing.
Details of Note
- Only after allowing root permissions and installing a custom recovery system can you begin installing custom ROMs and other tricks. We are supplying team Win’s TWRP recovery during the installation. TWRP is one of the two best custom recoveries. The other is ClockworkMod recovery. Many believe TWRP is easier to use, therefore it makes a great choice.
- Understand that rooting any Android smartphone or tablet always voids the remaining warranty. There’s no app or program that changes this. We are tripping the internals and the manufacturer always know the device is tinkered with. However, you can put the internals back in place by taking away the root access. Only then it is OK to send away for repairs again.
- There are many ways you can unroot the tablet. The first is by installing any official future OTA software update. You should only install the file manually. Many times the over the air updates will soft-brick your device, even if you are witnessing the notification coming in to your display.
- Stopover at the Developer Options menu from the Settings menu and enable the USB Debugging mode. Likewise you must have the up to date USB Drivers. Most people have the drivers working automatically. You can try accessing the pictures from the computer. If it works you know the drivers are working too.
- Make sure you have no less than 50% battery power on the tablet before starting the steps. You cannot afford the device shutting down until the flashing process finishes. Failing this step can result in damage such as soft-bricking the device.
- The USB charging feature will charge the battery when it’s plugged into the computer.
- Moreover, you must have a Windows PC for completing the steps. It will work on a notebook or laptop too so long as it has a USB slot mounted in the side. We are using the slot for connecting the phone to the Windows machine of your choice. Furthermore, you want the machine running a minimum of Windows XP.
How to root the Amazon Kindle fire using the Kindle Fire utility
- Download the official utility from this link.
- Extract the file to the desktop.
– you can open the file and it not be extracted properly. Make sure you look at the menu for the extraction option. Only then can you use the contents of the folder properly. - Double click the mouse on the ‘install_drivers’ .bat file.
- Connect to the PC using the USB wire.
- Double click the ‘Run .bat’ file from the zipped folder.
- Choose to run the ‘install permanent root with superuser’ option.
- Confirm the process by pressing the ‘3’ key.
- Select ‘install latest TWRP Recovery’ from the menu.
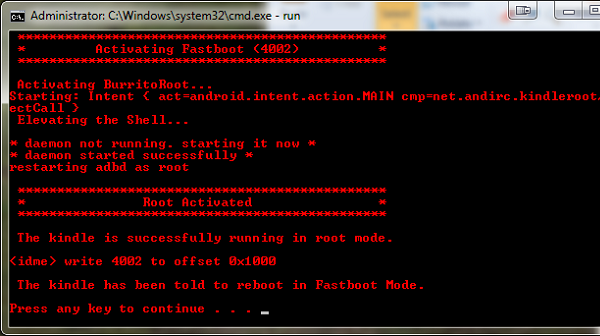
- Wait for the flashing to complete.
- Select the ‘boot mode’ with the ‘1’ button and the ‘1’ again for normal boot mode.
- Wait for the tablet to successfully reboot.
Now that you are officially running with root access, you may want to check out some of the best applications for your Kindle. One of the best is the Alternate keyboard app which you can download from Google Play here. Most people type a great deal when using tablets. The new keyboard works with Swift-key, Smart keyboard and many other options such as Touch-Pal.