If you have not rooted your XOLO Q1100 yet, then you are missing out on a lot of goodies that you can load and enjoy on your phone. These goodies let you customize your phone beyond the normal limit and there are limitless options for you to customize your phone when you are rooted.
If that makes you to take the plunge, here’s how to root your XOLO Q1100:

Files You Need
- You must have a computer that runs Windows in order to do this tutorial as the tool that you are going to use is Windows only.
- You should have Universal ADB drivers installed on your Windows computer. Install them if they are not already.
- You should only try this on a XOLO Q1100 phone.
- This should install the SuperSU app in Chinese but our instructions should help you change it to English.
- Download Root Tool to your computer. It is the tool that will help you gain root on your XOLO Q1100.
- Update: The rooting tool link has been removed by its developer. You can check the XDA Developers threads for the XOLO Q1100 for potential updated tools in the future.
Rooting the XOLO Q1100
1. Unzip files from Root Tool over to your computer by right-clicking on the tool archive and selecting Extract here. That should make all the files available for your use.
2. Unlock the developer menu on your phone by heading to Menu->Settings->About phone and tapping on Build number for 7-8 times and it will say you are a developer. It should unlock the menu for you.
3. Now head to the unlocked menu in Menu->Settings->Developer options and turn on the option that says USB debugging.
4. Once USB debugging is enabled, plug-in your phone to your computer using a USB cable.
5. Make sure your phone is in Charge only mode else the following steps will not work.
6. Double-click on rootboot.bat that you extracted from the archive and it will launch.
7. Press 1 on your keyboard and hit Enter. What it does is select the option that roots your phone.
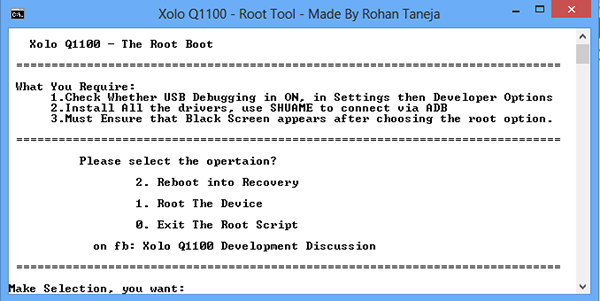
8. The tool should begin rooting your phone.
9. Wait for the tool to root your phone. Your phone should reboot when it is rooted.
10. When your phone reboots, you should see a new app called SuperSU in your app drawer. Tap on it and it will launch.
11. Tap on the third tab in the app. It is the last tab on the top.
12. Select the Chinese option that is shown in the following screenshot.
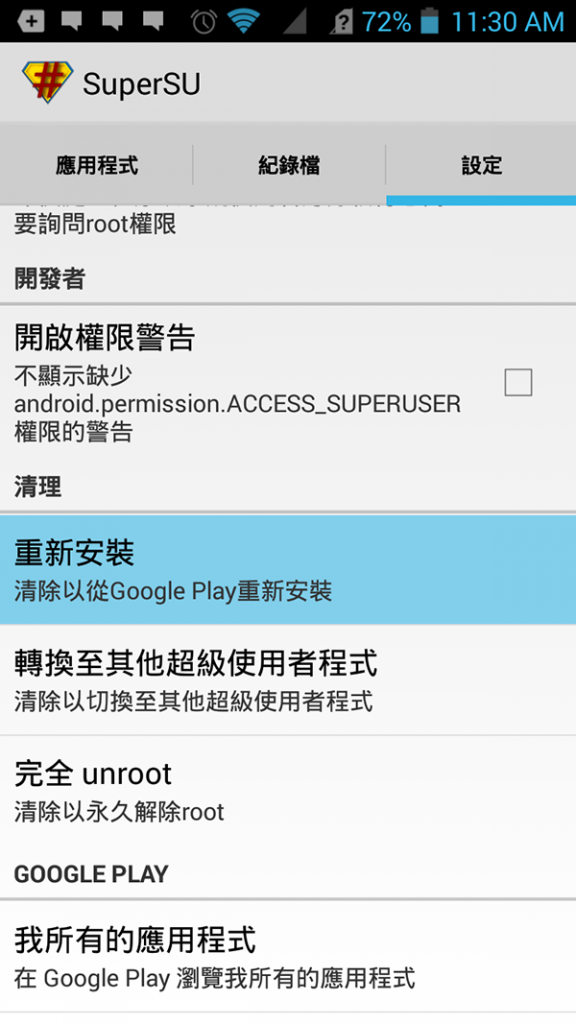
13. Tap on the right option when prompted.
14. Now head over to the Google Play store and reinstall the SuperSU app on your phone.
15. You are now fully rooted.
Your XOLO Q1100 is now fully rooted and equipped with the English version of SuperSU to help you easily manage root permissions on your phone.
You are now just a step away from being able to flash a custom ROM on your phone. Just go ahead and get a custom recovery flashed on your phone and you will have everything you need to get a new ROM running on your phone. Not only will a custom recovery let you flash a custom ROM, but it will let you even backup your current ROM that can be restored whenever you wish, and the ideal time to do so is when you have flashed non-working ROM on your phone and it does not boot up no matter how hard you try. At such a time, just restore the backup and you will be back on the track again.
The SuperSU that is installed and enabled on the device is now sitting there in the app drawer along with the other applications. You can enter the SuperSU application if you want to check out its options that are available from inside the app but none of them need changing if you want to start running the root applications. Since the SuperSU is already installed and enabled, the root apps have the chance to be running on the device right away. The only thing you need to do now is install the ones you want and then confirm it once with SuperSU that you do want to grant the app that root folder permissions that it needs to run. You get the chance to do that when SuperSU display’s a pop-up message when you open the app for the first time. While that might sound like a bit of an annoyance, the SuperSU only prompts you with the confirmation message once and not each time you open the app. With that said, if you ever feel like you have made a mistake and granted the wrong application root access, you can choose to remove its root access at any time.
Related Tutorials