For most phones, a custom recovery is a must for them to be rooted. The same is the case with the Google’s latest device in the Nexus lineup – the Nexus 5X.
If you have got your hands on this shiny new phone and thinking to tinker around it, you are going to need root access before you can customize it. And in order to get root access, you will first need to unlock the bootloader and flash a custom recovery on the phone. Well, how do you go about doing that? The answer is right below; the following guide should help you with both of these and to get you going with rooting your phone.
Here’s how to install a custom recovery on the LG Nexus 5X:
Files You Need
- The following tutorial has been written keeping a Windows based PC in mind. The tool works for Mac and Linux, too.
- Before you do the tutorial, it is recommended that you take a backup of your phone. Just in case something goes wrong, you can easily revert back to the stock using the backed up files.
- This tutorial should also unlock the bootloader on your phone, so you can then flash a custom recovery on it.
- Download 5X Multi Tool to your computer. It’s an all-in-one package that contains everything you need to flash a custom recovery on your phone.
Unlocking the Bootloader on the LG Nexus 5X
- First of all, extract files from 5X Multi Tool over to your computer by right-clicking on it and selecting Extract here. It will make the files available for you to use.
- Unlock the developer options menu on your phone by heading to Menu > Settings > About phone and tapping on Build number for 7-8 times and it will then say you are a developer. When it does, you are done.
- Head back to the main Settings menu and tap on Developer options. Turn on the options for USB debugging and Enable OEM Unlock. These are required for the following steps to work.
- Turn off your phone completely.
- Turn your phone back on in fastboot mode so that the tool recognizes it. To do that, while your phone is turned off, hold down Volume DOWN and Power buttons together for a few seconds.
- Your phone should get into fastboot mode.
- Connect your phone to your computer using a USB cable.
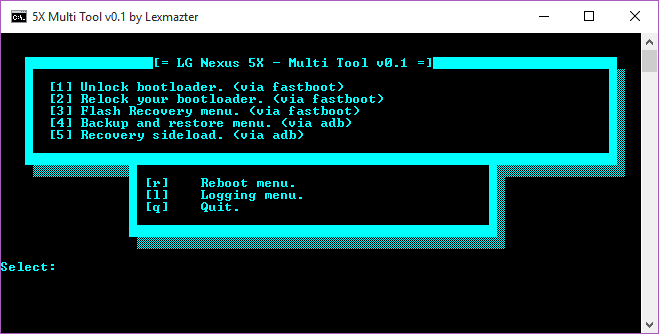
- Now, double-click on the tool’s .bat file available in the folder where you have extracted the archive. It should launch the tool on your computer.
- When the tool launches, press 1 on your keyboard and hit Enter. It should unlock the bootloader on your phone.
- Follow the on-screen instructions for unlocking the bootloader. It should not take too long to do that.
- When it is done, you are done.
So, the bootloader on your LG Nexus 5X is now unlocked. Let’s see how you can install a custom recovery on your phone:
Installing a Custom Recovery on the LG Nexus 5X
- Head to Menu > Settings > About phone on your phone and tap on Build number for 7-8 times to unlock the developer options menu.
- Head to Menu > Settings > Developer options and enable the option that says USB debugging.
- Plug in your phone to your computer using a USB cable.
- Launch the tool by double-clicking on its .bat file available on your computer.
- When the tool opens, press 3 on your keyboard followed by Enter to flash a custom recovery on your phone.
- The following screen should ask what custom recovery you would like to flash on your phone. Choose the one that you like and follow the on-screen instructions until the procedure is done.
- Once the recovery has been successfully installed on your phone, reboot your phone and then eject it from your computer.
- And you are all set!
Your LG Nexus 5X now has an unlocked bootloader and is rocking a custom recovery to help you flash custom ROMs on your phone.
Now that you have everything you need to root your phone, head to our how to root the LG Nexus 5X tutorial to learn how you can go about obtaining root access on your phone. Once rooting’s done, the gates to custom developments world will be open for you.
You might also be interested in:
- How To Root The LG Nexus 5X
- How To Root The Sony Xperia T3
- How To Install A Custom Recovery On The Sony Xperia T3
- How To Install A Custom Recovery On The Asus ZenWatch
- How To Root The Asus ZenWatch
Have something to say? You can contribute to this tech article by leaving a comment below.